Producing safe and high-quality goat milk
Learn about best practices for the production of safe, high quality goat milk on Ontario dairy farms.
Goat milk sampling and testing
Bacteria in milk
One of the key measures of milk quality is bacteria count. High quality milk and milk products are made from milk that contains low numbers of bacteria. If a high bacteria count is reported, producers must take immediate action to determine the cause and correct the problem.
Troubleshooting high bacteria counts
When bacteria counts are high, producers can take the following steps:
- Check milk temperature and be aware of milk cooling rates. For information on proper cooling, refer to Milk cooling.
- Check wash water temperature at the start and end of the chlorinated alkali (soap) wash cycle. Wash cycle start temperatures should be no lower than 77°C (170°F) and cycle end temperatures should be no lower than 49°C (120°F). Once equipment has had some time to drain and dry, visually inspect the pipeline, milk hoses, inflations and any other milk contact surface for the presence of films. Observe a complete wash cycle of the milking and the cooling equipment. You may find that a pump or valve is worn and not working properly, or that cleaning chemicals are not being dispensed as required.
- Consult your equipment dealer and/or the food safety inspector to discuss findings and arrange for a quality assistance inspection.
- Use the California Mastitis Test (CMT) or a strip cup to screen goats for udder health issues.
Milk cooling
Rapid cooling on the farm is critical to maintaining milk quality. Bacteria multiply rapidly when milk is stored over 4°C (40°F) or cooled too slowly and can quickly lead to deterioration of quality. The faster milk is cooled, the lower the bacteria counts will be, resulting in higher quality finished milk products.
The first milking, which enters a clean empty bulk tank, generally takes longer to cool than milk entering a bulk tank that already contains chilled milk. Cooling should be switched on as soon as possible during the first milking while also ensuring that the milk doesn’t freeze. Consult your equipment service provider for recommendations on when to turn on cooling for your specific tank and milk volume. First milkings should cool to between 0°C and 4°C (32°F-40°F) within 2 hours of the end of milking.
Subsequent milkings should reach 0°C to 4°C (32°F to 40°F) within 1 hour after the end of milking. The milk blend temperature should never go above 10°C (50°F) during these subsequent milkings.
Once cooled, milk temperature must be maintained between 0° and 4°C (32°F to 36°F) for the duration of storage. The ideal storage temperature for bulk tank milk between milkings is 1°C to 2°C. Confirm the acceptance criteria related to milk temperature at time of pickup with your milk broker.
Tips to ensure proper functioning of the cooling tank
- Check the milk temperature before each milking.
- During the first milking, turn on the cooling system as soon as the milk reaches the agitator paddle (milk may freeze to the sides of the tank if turned on before this point and could cause defects such as an off flavour or a freezing point problem).
- Check the milk temperature after each milking.
- Check the thermometer regularly against the Bulk Tank Milk Grader’s (BTMG) thermometer for accuracy.
- Have the cooling refrigerant level checked if you notice increased cooling time.
- Keep the condenser radiator clean and ensure proper air flow can be maintained through the radiator at all times of the year.
Rejected milk
Occasionally, milk doesn't meet regulatory standards and must be rejected by the BTMG. Criteria used to determine when milk is acceptable and when it must be rejected is provided in Regulation 761 – Milk and Milk Products under the Milk Act.
Section 51 (1) of the regulation requires that a BTMG reject milk that:
- is not clean
- has an objectionable flavour or odour
- shows evidence of being watery, flaky, stringy, bloody, thick or adulterated
- shows evidence of melted or churned fat floating on the surface of the milk
- contains any foreign substance
In addition, BTMGs will reject milk that they are unable to adequately grade, including by sight or smell, due to non-compliant conditions in and surrounding the milk house.
Milk rejection procedures
Milk that does not meet grading criteria is referred to as rejected milk and must be left in the bulk tank by the BTMG. Rejected milk cannot be marketed. The decision by the BTMG to reject a bulk tank of milk is final.
If the BTMG determines that the milk must be rejected, they must leave the milk in the bulk tank and complete the following steps:
- Complete a red rejection tag, indicating the reason for the rejection, and attach the tag to the tank. Clearly indicate the reason for rejection on the milk collection receipt.
- Attempt to notify the producer.
- Notify the milk broker as soon as possible.
- Notify the Ministry of Agriculture, Food and Agribusiness (OMAFA).
Producer responsibility
Producers are responsible for:
- emptying the rejected bulk tank of milk
- disposing of the milk in an environmentally approved manner
- washing the bulk tank prior to the next milking
Milk brokers will monitor subsequent bulk tanks of milk for irregularities in volume.
Using and maintaining dippers
Regulatory milk samples must be collected under sanitary conditions, ensuring there is no possible contamination of the milk sample due to sampling technique or the sampling tools used. BTMGs carry a supply of sterile, individually wrapped straws intended for collecting a bulk tank milk sample at each pickup.
When bulk tank volumes are low and the BTMG cannot reach the milk, a sample dipper must be provided by the producer. Both the producer and BTMG have responsibilities when using and maintaining sample dippers.
Producer responsibilities
Producers must:
- provide a sample dipper when requested by the BTMG
- ensure the sample dipper is made of food grade material (such as stainless steel or hard plastic) that is easily cleanable and has smooth surfaces with no cracks or rough edges. Duct tape, rust, wooden extension handles, and painted surfaces are unacceptable.
- ensure the sample dipper is clean. It is recommended that producers clean the dipper after each use with hot water and an appropriate cleaner, rinse and store it in a clean, dry location until the next use. Plastic dippers left in the wash sink often degrade more quickly because of the increased exposure to chemicals and heat.
- provide an appropriate container filled with a sanitizing solution prepared according to label instructions. For example, 200 ppm chlorine solution is recommended for sanitizing milking equipment and can be prepared by mixing 10 mL (⅓-ounce) of chlorine sanitizer (12% sodium hypochlorite) with 4 L (one gallon) of water. Sanitizing solutions lose their strength with time and must be prepared just prior to each milk collection.
- place the dipper in the container of freshly prepared sanitizing solution with a minimum of 2 minutes contact time on pickup day, prior to milk collection.
- clean and rinse the dipper and return it to a clean, dry location for storage until the next use after milk pickup.
BTMG responsibilities
BTMGs must:
- take the sample dipper from the sanitizing solution container, using caution not to touch any surfaces with it
- not rinse the dipper with tap water or set it down
- rinse the dipper in bulk tank milk at least twice to remove any residual sanitizing solution
- carefully fill sample vial with milk to the vial’s fill line
- rinse the dipper with clean tap water and place it in the sink
Equipment cleaning and sanitizing
Effective cleaning requires attention to specific details related to the length of each cleaning cycle (time), temperature, chemical strength (where applicable) and physical action throughout:
- pre-rinse
- hot wash
- acid rinse
- sanitization
All cleaning steps must be done using potable or “drinking quality” water. Refer to Importance of water quality for more information.
All cleaning and sanitizing chemicals must be approved for use in dairy operations. An approved chemical will have a Drug Identification Number (DIN) and be labelled for use in dairy.
For clean-in-place (CIP) milking systems such as pipelines, work with your cleaning chemical supplier to ensure cleaning solutions are sufficient strength and temperature, and cycles are of sufficient duration to work effectively. Instructions and procedures for cleaning each piece of CIP equipment must be up-to-date and posted in the milk house.
The vacuum system, including the pump, distribution tank, lines, hoses, pulsators and regulator(s) must be kept clean. Obtain instructions from your equipment service provider on how to clean and maintain your vacuum system.
For equipment that requires manual cleaning, use cleaners that are specially formulated for manual cleaning milking equipment and follow label instructions.
There are 4 basic steps to cleaning milking equipment.
These are general recommendations. You must work with your equipment and chemical suppliers for specific chemical concentration, solution temperature and cycle length parameters.
Step 1: Pre-rinse
Immediately after each milking, rinse all milk-contact surfaces with potable lukewarm water between 46°C to 49°C (115°F to 120°F). It is important to stay within these temperature ranges. If rinse water temperature is too hot, milk residues can become baked-on, making them harder to remove. If rinse water is too cold, milk fat residues can solidify, making them more difficult to remove later.
Rinse until the majority of milk residue is removed or until rinse water runs clear. Drain all pre-rinse water to an approved handling system. Do not recirculate the pre-rinse.
Do not allow pre-rinse water with visible milk residue to enter a sediment tank or septic system.
Step 2: Hot wash
Circulate a hot solution of chlorinated alkaline cleaner through equipment to remove fat and protein. Hot wash solution should have a beginning temperature of 77°C (170°F). Do not allow the water temperature to go below 49°C (120°F) at the end of the wash cycle. Colder temperatures could allow milk fat to begin re-depositing on pipeline or tank surfaces.
During the hot wash cycle, monitor to ensure that:
- alkalinity is between 1100-1200 ppm (this is higher than the 900 ppm required for cow milk). Your chemical supplier can confirm this.
- pH is a minimum of 12. This can be easily monitored with pH strips that read between 1 and 14.
- chlorine concentration in the wash cycle is between 100-200 ppm. Your chemical supplier can confirm this.
Step 3: Acid rinse
Circulate an acid rinse after proper drainage of the hot wash solution. Allow equipment to drain and dry.
An acid rinse has several benefits because it:
- removes residual chlorinated alkali and prevents mineral buildup such as milkstone
- leaves equipment surfaces with an acidic pH environment which discourages bacteria growth
- helps prevent black rubber parts from deteriorating and ‘inking’
Step 4: Sanitize
Immediately before milking, sanitize any milk contact surfaces with an approved sanitizer. Check the container label or ask your supplier about proper sanitizing cycle concentration and temperature. Improper temperature can reduce the effectiveness of sanitizing.
Importance of water quality
The water used to supply your milkhouse to clean your equipment and to feed your animals (which in most cases is the same water that supplies the farmhouse) must meet the same standards as drinking water. Regulation 761 of the Milk Act requires that all milk houses have an adequate supply of potable hot and cold water. Ontario Drinking Water Standards describe potable water as having zero E. coli and zero coliform per 100 mL.
Water contaminated with certain bacteria can cause serious animal health issues that directly affect milk quality. Coliforms, such as E. coli, are an indication of fecal contamination of the water supply and can increase the risk of mastitis developing in the herd. Pseudomonas bacteria are very common in water sources and, in high numbers, can also cause mastitis. Pseudomonas bacteria can also readily create stubborn biofilms that stick to equipment surfaces and intermittently shed high levels of bacteria into the milk supply.
Problems that arise from poor water quality are not limited to bacteriological quality. Hard water, buffers and sediment can reduce the effectiveness of chlorinated alkali cleaners, acids and sanitizers in your milking equipment. Muddy or cloudy water can indicate that there is sediment, or high levels of floating soil particles, in your water supply. In the presence of alkaline cleaners, these particles can settle out of the water and deposit back onto the milking equipment. This creates an opportunity for a biofilm to form and negatively affect your milk quality.
Hard water
Hard water, containing high levels of calcium or mineral salt levels, reduces the effectiveness of cleaners and can cause serious problems that will be expensive to fix in the long term. Scale can also build up in the milking equipment, causing milkstone to deposit more easily and will eventually lead to a biofilm problem.
Hard water can also shorten the life of your water heater. When buildup from hard water occurs on the elements in a water heater, it slows the water from heating up as quickly and blocks it from reaching the proper temperature of at least 76°C. This can allow certain bacteria to flourish in the water which can compromise the quality of your milk. An important first step to setting up and evaluating a milking equipment wash system includes an analysis of water hardness properties. Consult your equipment dealer who is trained to conduct these tests.
If your water contains more than 10 grains per gallon of hardness, consider installing a water softener. Softer water will clean your milking equipment more efficiently while reducing the amount of cleaning chemicals needed, ultimately saving you money while improving your milk quality.
Water testing
Water sample bottles for bacteria testing are available at your local public health unit. Consult with your public health unit for proper sampling technique.
Since water quality can fluctuate throughout the year, it is important to test at times when the risk of contamination to wells is higher, such as during spring run-off, after a heavy rainfall, or if you notice any changes in the water colour or odour (smell). Changes in land use next to wells and well repairs may also impact water quality and are therefore good times to test.
Everyone should be aware of and test their own well water out of concern for their own health, the health of their animals, and the impact it may have on their milk quality.
Proper milk filtration
The purpose of filtration is to separate any solid particles suspended in the milk before they reach the bulk tank. The importance of milk filters on any dairy farm can easily be overlooked, yet they provide significant benefits by helping to:
- provide high quality milk to dairy processors
- identify mastitis and other udder health problems
- identify insufficient bedding or an unclean environment
- ensure plate coolers remain clean, free of debris and functional
Filtering milk is also a regulatory requirement. Section 5.(2) of Regulation 761 under the Milk Act states that no producer shall sell or offer for sale milk that has not been filtered by means of a single-service filter or an approved stainless steel mesh-type filter.
How filtration works
When raw milk is pumped across the porous surface of the milk filter, it creates a pressure difference on both sides of the filter and forces particles that are smaller than the pore size of the milk filter (such as bacteria, somatic cells, water, fat, protein, minerals) to pass through. Milk filter pore size ranges from 100 to 250 micrometres, while bacteria are much smaller – typically 1 to 10 micrometers. Particles that are larger than the pore size (such as straw, hair, flakes, clots or insects) are caught on the filter, preventing them from entering the bulk tank.
Milk filter location
Milk filters should be installed only on the discharge side of the milk pump, usually in the pipeline between the milk pump and the bulk tank. In systems with plate coolers, the milk filter is always located between the milk pump and the plate cooler to ensure the milk is warm when filtering and to prevents debris from entering the plate cooler. It should also be noted that warm milk (36 to 38°C) can be filtered easily, whereas cold milk will block disposable filters.
Milk filter types
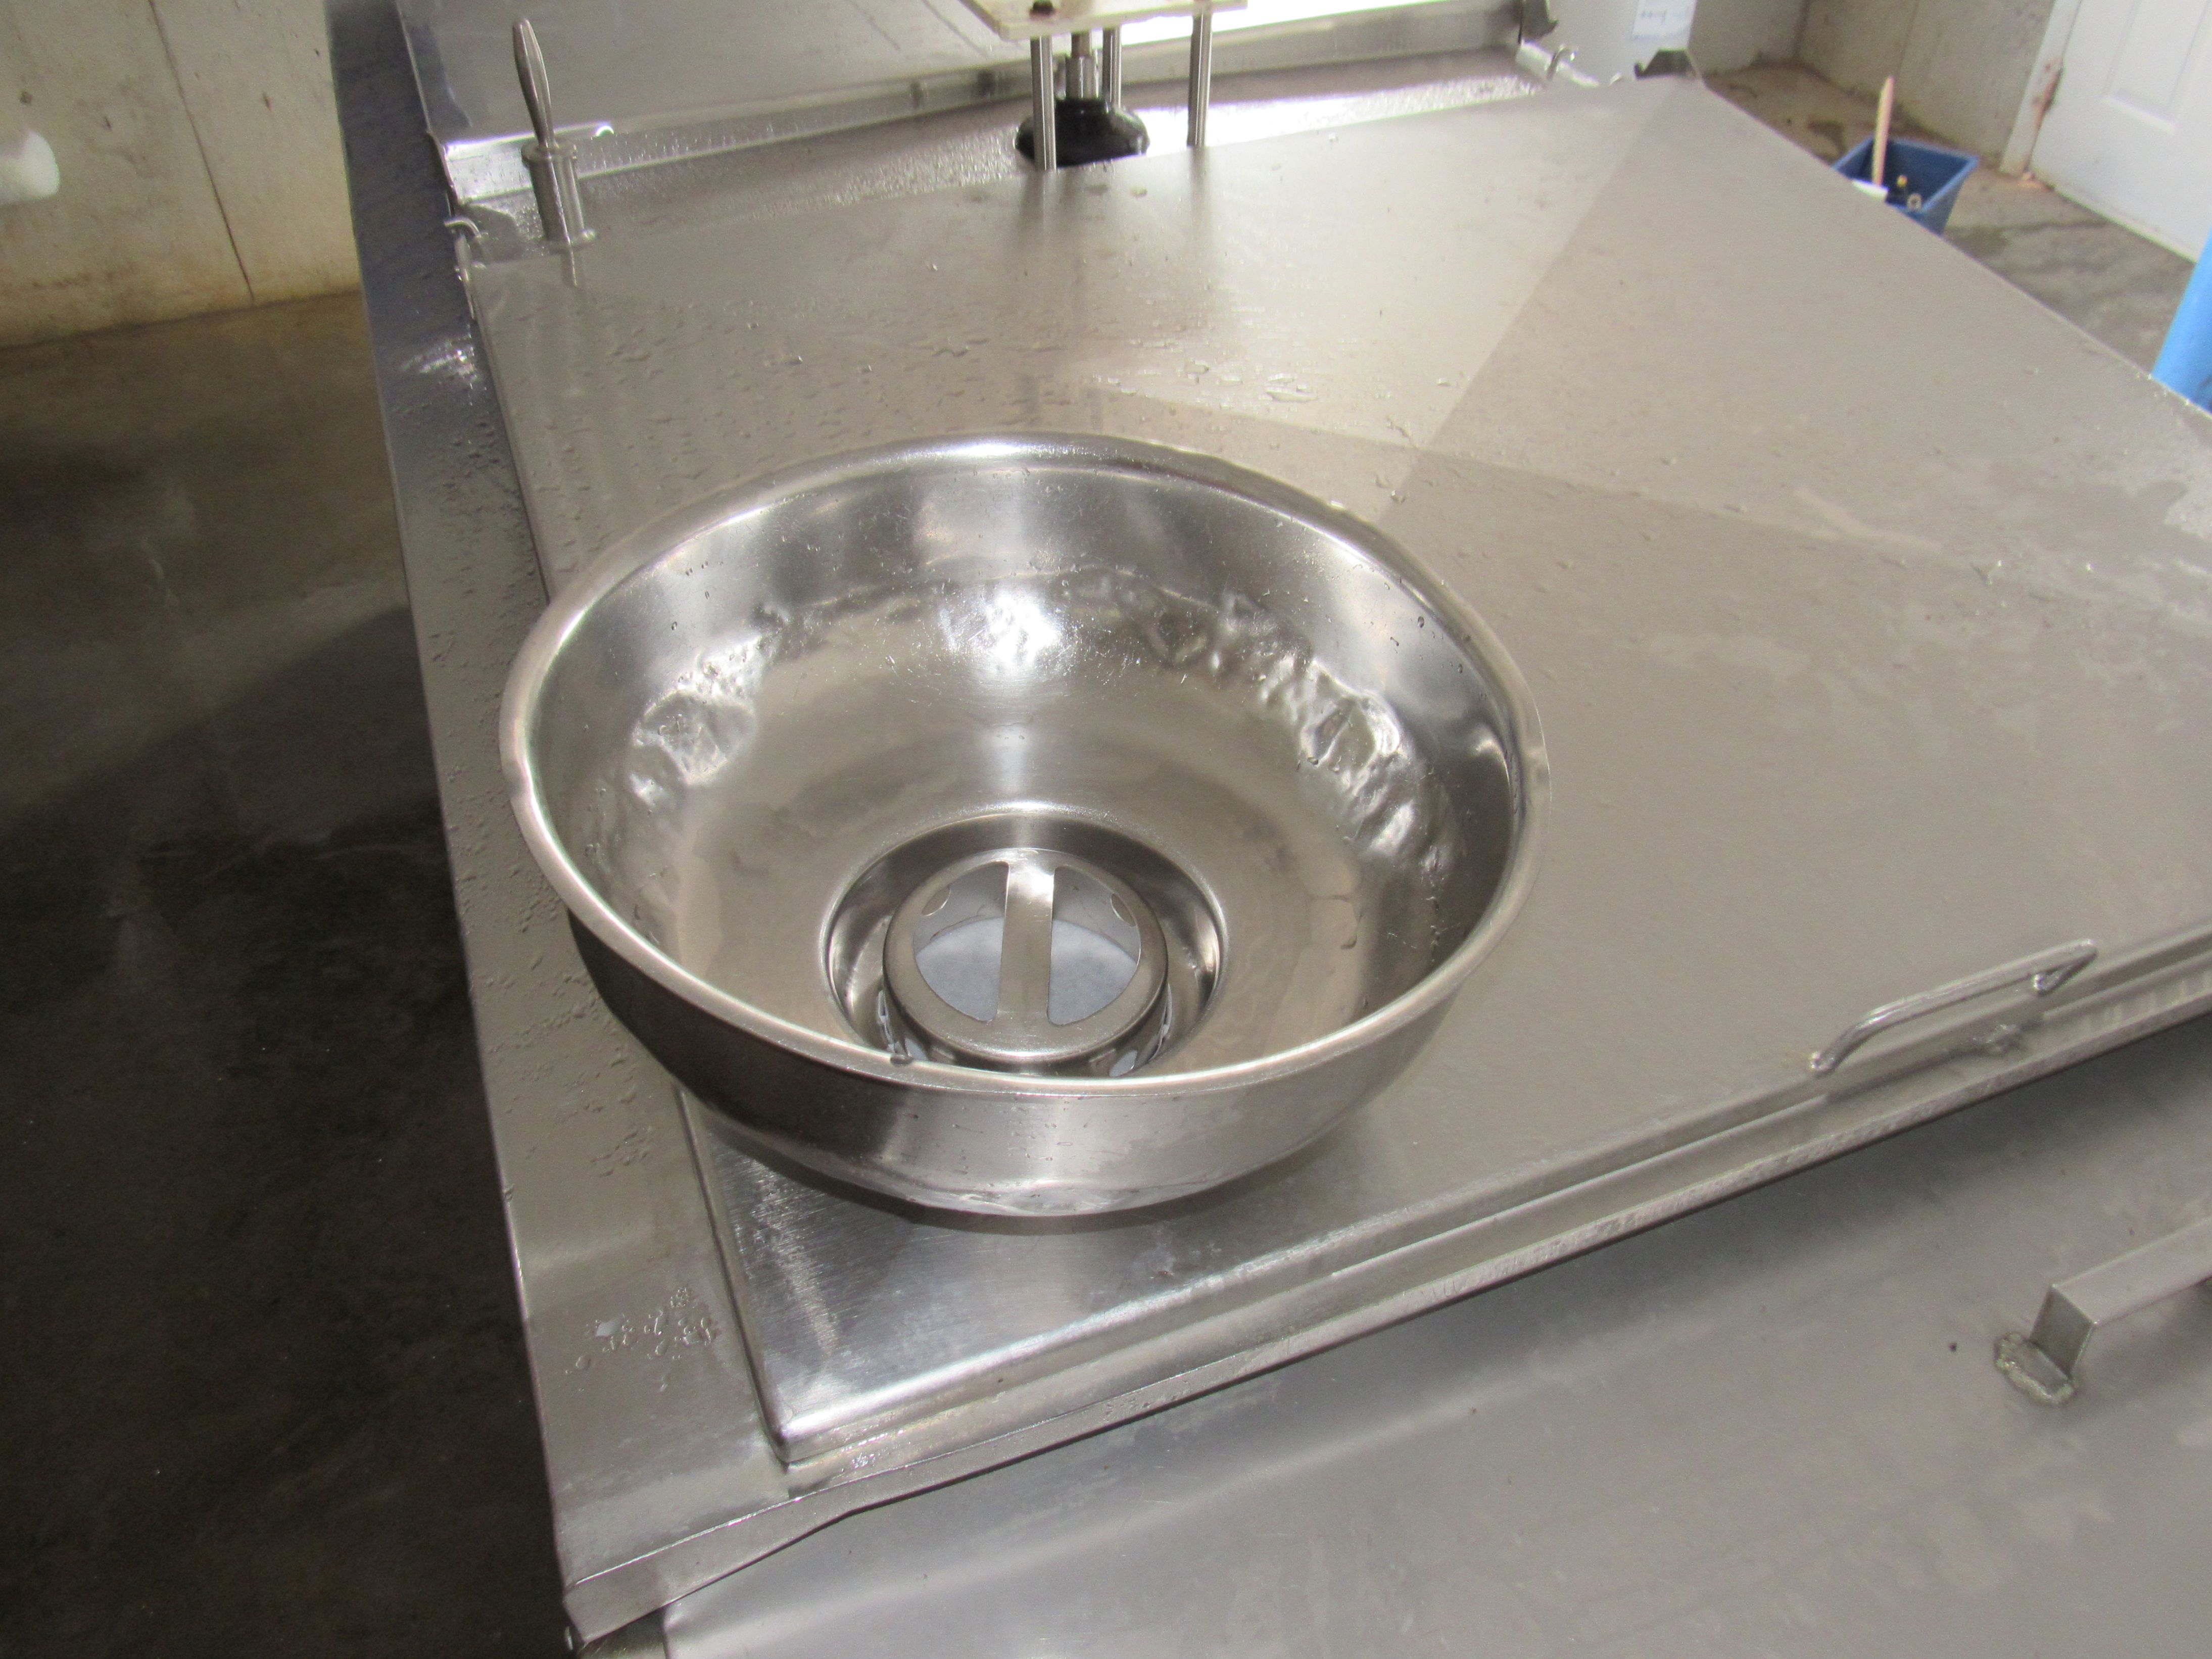
Modern disposable milk filters are made of food grade materials with high wet strength, a sturdy seam and evenly sized and distributed pores for consistent, reliable filtration. Producers milking with a pipeline typically use a sock-type filter. Producers milking by hand or with buckets will use a filter disk. Refer to Figure 1.
There may be a slight advantage to using a blue-coloured filter as clots or flakes, indicating mastitis, may be more visible on a blue filter.
Sizing the milk filters
Filters come in a variety of sizes and fabric weights to meet dairy goat producers’ needs. A filter that is oversized for the milking system is not cost effective, whereas a milk filter that is too small has insufficient surface area for effective filtering.
When milk filters are too small, the flow rate during the milking session gradually decreases as debris builds up on the filter. This could lead to milk by-passing the filter or, in some cases, the filter could burst. The milking system could also “trap out”, meaning milk in the receiver jar flows over to the sanitary trap where the ball or float rises, shutting down the milking system. If this happens, additional manual cleaning of the trap and piping to the trap is often required.
Producers expanding their milking parlour need to work closely with their equipment dealer for advice on selecting the proper size of milk filter. If a producer experiences frequent milk filter issues they should work with their equipment dealer or an OMAFA food safety inspector to determine the root cause.
Plate cooler considerations
Poor milk filtration allows debris to enter the plate cooler, resulting in a buildup in the cooling plates. The impact is a reduction in heat exchange efficiency as well as a dirty plate cooler which will eventually lead to elevated Bactoscan (bacteria) results. Using a new filter before and after each pipeline wash helps to ensure debris and sediment do not pass through to the cooling plates.
If abnormalities are observed on the filter
Visible flakes or other abnormalities on the milk filter are an indication of an elevated somatic cell count (SCC) in the udder of one or more goats. Consider using a strip cup and/or the CMT during the next milking to try to identify the problem goat(s). If you have individual goat milk meters you can also check for a drop in milk production or a change in milk conductivity to isolate the problem.
If you use a disk filter and observe slow milk filtering through the strainer, it may also be an indication of high SCC milk. Consider using the CMT to help identify problem goat(s).
If the milk filter appears to have more residue than normal, re-evaluate the cleanliness of the environment including pens and holding areas and review udder preparation procedures. Milk filters often indicate that fly control measures need improvement.
In some cases, producers with a large group of goats in heat have noticed slight compositional changes in the milk which can lead to clogged milk filters. Producers in this situation should consider switching to a different type of filter during this time. Check with your supplier for milk filters that are less prone to clogging.
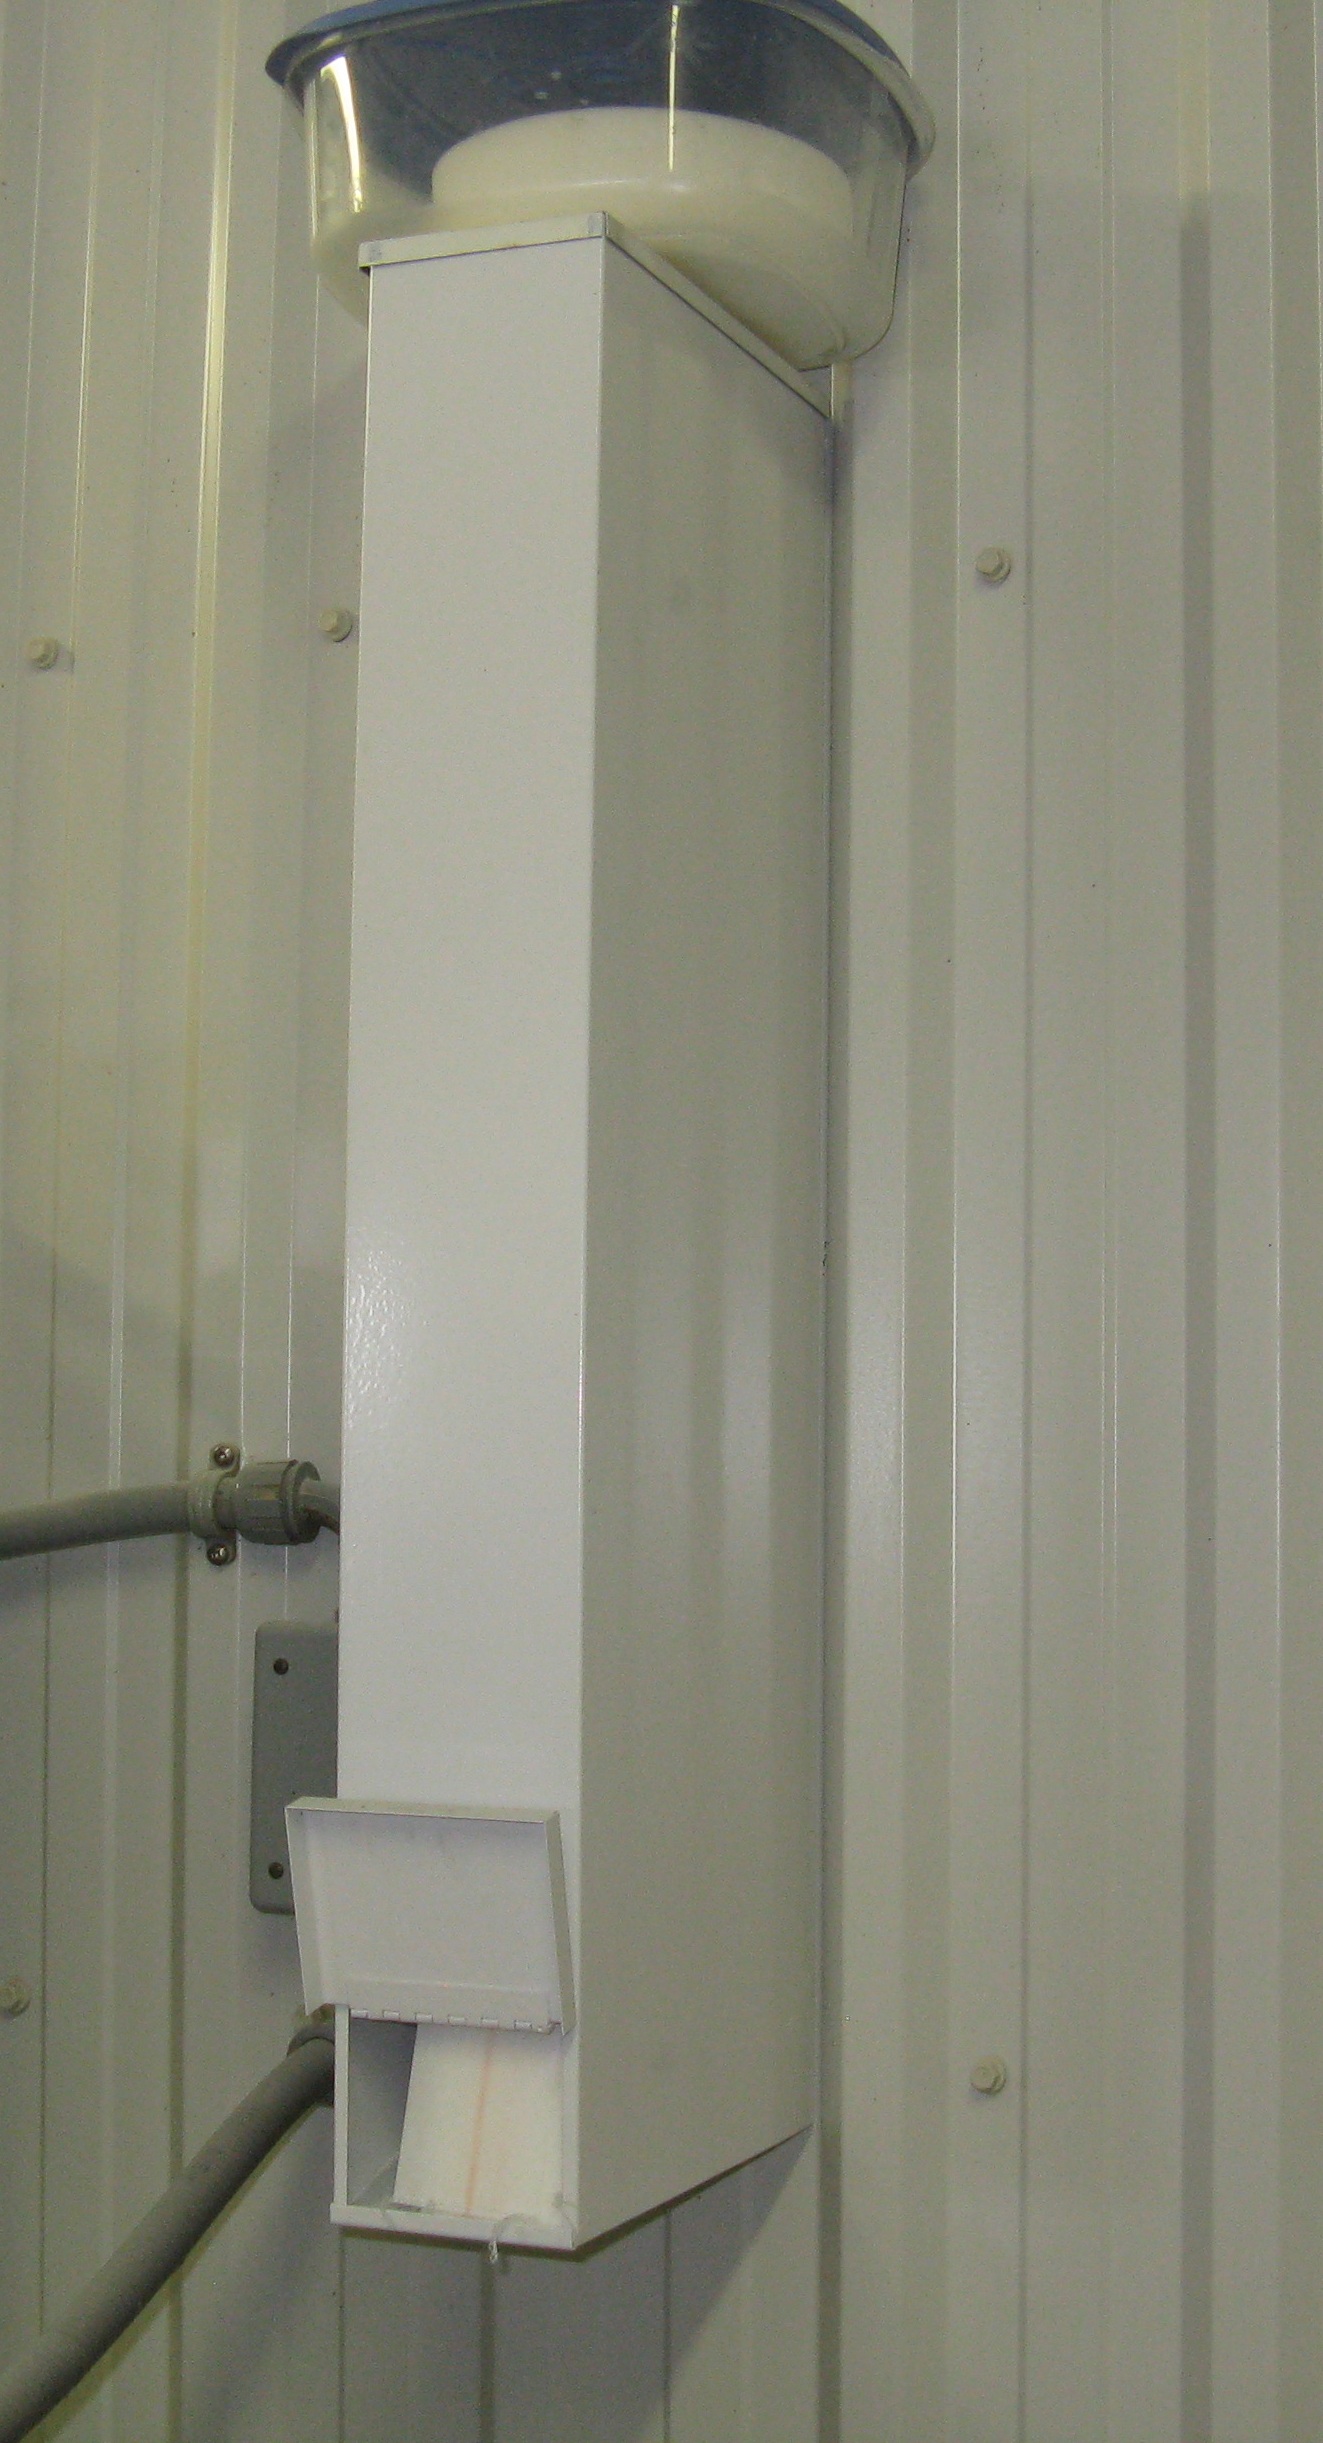
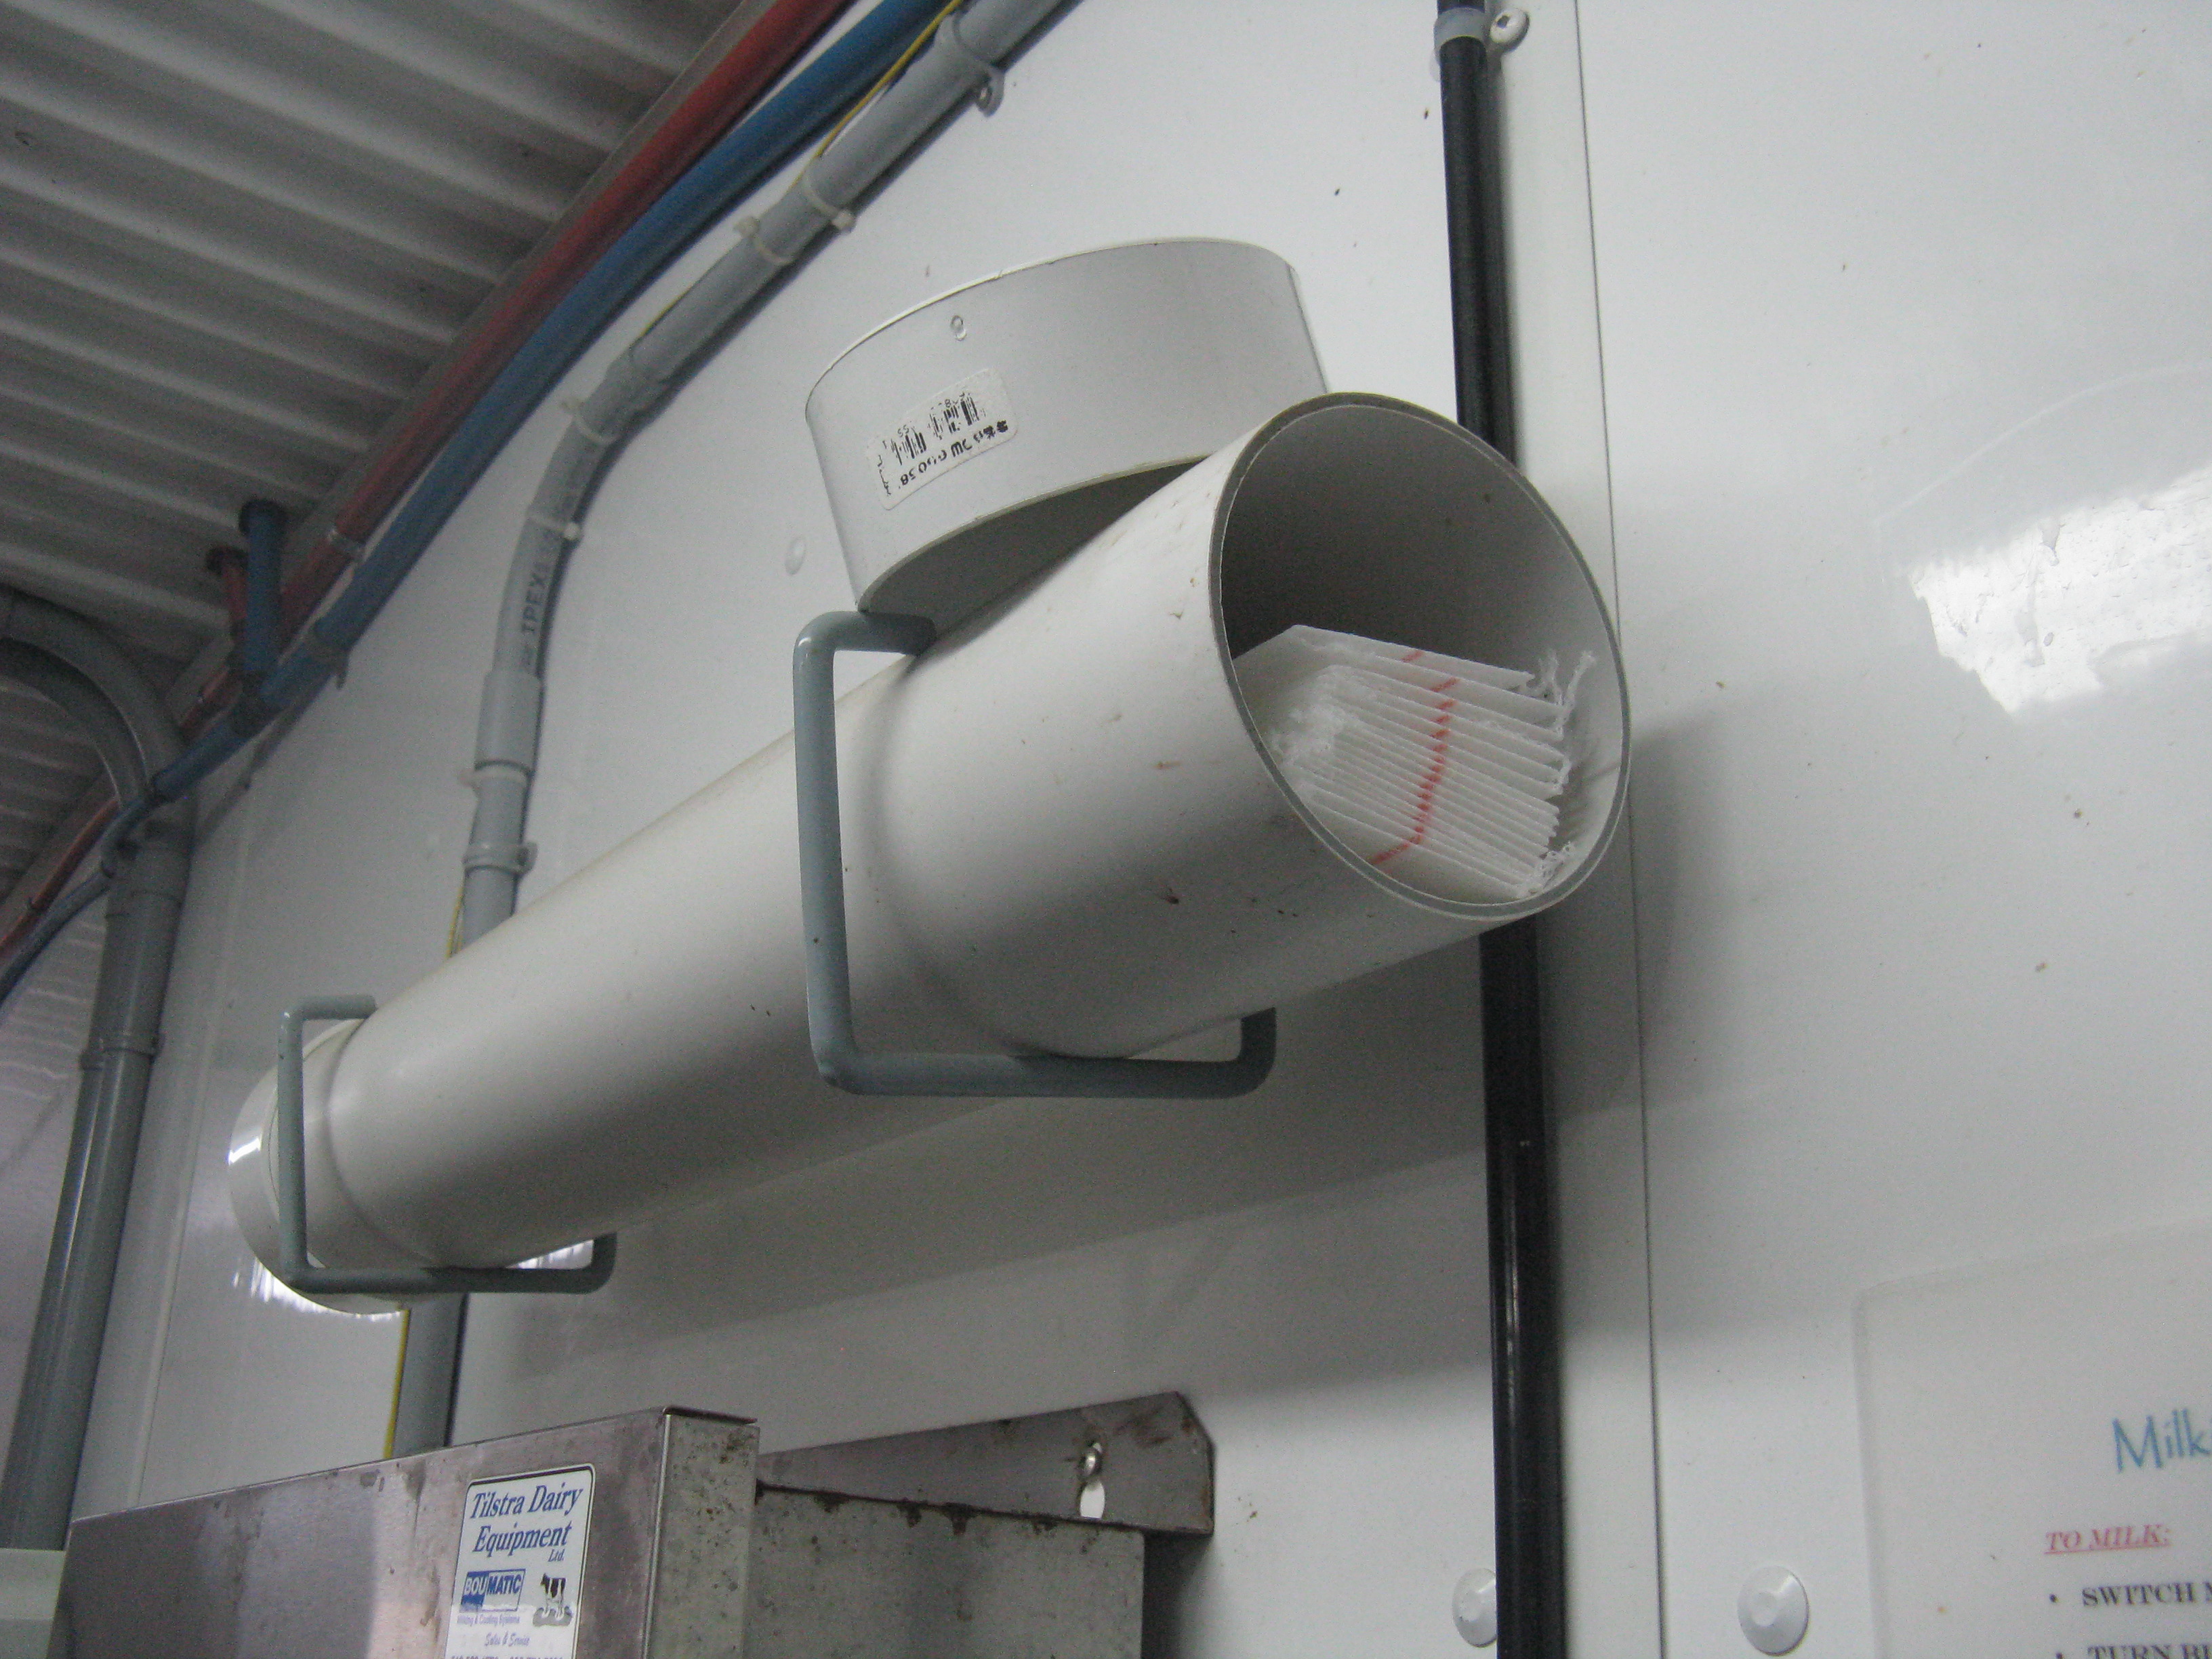
Milk filter storage
Store milk filters in a clean area that is protected from moisture and dust (refer to Figure 2 and 3). The heavy cardboard box that filters come in may suffice, however, disk type filters often come in a light duty cardboard box and should be transferred to a sturdy, dust-proof and moisture-proof container for storage. To prevent contamination, milk filters should never be stored in a cabinet or fridge that contains drugs or medicines.
Changing milk filters
To avoid washing equipment with a dirty filter, producers with plate coolers are advised to change their milk filters after milking is completed and before the pipeline wash. Installing another clean filter prior to the next milking ensures any debris caught in the wash cycle will not impact the quality of subsequent milkings.
Producers that do not have a plate cooler should remove the in-line filter before starting the wash. The filter holder/spring can be washed in-line or left in the wash sink depending on the type of gasket used to connect the pipeline for wash. Do not wash the pipeline with a filter in place, particularly a used filter. Filters can reduce the flow in the discharge line during the wash cycle and reduce cleaning effectiveness.
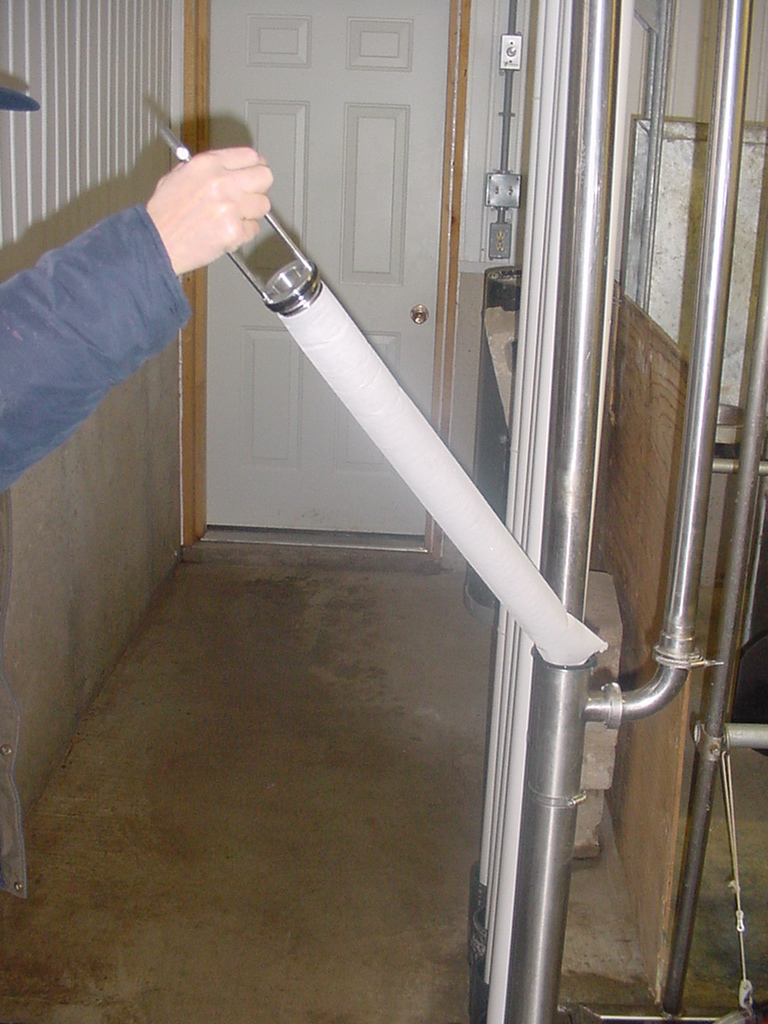
When changing/installing filters:
- use care to avoid filter contamination. Ensure your hands are clean or you are wearing clean gloves when changing filters (Figure 4)
- you may choose to wet the filter (such as dipping it in wash sink sanitize solution) prior to installation, to help the filter slide into the pipeline easily
- milk filters are intended for single use. You should not attempt to re-use a disposable milk filter because it will reduce milk quality
Milk filter disposal
Filters should be closely examined for abnormalities after each milking. A good practice is to thoroughly rinse the milk filter to remove any residues prior to disposing the filter in a garbage can with a lid.
Milk filters should be removed from the milk house regularly because even a rinsed milk filter can attract flies and become a fly breeding area.
Inhibitors
When treating livestock with antibiotics or other medications, producers must take necessary precautions to prevent residues in milk that is going to market. Any residues, including antibiotics, that prevent or inhibit bacteria growth are referred to as inhibitors.
Antibiotic residues in foods are concerning because they have been linked to severe allergic reactions and the spread of bacterial resistance to antibiotics used in human medicine. If antibiotics are present in milk, they can reduce or destroy starter culture activity used in the manufacture of cheese and yogurt, resulting in considerable economic loss to processors.
Truckloads of milk are tested for inhibitors before they are unloaded at processing plants. If the test result is positive for the presence of an inhibitor (a positive inhibitor), bulk tank samples are used to trace the inhibitor back to the originating farm and can lead to financial penalties. Positive inhibitors are often the result of improper use of medications or a communication failure at the farm.
Best practices to prevent inhibitors in milk
You should do the following to help prevent inhibitors from contaminating milk:
- Administer drugs only on the advice of your herd health veterinarian.
- Follow the veterinarian's precise instructions for the method of administration (such as intramuscularly or orally), the dosage amount and timing.
- Identify animals that have been treated with antibiotics (treated animals) using markings or bands. Ensure everyone involved in milking knows which animals have been treated.
- Follow special milking procedures for treated animals to ensure milk is kept out of the bulk tank until the recommended withhold time has passed.
- Follow the milk withholding time specified by your veterinarian.
- Make a written and permanent record of the animal(s) being treated, dosages, date(s) administered and withdrawal times (milk and meat).
- If you are uncertain of antibiotic residues, test the milk using an appropriate inhibitor test kit prior to re-entry of treated does into the normal milking line-up.
If you suspect treated milk has mistakenly entered the bulk tank:
- stop milking
- dump the milk already in the bulk tank or contact your veterinarian to arrange inhibitor testing of milk in the bulk tank
- notify your milk transporter to ensure the milk in question is not picked up until a result is known, if necessary
- thoroughly rinse and clean the bulk tank and all milking equipment, including hoses and pipelines, before you resume milking if the milk is dumped
Testing suspect milk
If you are uncertain about antibiotic contamination, have the milk tested before shipping. Test kits specifically for goat milk are available for the beta-lactam, tetracycline, sulfonamide, macrolide, neomycin, streptomycin and gentamicin families of drugs. Each test has its own benefits and limitations in cost, speed, sensitivity and efficacy. Note that some test kits are approved only for bovine milk and may produce inaccurate test results when used to test goat milk.
Testing services are available from:
- veterinarian clinics
- some processors
- the Agriculture and Food Laboratory, University of Guelph at
519-767-6299 (toll-free at1-877-863-4235 )
Producers can also purchase their own test kits from any major test kit supplier for the North American dairy goat market.
Extra-label drug use in dairy goats
There are no approved antibiotics for use in goats in Canada. Any use is therefore considered extra-label drug use (ELDU).
ELDU is defined as:
- administration to a different species or production class than listed on the label. Different production classes include lactating, dry or weaned animals.
- administration of a different dose than listed on the label
- administration of a different volume per injection site than listed on the label
- administration via a different route than listed on the label (such as intramammary rather than intramuscular)
- administration at a different interval (frequency) than listed on the label
- administration for a different duration (length of time) than listed on the label
- administration for a different indication (purpose) than listed on the label
ELDU’s affect on milk and meat withdrawal times
Milk and meat products from treated animals cannot be marketed until the minimum period of time from administering the last dose of mediation has passed. This is known as the withdrawal time. Milk and meat withdrawal times for goats are different than for cattle.
Drug withdrawal times for products used in an extra-label manner, such as on goats, are based on scientific studies and established maximum residue limits (MRLs), however, since no MRL has been established for a drug in the milk or tissue of goats, any amount detected in their milk or tissue is a residue violation. This is one of the reasons why goat withdrawal times are longer than cattle withdrawal times.
Troubleshooting antibiotic residues in goat milk
| Cause of antibiotic residues | Preventative steps |
|---|---|
| Improper use of medications | Consult with a veterinarian and follow instructions carefully. |
| Poor communication between barn staff, such as the person who treated the animal, and person who milks | Post treatment information on a message or bulletin board to ensure people milking are aware of the identification of treated does and the appropriate withdrawal time. Ensure Standard Operating Procedure (SOP) for treated does is available for all staff to read during training. |
| No permanent records of treatments | Make a permanent record of all treatments. |
| Forgetting doe was treated or poor identification of treated doe | Prior to administering the treatment, mark all goats to be treated in an easily recognised manner (such as spray marker or coloured tape) and segregate them from the milking herd. |
| Treated dry does are not separated from milking does | Use appropriate antibiotic test(s) to identify treated does. Separate treated dry does from milking does. |
| A separate milker unit is not used for treated does | Milk the treated does last or use separate equipment to ensure contaminated milk does not enter the milk supply. |
| Milker unit is not cleaned properly between treated and untreated does | Thoroughly clean the milker unit and all other potentially contaminated milk contact surfaces between milking treated and untreated does. |
| Pipeline is used as a vacuum source to milk treated doe when using bucket milker to milk | Have equipment dealer install separate inlet into vacuum line for use instead of pipeline. |
| Not keeping all milk from both halves of the udder out of the bulk tank | Discard all milk from treated does. |
| Lactating goats accidentally accessing medications, medicated feed or medicated milk replacer | Ensure all medications, including medicated feed and milk replacers, are stored appropriately and securely to prevent inadvertent exposure to animals. |
For more information about preventing antibiotics from entering your bulk tank of milk, contact an OMAFA food safety inspector or the raw milk quality program coordinator by emailing dairyfoodsafety@ontario.ca. You can also contact the Agricultural Information Contact Centre by phone at
Freezing point
An abnormal freezing point is an indication that the milk is abnormal in its composition.
Abnormal freezing points can occur if:
- water or system wash solution has mixed with milk in the bulk tank
- there is frozen milk in the bulk tank when the sample is collected
- the milk has not been mixed properly before sampling
- milk is abnormal in composition for any other reason, such as a feed imbalance
Changes in the concentration of solids (such as fat, protein, lactose) within the milk will cause the milk to freeze at different temperatures. Dilution of milk with water progressively gives a freezing point closer to that of water (0°C).
A goat milk sample freezing point is considered abnormal if it is equal to or greater than -0.534°C. Refer to Figure 5.
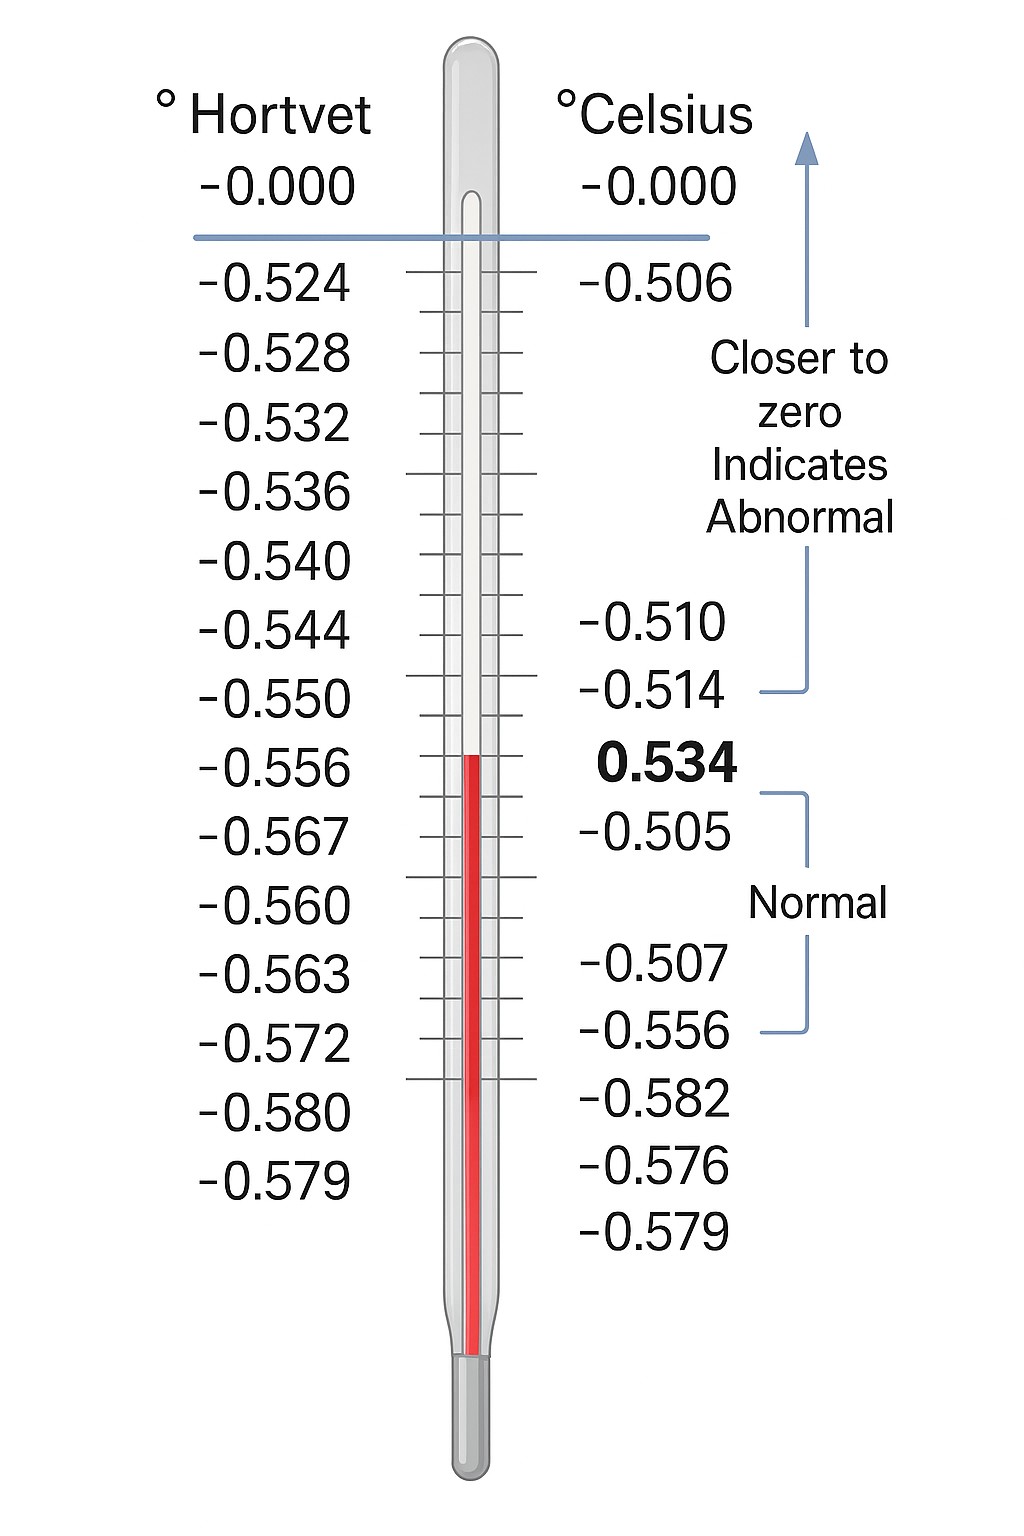
Regulation 761 under the Milk Act does not allow producers to sell milk that contains any foreign substance or has an abnormal freezing point. OMAFA routinely tests the freezing point of milk from every producer. If your bulk tank sample of milk is tested and found to have an abnormal freezing point, you will be notified on the monthly test results report.
Troubleshooting an abnormal freezing point
To troubleshoot an abnormal freezing point:
- check the slope of the milk pipeline to ensure that all liquids completely drain from the lines following wash, rinse and sanitizing cycles
- ensure the receiver jar has drained following the sanitizing cycle
- ensure the bulk tank has drained following the sanitizing cycle
- do not chase milk through the pipeline and into the bulk tank with water following milking
- ensure you have a properly functioning pipeline safety switch installed to prevent accidental addition of wash water to the bulk tank
- consult your equipment provider on how to check for leaks or incomplete drainage if you have a plate cooler
Somatic cell counts
Somatic cells are primarily white blood cells. They are the first defence against any bacteria entering a milking doe’s teat canal. High SCCs may indicate infection in the udder (mastitis). Certain types of mastitis can spread throughout the herd through milking equipment. High SCCs lower milk production as well as the quality and quantity of dairy products into which milk is made (such as cheese).
SCC greater than 1,500,000 somatic cells per mL is considered high and is a contravention of Regulation 761, S. 54(4)(2).
Farm management practices to help avoid high SCCs
To avoid high SCCs:
- follow proper milking procedures (refer to A Guide to Udder Health for Dairy Goats for more information)
- provide adequate feed and housing. Clean, dry, well nourished, comfortable dairy animals are less likely to develop problems from mastitis and many other diseases
- properly operate and maintain the milking system. The system needs to provide uniform vacuum, adequate pulsation and a gentle milking action
- work with your veterinarian to develop and use effective treatment protocols for mastitis
- identify mastitic animals by frequently screening the herd with the CMT. Cull any chronically mastitic does.
- maintain records of animal health and history of treatments
Milking procedures to avoid high SCC
Clip udders for cleanliness
Some goats have a lot of hair on their teats. Teats with long hair are difficult to clean and dry. Milking wet or dirty teats increases the risk of high bacteria counts in the milk and increases the rate of new cases of mastitis. Although not a common practice, some producers clip the hair.
Check foremilk and udder for mastitis
Mastitis can be detected by examining the udder and using a strip cup to examine the foremilk prior to each milking. Milk should never be stripped directly into the hand because this spreads organisms from teat to teat and goat to goat by the person doing the milking.
Pre-dip teats in an approved product or use approved sanitizing dairy wipes
Pre-dipping is a common practice. Pre-dipping works best when teats are clean. The entire length of the teat should be immersed. Pre-dip should remain in contact with the teat for 30 seconds and then be thoroughly wiped off prior to attaching the milking unit. Sanitizing dairy wipes are also an option. A teat drying step is not required with the sanitizing wipes.
Dry teats completely with an individual towel
If using a pre-dip, you must dry the teats with individual paper towels or separate cloth towels. Cloth towels can be laundered and dried after each milking. Milking wet teats increases the likelihood of mastitis and decreases milk quality.
Attach milking unit within 90 seconds after the start of stimulation
The milking machine should be attached as soon as possible after milk letdown occurs. Attachment should be done carefully to prevent excessive air from entering the milking system and potentially injuring teat ends.
Adjust units as necessary for proper alignment
Observe units while they are attached to the udder to be sure they are adjusted correctly to help prevent liner slips. The greatest concern is slipping or squawking teat cups. Most new udder infections caused by liner slips occur near the end of milking when a teat cup liner slips and the liner opens, propelling small droplets of milk back against the end of the teat. These droplets may contain mastitis-causing organisms.
Since milk flow near the end of milking is minimal, there is less flushing of the teat end and therefore increased risk of the organism remaining in the teat canal and causing infection if liner slips occur.
Shut off vacuum before removing unit
The unit should be removed as soon as the udder is milked out. In parlours equipped with automatic takeoffs, care should be taken to ensure they are properly adjusted. The vacuum should always be shut off before teat cups are removed. Avoid pulling the unit off under vacuum because it may result in liner slips and new udder infections.
Dip teats with an effective product immediately after unit removal
Cover the full teat in post dip using a teat cup or a spray bottle. A good teat dip destroys organisms on teats, prevents them from colonizing in the teat canal, and may eliminate organisms already living inside teat ends. Research with dairy cows indicates teat dips reduce new infections by 50%.
Teat spraying is an alternative to teat dipping and may be acceptable if done correctly with a device that provides good coverage. Spraying typically takes longer to ensure that the entire surface is covered and uses up to 50% more product compared to using a cup.
Teat disinfection does not affect existing mammary gland infections but may reduce new infections of coagulase negative staphylococci (CNS). This is an important factor with dairy goats as CNS has been associated with high Bactoscan results and is frequently cultured in high numbers.
Keep teat dip cups clean and sanitary. Teat spraying is an alternative to teat dipping and may be acceptable if done correctly with a device that provides good coverage. If possible, milk first lactation goats first and problem goats (goats with clinical mastitis or high SCC) last to avoid transferring infections to new milking animals.
California Mastitis Test (CMT)
If a goat has an udder infection, the body will send white blood cells to the udder to fight off the infection. When milk and CMT solution are mixed, a gel forms in proportion to the number of white blood cells present, indicating the severity of inflammation.
The CMT is a tool producers can use to monitor SCCs. The CMT can also be useful in troubleshooting Bactoscan problems.
A goat with subclinical mastitis does not have the typical symptoms of infection such as a swollen, painful udder or abnormal milk. Subclinical infections can therefore go undetected while goats shed bacteria in huge numbers causing the bulk tank bacteria test result to rise sharply. In these cases, the CMT can be used to help identify a goat shedding high numbers of somatic cells and contributing to a high bacteria count.
The CMT can be done on fresh goats. However, the milk of fresh goats may gel more evenly in the absence of significant subclinical mastitis. The milk of goats in very late lactation may react similarly. Therefore, CMT results on fresh and late lactating goats are not always reliable.

Using the CMT
- Strip the teats before using the foremilk to conduct the CMT.
Use each half of the udder, or a composite of the two, by:
- putting about 2 to 4 mL of milk into a well on the CMT paddle
- tipping the paddle almost vertically, allowing the excess milk to drain out, leaving about 2 mL of milk in each well
Too much milk or reagent in the wells will skew results, making gelling difficult to observe.
- Using the squeeze bottle, add 2 mL of CMT reagent per well and swirl the paddle in a horizontal motion to gently mix
- Observe the gelling reaction.
Interpretation of the CMT
CMT scoring is very subjective. Each person performing the test may interpret the results differently. This is the biggest disadvantage of the CMT. Producers should begin by getting a clear understanding of what a negative and positive CMT result looks like by referring to Table 2.
| Score | Interpretation | Visual characteristics of liquid | SCC range (cells/mL) |
|---|---|---|---|
| N | Negative sample | The mixture does not change and remains the same liquid consistency of milk with bluish/purple tinges. | 0–200,000 |
| T | Trace sample | The mixture will thicken slightly like very thin porridge. However, it can revert back to its original state when moving the paddle. | 150,000–500,000 |
| 1 | Weak, but positive sample | There is slight thickening of the milk like thin porridge. No gel forms. When swirled, the mixture will climb the walls of the well, and when poured out, the mixture flows at a steady pace. | 400,000–1,500,000 |
| 2 | Distinctly positive sample | Gel is beginning to form. When swirled, the gel tends to clump in the middle of the well. When poured out, the gel will pour out first, leaving some liquid remaining in the well. | 800,000–5,000,000 |
| 3 | Strongly positive sample | The entire mixture is gel. When swirled, it clumps in the middle, and when poured out of the paddle, no liquid remains in the well. | > 5,000,000 |
Comparing cow and goat milk SCCs
Goats produce milk differently than cows. The way milk is produced in the healthy udder of the goat naturally results in a greater number of skin cells and cell fragments containing DNA being present in the milk as compared to milk from healthy cows. These skin cells and cell fragments are counted as somatic cells when samples are tested using automated counting methods such as those used at the University of Guelph Agriculture and Food Laboratory and milk testing labs worldwide. As a result, goat milk SCCs are higher than those found in cow milk.
Goat milk SCC levels also tend to be elevated towards the end of lactation, in does with a higher number of lactations, and in herds with caprine arthritis encephalitis (CAE). All of these factors contribute to a higher normal SCC level in goat milk than in cow milk. Nevertheless, routine bulk tank SCC test results should be monitored from month to month to be aware of any upward trends which can indicate udder infection.