Planter modifications for no-till
Information on general modifications, planter suitability and field adjustments to achieve best performance for no-till.
Introduction
Of all the various conservation tillage and planting options open to the farmer, the no-till system maintains the greatest amount of the previous crop's residue at or near the soil surface after planting. This residue can control erosion caused by wind and water over large areas despite variations in the terrain of the field.
Modifications are required on most conventional planters to plant into the high amounts of residue present in the spring. The type of modification required depends on the individual situation. The following suggestions are made to assist the conservation farmer in the modification process.
General modifications and planter suitability
Most conventional planters can be modified to plant into no-till conditions. Planter weight is an important consideration. Some planters require the addition of brackets and tractor weights, especially on heavy or compacted soil, to keep coulters and openers in the ground ensuring proper drive wheel contact.
Additional tool bars or planter frames may be required to install coulter assemblies. These have to be strong enough to withstand the additional weight and stress during the planting operation. When tool bar coulter assemblies are installed in front of the planting units the planter tongue may have to be lengthened.
A knock-down bar may be installed to push down residue, particularly long standing corn stalks, ahead of the planter and angle the stalks away from drive chains and other moving planter parts.
Some modification to markers may also be required when modifying a planter for no-till. Adjusting the angle of the marking discs may improve the ability of the discs to cut through residue and leave an acceptable mark. Hub weights are also available for many planter markers. The additional weight improves the cutting action of the discs but they also act as gauge wheels, minimizing deep cutting in soft soil. In many situations it may be desirable to notch the marking discs to improve the movement of residue and the performance of the markers.
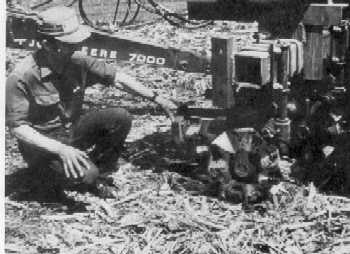
Coulter assemblies to facilitate seed and fertilizer placement
Modifications may be required for the accurate placement of fertilizer 5 cm (2 inches) to the side and 5 cm (2 inches) below the seed. Penetration through residue and soil is better with offset disc openers as the leading edge cuts more effectively. Placement can be further improved by the addition of coulters as illustrated in Figure 1. These are added to cut residue and may be used to strip-till a narrow area ahead of fertilizer and seed openers. The most commonly used coulters include the plow or ripple coulter, bubble coulter, and the fluted coulter.
The depth of tillage immediately in front of the seed openers should only be as deep as necessary for seed placement. Tillage in the seedbed area promotes warming and drying. However, in dry years this may further aggravate a droughty seedbed.
Residue removal from row area
Modifications can be made to a planter assembly to remove residue from the row area, planting into a 15-20 cm (6-8 inch) cleared strip. This also aids drying and warming of the seedbed. Research carried out at the University of Guelph indicates that at least a 5% increase in yield is possible when residue is removed from the row area in some crops (1). Toxic effects of the decomposing residue may also be avoided by clearing the new row area.
Residue removal is most important following crops which produce high amounts of residue, (i.e. corn, wheat, spring grain). Commonly used additions for residue removal include disc furrowers, fluted coulter assemblies, and trash plows as described below and illustrated in Figure 2.
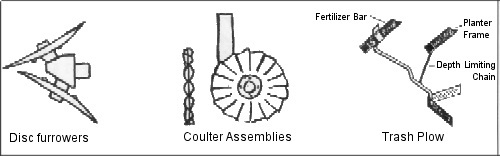
Disc furrowers (Trash whippers)
- depth control is improved when mounted on planting units
- should be set to remove residue but avoid trenching
- may require adjustment for variable field conditions
- notched discs pluck residue from the soil surface better than smooth discs.
Fluted coulter assemblies
- reduces surface residue by incorporation or limited removal
- provides seedbed preparation
Trash plow
- mainly for mulch tillage
- relatively simple and less aggressive
- designed to float over ground
Improving seed to soil contact
Adequate seed to soil contact is important for consistent germination and emergence of the planted crop. To improve seed to soil contact one should consider the following:
Firming shoes
- firm seed trench and give a true V opening
- should be set to run slightly inside disc openers to avoid breakage by stones
Firming wheel
- runs in seed trench directly behind seed disc openers
- firms seed into seed trench
Press wheels
- width and extent of tillage will dictate the type of press wheel required
- V press wheels adequate under most conditions
- wide single wheel press wheels may be better in sandy or very loose soil conditions
Field adjustment important for best performance
No-till planting is a one-pass operation. Mistakes or poor performance during the planting operation can be very costly. Take the time to check and adjust the planter on a regular basis.
No-till is more than just modifying a planter. Start developing a no-till system on a small acreage and plant into low residue such as that produced by soybeans. Acreage can be increased, and more residue can be planted into as experience and confidence increases. Remember that any change in tillage will require changes in other aspects of the cropping program such as weed control, variety selection, and nitrogen application. A good rotation will also help ensure success with a no-till cropping program.
References
- Ketcheson, J.W., T.J. Vyn and T.B. Daynard. 1983. Tillage Practices for Residue Management and Erosion Control. Ontario Ministry of Agriculture and Food fact sheet. Agdex 100/516.