Spring littoral index netting manual
Manual of Instructions: Spring Littoral Index Netting (SLIN)
1999
Frank Hicks
Ontario Ministry of Natural Resources
Algonquin Fisheries Assessment Unit
Box 219
Whitney, Ontario
K0J 2M0
MNR 51270
(0.25k P.R., 1999 07 12)
ISBN 0-7778-8402-x
Copies of this publication are available from:
Ontario Ministry of Natural Resources
Fish and Wildlife Branch
P.O. Box 7000
300 Water Street
Peterborough, ON K9J 8M5
Cette publication specialisee n’est disponsible qu’en anglais
1.0 Introduction
The purpose of an index netting survey is to assess the relative abundance of a particular species (or group of species) in a lake at a given time. The mean number of individuals of a species caught per unit of fishing effort, CPUE, is used as an indicator of that species’ abundance. The underlying assumption is that this index (i.e. CPUE) changes relative to changes in the actual abundance of the species. To compare index values over time or between lakes requires that the same survey method be used from year to year and between lakes (Willox and Lester 1994).
Unfortunately, survey methods employed in the past in Ontario have varied over time, among lakes, and within the individuals conducting the surveys. This lack of standardization has resulted in information that is not directly comparable and is much less useful for synthesis or management purposes (Willox and Lester 1994). Spring Littoral Index Netting (SLIN) attempts to address this issue by standardizing sampling methods with respect to the type of gear used, the season and technique to deploy the gear, and the sampling strategy. This approach will provide results that can be used for multiple lake comparisons or to examine trends through time.
The SLIN method uses 90 minute gillnet sets to sample the littoral zone of a lake during the spring. It was initiated by the Algoma FAU in 1987 on brook trout lakes, adapted in 1988 for lake trout lakes and proposed as a provincial standard for lake trout in 1991 (Lester et al. 1991). The technique is easy to apply and the short duration sets of small mesh gillnets (38, 54 and 61 mm) significantly reduce mortality compared to overnight sets. At the same time, biological information can be collected which may further assist in understanding the status of a population or community.
This manual describes the standard methods and provides the technical information necessary for project leaders and field crews to conduct the SLIN field program.
2.0 Survey design and methods
The SLIN method utilizes a simple random sampling design in which the individual sampling units (sites) are selected on a daily basis without replacement. The selection of sampling sites is done randomly to minimize bias in locating sites and setting gear. Spatial stratification is generally not required unless a lake is large with potentially long travel times between randomly selected sites. Selection of sites is essentially a map exercise that is completed in the office before field work begins.
2.1 Sampling methods
Sampling methods for SLIN are summarized in Table 1. Sampling occurs during daylight hours after ice melt and before surface temperatures reach 13°C. Sometimes, due to multiple projects or an exceptionally warm spring, surface temperatures will reach 13°C before the required number of sets can be completed. If you are in the middle of a project and this occurs, then nets should be set in deeper water so that the entire net is in 13°C water or cooler. However, do not begin a project after thermal stratification has begun because it will not be comparable with other projects. If you will be doing more than one project then, if possible, sampling days should be alternated between lakes (e.g.. 2 - 3 days on Lake A followed by 2 - 3 days on Lake B then return to Lake A for 2 - 3 days and so on). This approach will help to minimize potential influences of weather on the catch results.
Nets are set for 90 minutes at each site. The number of sites which can be netted in a work day depends largely on the numbers of fish (all species) you are likely to encounter. However, the recommended minimum number of net sets per day is 6. Three gangs of gillnets (i.e. 38 mm, 51 mm or 64 mm) are used and each should be set the same number of times within a given day. If the fish community is simple or lake trout are not abundant, then 9 sets or even 12 sets per day may be possible. Assuming you have 7 working hours on the lake, then to complete six, 90 minute sets means you have 30 minutes to lift a net, remove and sample the fish, travel to the next site and set the next net (see schedule in Table 2). Under this scenario, there will be time, if necessary, to resume sampling fish once the next net has been set (and before the next net needs to be lifted). Increasing the number of sets will reduce the amount of time available to complete these tasks. When catches are low it is beneficial to set as many nets as possible to obtain a more precise index of abundance. Netting effort should be evenly distributed over the entire day to account for within day variation in catches due to time of day.
Gangs are set perpendicular to the shoreline starting at a depth of 2.5 m and extending to no deeper than 60 m. Cliffs and other sites with extreme slopes (i.e. > 45 degrees) are excluded because gillnets will not operate efficiently there; consequently, the lake depth at the offshore end of the net will never be greater than 60 m.
Table 1. Summary of methods for Spring Littoral Index Netting
| Criteria | Target |
|---|---|
| Season | After ice-out to ~ 13°C surface temperature |
| Set duration | 90 minutes |
| Gear | 3 gillnet configuration:
|
| Depth | Starting from 2.5 m to a maximum of 60 m |
| Orientation | Perpendicular to the shore |
| Spatial stratification | Not required for small lakes of 1,000 ha or less. Large lakes may require spatial stratification to avoid long travel time between sampling sites. If stratification is used each area must be sampled equally over the duration of the study. For example, a large lake might be divided into 5 spatial strata and of allocated to each stratum. |
2.2 Sample size
Sample size decisions may be influenced by a variety of factors. Practical considerations such as cost and availability of manpower or equipment come into play, but more importantly, decisions should be linked to management objectives. If your objective is to statistically detect differences in abundance between years or lakes then significantly more sampling is required than if your objective is to make relative comparisons between lakes or years. The precision of the estimate of abundance (i.e. CPUE) increases as the number of samples (i.e. net sets) per lake increases.
For Area Office SLIN programs the recommended minimum number of net sets per lake is 30 and the minimum number of sample days is 5 (eg. 5 days x 6 sets per day). This sample size should be suitable for making relative comparisons between lakes or years.
For FAU SLIN programs the recommended minimum number of net sets per lake is 60 and the minimum number of sample days is 10 (eg. 10 days x 6 sets per day). This sample size should be suitable for purpose of statistical comparison between lakes and years.
3.0 Gear description
The standard gear is 3 mesh sizes of monofilament gillnet, made in Finland according to specifications that were established by the B.C. Ministry of the Environment. The configuration is a 91.4 m (300 ft) gillnet gang, comprised of six 15.2 m (50 ft) x 2.4 m (8 ft) panels tied together with the brailloops. All six panels per gang are of the same mesh size, either 38 mm (1.5 in), 51 mm (2 in), or 64 mm (2.5 in) stretched mesh. The nets, referred to as “monofilament research gillnets” are available from two Canadian distributors. See Appendix A for names of distributors and more detailed specifications.
4.0 Pre-field activities
4.1 Random selection of sampling sites and scheduling
The selection of sampling sites and development of the sampling schedule are completed prior to field work. This process maintains the principles of randomness, minimizes bias, but allows the crew in the field some flexibility in site selection on any given day.
The following guidelines should be followed when selecting sites:
- sites must be selected such that the same sites are not sampled more than once on a given day.
- each gillnet gang (38 mm, 51 mm and 64 mm) should be set the same number of times each day. For example, to complete six sets in one day each gang must be set twice. To complete nine sets will require each gang to be set three times, etc.
- sites should be at least 500 meters apart on any given day. Where this is not possible, such as in small lakes, then no two nets which are in the water at the same time should be closer than 500 meters.
- when sampling a large lake stratified into two or more areas, ensure that each area is sampled equally over the duration of the study.
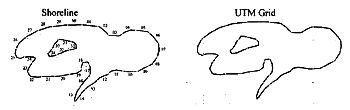
There are a number of techniques for selecting sites to be sampled. A relatively simple method is to take a map of the study lake, mark the shoreline off into 100 meter segments and then sequentially number the segments (Figure 1). A 100 meter segment length is desirable because it is large enough to allow the sector to be identified on the lake, but small enough to restrict subjectivity in site location. Site location is usually the mid-point of a 100 m segment. This method can be quite time consuming for very large lakes (e.g..> 5,000 hectares) and in these cases the shoreline segment length could be increased to 250 or 500 meters.
An alternate approach involves dividing the shoreline into segments based on the boundaries of Universal Transverse Mercator (UTM) grids (Figure 1). A benefit of the UTM grid method is that the grid system is geographically referenced which can simplify the process of transferring the netting sites and associated data into a Geographic Information System (GIS). The use of UTM grids will result in netting sites of different sizes, depending on the shore orientation with the UTM grid system. UTM grids are 1 km long on each side of the grid. To make this method more versatile, the UTM grids may be divided into smaller sub-grids suitable for the size of waterbody being sampled (e.g.. 4 subgrids= 500 m per side, 16 sub-grids= 250 m per side, etc.). A convenient method to divide the UTM grids is to use a clear plastic overlay sheet with the sub-grid boundaries marked on it. Lastly, the grids or sub-grids that actually overlay or intersect the lake shoreline must be sequentially numbered.
Figure 1. Identification of sampling sites by shoreline segments and UTM grid overlay.
If you are sampling a large lake and travel time between sites prohibits sampling the entire shoreline on any particular day, the lake should be divided into manageable areas. On each day a different area is then sampled, but remember all areas must be sampled equally. For example, if you have divided your lake into 3 areas then each area should be allocated two days of sampling.
Once the numbered shoreline segments or grids are established a random number generator or table of random numbers is used to select the sites to be sampled each day. Remember to select more sites than the target number of net sets since some sites may be unsuitable when visited in the field and alternate sites may be required. (Hint: A telephone book can also be used to randomly select sites. Open the book to any page and then using the last two digits (or three digits if you have more than 99 segments) of the telephone numbers select the sites to be sampled. If the last two digits do not correspond to any of your sequentially numbered sites then move on to the next telephone number which does.)
Once you have randomly selected the sites to be sampled, they can be marked on a map and you can determine the optimum survey path (easiest route) for visiting the sites to be sampled during the day. Since the sites were randomly selected, the order in which they are netted should not bias the results. If desired, you may change the starting point for each days netting, one day begin at the far end of the lake and the next day at the near end. Randomly select the first gillnet gang to be set for the day and then assign gangs to sample sites in a sequential manner. For example, the gillnet gangs in increasing order of mesh size are 38, 51 and 64 mm. If the first gillnet identified to be set is the 51 mm mesh size, you must follow next with the 64 mm mesh size, then the 38 mm, the 51 mm, and so on.
Gillnet gangs are set for 90 minutes. In order to make 6 sets in a regular 8 hour working shift they must be overlapped by setting at intervals over the 90 minutes. Caution however, must be exercised in allowing too little time to set and lift nets during this interval due to travel time, high abundance of lake trout or large catches of incidental species such as white sucker, perch or coregonids.
A typical SLIN netting program is outlined in Table 2. This SLIN schedule allows approximately 30 minutes between lifting one net and setting the next. Under normal conditions encountered in the spring, this will allow ample time to sample the fish before travelling to the next set site. Selecting six sites to be sampled in a day allows flexibility in the sampling program to increase the time interval between sets and lifts to account for long distances between sites or encountering large numbers of fish. In small lakes with low numbers of fish, the time interval between lifting and setting can be decreased to 20 minutes to allow more sites (e.g.. 9 or 12 sites) to be sampled in a day. Regardless of the time interval between lifting one net and setting the next, the net fishing time must be exactly 90 minutes.
4.2 Preparation of field forms and equipment
Before any field work can begin, it is important that each survey crew is familiar with the waterbody to be surveyed (i.e., directions on how to find the waterbody, boat launching sites, and navigational hazards). The survey crew should have all the necessary maps, including sampling site location maps before going into the field. In this manual, we have assumed that each survey crew is familiar with safe boat handling procedures, use of gillnets, fish identification and fish handling techniques to ensure the safe release of fish to minimize mortality.
Table 2. Example of a daily SLIN sampling schedule where six nets are set in a hypothetical lake.
| Net set | 1 | 2 | 3 | 4 | 5 | 6 |
|---|---|---|---|---|---|---|
| Site | 4 | 57 | 18 | 10 | 23 | 34 |
| Mesh size (mm) | 51 | 64 | 38 | 51 | 64 | 38 |
Sampling schedule
| Time | Net set | Net lift |
|---|---|---|
| 0800 | 1 | |
| 0830 | ||
| 0900 | 2 | |
| 0930 | 1 | |
| 1000 | 3 | |
| 1030 | 2 | |
| 1100 | 4 | |
| 1130 | 3 | |
| 1200 | 5 | |
| 1230 | 4 | |
| 1300 | 6 | |
| 1330 | 5 | |
| 1400 | ||
| 1430 | 6 |
Prior to the first field sampling day, crews will need to prepare enough SLIN Sampling Forms to record their results while in the field. At least six Forms will be required each day; a separate Form is used for each net set. A blank copy of the standard SLIN Sampling Form is included in Appendix E.
SLIN forms can be printed or photocopied on waterproof paper for working in inclement weather. It is recommended that a set of waterproof forms be made available to the field crew for days when such forms would be required. A supplier of both weatherproof photocopy paper (“Rite in the Rain” Copier Pak@ $18.75 US/200 sheets) and waterproof photocopy paper (“Rite in the Rain” Dura-Copy@ $52.45 US/100 sheets) is the J.L. Darling Corp., 2614 Pacific Highway East, Tacoma, Washington, USA, 98424-1017
All equipment should be checked and serviced (if necessary) at least one week before the survey is to begin. A checklist is included in Appendix B.
5.0 Field procedures
5.1 Safety and communication
SLIN surveys take place in the spring immediately after ice out. As such, hypothermia is a real threat and safety is of the utmost concern. Delay sampling if there are severe weather conditions. All safety equipment should be accessible and personal flotation devices, preferably floater suits should be worn while on the water. Everybody participating in the SLIN survey should be aware of their rights and obligations according to the Occupational Health and Safety Act. A designated person should know where the field crew is on any given day and how to contact them.
5.2 Site selection
Use the sampling schedule and lake map you prepared in the office (as described in the section on Random Selection of Sampling Sites and Scheduling) to determine where and when to set each gillnet. On reaching the predetermined site, assess whether the location is suitable by measuring surface temperature (at 50 cm) and using the depth sounder to check water depth. Remember, the net must be set in water less than 13.0°C and should be perpendicular to shore starting at 2.5 m and extending no deeper than 60 m. If surface temperature is warmer than 13°C then use your telethermometer to locate the depth of water where the temperature is less than 13°C and start your net set at that depth (actually 2.5 m deeper to ensure that the entire net is in proper temperature zone). Generally the starting location should be the mid point of the selected segment, except that river mouths, debris strewn areas and very steep gradients should be avoided. Always try to set at the designated site, but in extreme cases (boat channels, private docks), move the sampling site left or right until a suitable sector is found.
5.3 Setting the net
To set the net one crew member should be positioned in the bow of the boat and the second member at the rear operating the motor.
- Upon reaching desired depth for the shallow end of the set, shift the outboard motor into Attach the anchor and marker-buoy to the bridle rope and lower the anchor to the bottom (2.5 m). An anchor can be made with a short piece of chain or an empty plastic jug filled with sand. (The weight of the anchor must be sufficient to hold the nearshore end of the net in place as you reverse the boat to set the net.)
- Once the anchor has reached the bottom shift the outboard motor into reverse and begin to play out the Make sure that the net float line and lead line are playing out evenly, free from twists and tangles.
- When the net is fully played out, shift the outboard motor into neutral and quickly attach the anchor-marker buoy line to the bridle {see Appendix C). Remember, the marker-buoy line length must be greater than the water depth at the offshore end of the
- While slowly reversing the boat away from shore, in the same line of direction as the net, begin to play out the anchor Be careful not to pull the net so hard as to move the nearshore anchor out from shore. When you reach the end of the line at the marker-buoy shift the outboard motor into forward and move back towards shore while maintaining hold of the marker-buoy.
- When the anchor touches bottom you can release the marker-buoy. Excess rope on the marker-buoy line should be coiled and tied off such that the markerbuoy is floating directly above the The set time is the time when the last panel has been set and the anchor is in place.
- Measure the depth at the offshore end of the net with the depth sounder.
5.4 Information to record at set
Net set information is recorded in the field with a HB pencil on the standard SLIN Sampling Form {Figure 2). The top section of the Form and the first 8 columns of the Sample Description section are completed at the time of set. The final two columns of the Sample Description section are completed when the net is lifted after 90 min. A minimum of one form is used to record each net set {more than one Form may be required to record biological information associated with large catches). The Form should be completed as follows:
Waterbody Name [WBY_NM]
Record the official name of the waterbody in which the gillnet was set {e.g.. Lake Opeongo).
Basin/Area
If the lake has been stratified by area, record the basin of the waterbody where the net was set {e.g.. East Arm). This is for local use only and the data will not be entered into Fishnet.
Field Crew
Record the names or initials of the field crew members who set the net (e.g.. Rick Hawkins & Brian Monroe)- note this data will not be entered in Fishnet
Weather Time
Record the time the weather observations were made - note this data will not be entered in Fishnet
Air Temperature [AIRTEM1]
Record the temperature in degrees Celsius as measured with a dry thermometer, at the time of set.
Wind
This field is optional for District SLIN programs. Record the wind direction, expressed in degrees, and the wind speed, expressed in knots at the time of set.
Cloud Cover - [CLOUD]
Record the estimated fraction of the sky in eighths that is covered by cloud at the time of set as per the following examples: O = zero eighths, 3 = three eighths, 8 = completely. covered, 9 = unknown).
Precipitation - [PRECIP]
Record the type of precipitation. fog or mist occurring at the time of set as per the following codes: 00 = none; 10 = mist; 40 = fog; 51 = slight drizzle; 55 = heavy drizzle; 61 = light rain; 65 = heavy rain; 71 = light snow; 75 = heavy snow; BO = light rain shower; 85 = heavy rain shower; 95 = thunderstorm
Comments
This field is used to document any useful descriptions or additional information relevant to the netting event.
Net Set
A number assigned for use in the field to identify the sequence for setting a net on a daily basis - note this number will not be recorded in Fishnet.
Sample Number [^SAM]
Record the unique (and sequential) number given to each individual setting of a net (i.e. the first set of project would be sample #001, the next set would be sample #002, the 261 set would be sample #026, etc). Sam is a Fishnet key field and cannot be left blank.
Site ID [SITE]
Record the shoreline segment number or UTM reference number used to identify the specific geographic location of the netting site (e.g.. 84).
Site Location [SILOC]
Record the location of the sampling site using a project-defined co-ordinates system. Can be used if local grid system (e.g.. UTM) is not available.
Site Temperature [SITEMO]
Record the water temperature in degrees Celsius taken at 50 cm below the water’s surface at the sampling site at the time of setting the net.
Gear ID [GR)
For SLIN program the codes are GL15 = 1.5“ mesh; GL20 = 2” mesh and GL25 = 2.5" mesh.
Minimum Gear Depth [GRDEPMIN]
Record the depth of the net at the shallow end of the set in metres to one decimal place.
Maximum Gear Depth [GRDEPMAX]
Record the depth of the net at the deep end of the set in metres to one decimal place.
Set Time [EFFTMO]
Record the time that the net was set (24 hr clock hh:mm). Set time is recorded as the time when the last panel has been set and the anchor is in place (i.e. step 5 completed).
5.5 Lifting the net
- After 90 minutes the net is retrieved. To lift the net:
- Prepare 2 fish holding tubs with fresh lake water (or deploy 2 outboard holding pens). Fish captured in the 3 nearshore panels will be placed in one tub/holding pen while fish from the next three panels will held in the other tub or holding pen.
- Retrieve the marker buoy at either the shallow or deep end of the net Detach the marker buoy (while retaining hold of the anchor-marker line) and pull in the net and anchor. The lift time is the time when you start to retrieve the first panel.
- Detach the anchor and the anchor-marker line from the net Place the marker buoy, anchor-marker line, and anchor in a storage container.
- Retrieve the net. carefully removing all fish as you go. Place all fish in the appropriate (see step 2 above) tub or holding pen for future sampling and subsequent release. Care should be taken to coil the net into a storage container to prevent tangling and facilitate resetting.
Once the net has been recovered the catch is processed immediately to minimize mortality. Often it is possible for one crew member to sample fish and release them while the other crew member continues to retrieve the net During the early spring when the water is cold, holding pens or tubs filled with surface water are satisfactory. As the water warms up in late spring the addition of ice or freezer packs to the holding tubs may be required to maintain temperatures below 13°C. This practice should improve survival of lake trout.
5.6 Information to record at lift
Immediately after each lift the following information is recorded with HB pencil on the SLIN Sampling Form. The first 8 columns of the Sample Description section of this Form were filled out when the net was set. The section is now completed by recording the following information in the final two columns (see Figure 2 for example of completed Form).
Lift Time [EFFTM1)
Record the time that the net was lifted (24 hr clock hh:mm). The lift time is the time when you start to retrieve the first panel.
Effort Status [EFFST]
Record the condition of the net set at the time of lifting (1 = net good fishing order at the time of lifting; 2 = net has been tampered with or twisted during set; 3 =wind and waves blew the net onto shore; any other number is user defined.)
5.7 Fish sampling
Designate one person as the data recorder and the other person as the fish handler. Lake trout are sampled before other species to expedite their release.
Sampling Lake Trout
For lake trout that are in good condition, fork length and round weight are measured and the fish is examined for any clips, marks or tags. These data are recorded in the Fish Sampling Section of the SLIN Sampling Form . In addition, a scale sample is taken and stored in a scale sample envelope which is labelled with identifying sample information (species, sample#, panel#, fish #, date and waterbody with area). For lake trout that were killed, in addition to the above information, sex and gonad condition are recorded on the SLIN Sampling Form and otoliths are removed and placed in the scale sample envelope.
- The data recorder initiates the fish sampling process by completing the first two columns of the Fish Sampling
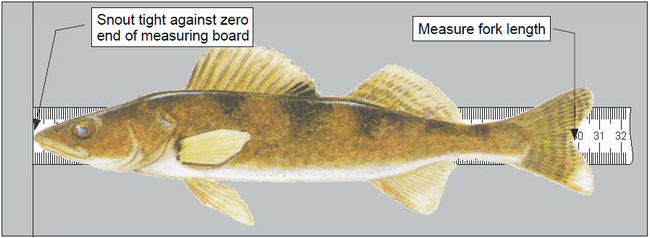
- The fish handler selects a lake trout from the tub or pen and places it on the measuring board such that the snout is snug against the zero end of the board and the fish is laying flat across the ruler (see Figure 3).
Measure the fork length to the nearest 1 millimeter and record the fish number [FISH] and [FLEN] on the Sampling Form.
Figure 3. Measuring the fork length of a fish.
- If you are using a hand held spring-loaded weigh scale place the fish in a damp weigh sock and measure and record the round weight [RW7] of the Remember, do not record weights that are < 10% of the minimum scale capacity (e.g.. 100 g for a 1 kg scale). Weigh the fish with an appropriate capacity scale. Do not use a 1kg scale to weigh an 80 g fish, use a 100 g scale. Hand held springloaded scales should be calibrated each day and tared with the damp weigh sock. If using an electronic weigh scale measure and record the round weight to the nearest 1 g.
- Collect a scale sample from the fish, place it in a scale sample envelope and record on the Sampling Fonrn that ageing structure was collected [AGEST]. Remember to record the corresponding identifying sample information (species, sample#, fish#, date and waterbody) on the Lake trout scales are collected just below the dorsal fin and above the lateral line. For a detailed description of collection methods for fish calcified ageing structures refer to Mann (1992).
- Examine the fish for any marks, clips or tags and record observations [CLIPC], TAG/D), and [TAGSTAT] on the Sampling
- Apply new clip if appropriate and record appropriate code under [CLIPA] on the Sampling Form.
- When all the required information has been collected, release the lake If the fish is sluggish you may help to revive it by gently grasping the caudal area and moving it back and forth slowly in the water.
- Record on the Form whether the fish was released or killed [FATE].
If the lake trout was killed then continue sampling as follows:
- Make an incision from the urogenital opening to the pectoral girdle and examine the gonads. Record the sex [SEX] and condition of the gonad [GON] on the Form.
- Remove the otoliths and place in the same scale sample envelope as the scale sample for that Record on the Form that otoliths were collected for ageing [AGEST]. For a detailed description of collection and storage of otoliths refer to Mann (1992).
Sampling other species
If time permits, fork length of other species is recorded on the SLIN Sampling Form. If catches of these other species are large, it is generally not necessary to sample all fish. A subsample can be randomly selected for measurement (the number of fish to subsample should be discussed beforehand with the project leader). Additional biological information and ageing structure samples may also be collected (use a scale sample envelope to store ageing structures) for these other species at the discretion of the project leader.
- The fish handler selects a fish from the tub, identifies the species and places it on the measuring board such that the snout is snug against the zero end of the board and the fish is laying flat across the ruler (see Figure 3).
- Measure the fork length to the nearest 1 millimeter.
- Record the species [SPC], fish number [FISH] and fork length [FLEN] on the Sampling form.
- Release the fish.
5.8 Recording fish data
Biological information is recorded with an HB pencil in the Fish Sampling section of the SLIN Sampling Form (Figure 4). If more than one Form is required to record the biological data then the waterbody name, date, set# and sample number are repeated on the second Form. This is necessary to link the biological information to the complete effort description data for the set. If more than one Form is used then complete the box on the lower, right corner to indicate the number total number of pages used to record that set.
Inshore/Offshore [^EFF]
The group of panels within the gillnet gang in which the fish was caught. For the nearshore 3 panels EFF = 1 and for the offshore 3 panels EFF = 2
Fish species [^SPC]
Identifies the fish species caught in the panel being sampled using the Fish Species Coding System in Appendix C.
Fish number [^FISH)
A serial number assigned to the individual fish being sampled for identification purposes. This number is also used to link all information for a single fish (the number in the Fish Sampling section of the Form must correspond to the fish number on the scale sample envelope). The recommended protocol is to assign the first fish of each species sampled the number 1 with each subsequent fish of the same species numbered consecutively upwards until the last fish in the entire SLIN survey is sampled (see example in Figure 4).
Fork Length [FLEN]
The length, measured to the nearest 1 mm, of the individual sampled fish from the anterior tip of the snout, with the mouth closed, to the posterior edge of the median caudal fin rays (i.e., the fork in the caudal fin). For fish without a fork in their caudal fin (e.g.., burbot or brown bullhead), fork length is defined to be the same as [TLEN].
Round weight [RWT]
The round weight of individual fish, measured in grams with hand held spring-loaded scales or to the nearest gram using an electronic balance. The hand held spring-loaded scales should be calibrated each day and tared with the damp weigh sock. Weigh fish with appropriate capacity spring scale. Do not record weights of fish that are <10% of the minimum scale capacity (100 g for a 1kg scale) whenever springloaded mechanical scales are used; spring-loaded scales are too insensitive for weighing such small fish (i.e., do not weight a 80 g fish on the 1 kg scale,use the 100 g scale).
Sex [SEX]
The sex of the individual sampled fish based upon internal examination. The OFIS codes for sex are: 1 = male, 2 = female, and 9 =unknown.
Gonad condition [GON]
Code indicating the developmental stage of the gonads from an internal examination of target fish that were killed. The OFIS codes for Gonads are: 10 = undeveloped, 21 = dormant, 22 = developing, 23 = fully developed, 30 = spawning, 40 =spent, 99 =unknown. A third character can be added to denote abnormalities. For a more complete description and definitions of these codes see OFIS Fishnet Data Dictionary.
Age structures sampled [AGES7]
Code listing calcified structures collected for the purpose of age determination. The OFIS codes for age structures are: blank = no data, 0 = no structure sampled, 1 = scales (any side), 2 = scales (left side), 3 = scales (right side), 4 = pectoral ray, 5 = pectoral spine, 6 = pelvic ray, 7 = dorsal spine. A = otolith, B = operculum, C = sub-operculum, D = cleithrum, E = Centrum, F = branchiostegal, G = other, X = more structures.
Marks [CLIPC]
Code for the location of up to 5 clips observed on capture. The OFIS codes for clips on capture are: blank = no data, 0 = no clip, 1 = right pectoral, 2 = left pectoral, 3 = right pelvic, 4 = left pelvic, 5 = adipose, 6 = anal, 7 = anterior dorsal, 8 = posterior dorsal, A = lower caudal, B = mid caudal, C = right opercular, D = left opercular, E = right maxillary, F = left maxillary. (e.g.. 15 = right pectoral, adipose combination)
Marks [CLIPA]
Code for the locations of up to 5 clips applied to a fish. The OFIS codes are the same as for [CLIPC].
Tag identification [TAGID]
The serial number recorded on a fish tag. Its status (applied or captured) is indicated using [TAGSTAT].
Tag status [TAGSTAT]
Indicates whether a tag existed on Capture or was Applied. If observed on capture, the disposition and condition of the tag site are also recorded here. Record up to 4 characters as follows: First Character is the applied code, C = existed on Capture, A= Applied; Second Character is the disposition code, 0 = no change, 1 = retied same tag, 2 = replaced lost tag, 3 = removed, 4 = not known; Third Character is the condition code, 1 = securely tied, 2 = some slack, 3 = loose, 4 = unknown; Fourth Character is a second condition code, 1 = healed, 2 = bit raw, 3 = festering, 4 = wear on fin, 9 = unknown. (e.g.. C = tag observed but no other information on disposition or condition recorded; C13 = existing tag was retied because it was loose)
Fish fate [FATE]
Code indicating whether a fish was killed or released. R = released alive, K = killed.
If an ageing structure (scales and/or otoliths) is collected the following information is recorded, with HB pencil, on every scale sample envelope. The minimum information that must be recorded in order to link the scale sample envelope to the fish biological information on the SLIN Sampling Form is highlighted. Since [AGES1], [FLEN], [RWT], etc. are recorded on the Sampling Form it is optional to duplicate this information on the scale sample envelope.
Figure 4. SLIN Sampling Form with the Fish Sampling Section completed.
| Scale Sample Envelope | Fishnet 2.0 Name |
|---|---|
| Species | [SPC] |
| Party No. | [SAM]+[EFF] |
| No. | [FISH] |
| Date | [DATE] |
| Locality | [WBY]+[AREA]+[GRID] |
| Age | [AGE] |
| Fork length | [FLEN] |
| Round weight | [RWT] |
| Sex | [SEX] |
| Gonad condition | [GON] |
| Marks or tags | [CLIPC,CLIPA,TAG/0, TAGSTAT] |
| Ageing structure | [AGEST] |
5.9 Completing the catch summary
Once sampling of the catch is finished the Catch Summary Section is completed (Figure 5). Remember, if you plan to subsample the catch then make sure you record the total number of fish caught and observe all fish for marks before you release them. This Section is a summary by panel and species of the number of individuals caught, the number of these which were recaptures, the number released alive, the number that were killed and the number which were sampled for biological information or ageing structure. This information is recorded as follows:
Nearshore/Offshore [^EFF]
The panel of the gillnet gang in which the fish was caught. For the three inshore panels EFF = 1 and for the three remaining offshore panels EFF = 2.
Fish species [^SPC]
Identifies the fish species caught in the panel being sampled using the numerical coding system included in Appendix C.
Number caught [CATCNT]
The number of fish caught in the panel being sampled (referenced to [SPC]).
Number recaptured [RCPCNT]
The number of fish of a particular species that were caught and carried a mark.
Number released [RLSCNT]
The number of fish of a particular species that were released alive.
Number killed [KILCNT]
The number of fish of a particular species that were killed.
Number sampled [BIOCNT]
The number of fish caught in the panel that are biologically sampled (referenced to [CATCNT]). It should be the same or less than [CATCNT].
Comments
Record any relevant infonnation in this field pertaining to the catch and processing of the catch (e.g.. Two lake trout appeared to be stressed so these were length measured and released immediately without further biological sampling)
Figure 5. The SLIN Sampling Form with Catch Summary Section completed.
6.0 Post field activities
6.1 Processing the collected fish tissues
After the completion of field work there is still some fish processing left to do. Otoliths should be removed from scale envelopes and immersed in small vials with glycerol.
If ageing structures other than scales or otoliths were collected then any excess muscle or connective tissue must be removed from the calcified structure (e.g.., opercles or cleithra). To remove the excess flesh, immerse the sample into gently boiling water for 5-10 seconds then remove the non-calcified tissue with your fingers or scrub with a toothbrush. Repeat until clean. Ensure that opercles and cleithra are completely dry before placing them into their labelled scale sample envelope.
Scale sample envelopes should be organized before being sent for age interpretation. The flap ofthe scale envelope should be folded over but not tucked in. Ageing tissues from each individual fish should be stored together. Samples from each species should be shipped in separate boxes.
6.2 Net storage and replacement
Gillnets should be dried completely following each SLIN survey to avoid transporting exotic species from waterbody to waterbody. Drying time varies with the weather; however, in general, nets should be dried for a minimum of four days. Small tears in the panels should be repaired as soon as possible. Nets with large tears or damaged panels should be replaced. The nets should be stored in their individually sealed containers in a dry place. Ropes, marker buoys and anchor should be dried out and stored in their sealed container in a dry place.
7.0 Data management
The data recorded on the SLIN forms are in a format compatible with the software package Fishnet 2.0 and as such data entry can be done directly from the forms.
Ministry of Natural Resources field offices may obtain copies of Fishnet 2.0 from the Ontario Fisheries Information System (OFIS) in Peterborough. A copy of the Fishnet 2.0 SLIN Project Template (a modified Index Adult template) and data entry assistance can be obtained from the Muskoka Lakes Fisheries Assessment Unit (MLFAU) at the following address:
Ontario Ministry of Natural Resources
Muskoka Lakes Fisheries Assessment Unit
R.R. 2, Hwy 11 at High Falls Road,
Bracebridge, ON
P1L 1W9
Completed SLIN projects should be copied onto computer diskettes and sent to the MLFAU. The MLFAU will ensure that copies of completed projects are forwarded to OFIS annually for inclusion in the Fishnet data archive called Fisharc.
8.0 Acknowledgements
Standardization of techniques has evaded us for a long time in fisheries. The torturous route in developing standards began with the inspiration of such fishery visionaries as Ken Loftus and Jack Christie, several very important symposia (SCOL, PERCIS), and over the years, programs such as SPOF, FAUs and Lake Trout Synthesis. It has been very rewarding for me to be a part of the process and, now, to see fisheries standards being adapted to MNR programs. Preparation of this report involved many fisheries workers over the years and I have merely brought their ideas together. I would like to thank Brian Monroe, Trevor Middel, Nigel Lester, Henk Rietveld and Neville Ward for their helpful comments. Constructive comments from Peter Hulsman and Chuck Brady improved the manuscript greatly.
9.0 References
Lester, N.P., M.M. Petzold, W.l. Dunlop, B.P. Monroe, S.D. Orsatti, T. Schaner, and D.R. Wood. 1991. Sampling Ontario lake trout stocks: Issues and standards. Lake Trout Synthesis, OMNR Toronto. 117p.
Mann, S.E. 1992. Collection techniques for fish ageing structures (northwest region). Technical Report #73. Ontario Ministry of Natural Resources, Northwest Region Science and Technology Unit, Regional Ageing Laboratory, Dryden, Ontario. 20p.
Willox, C. and N. Lester. 1994. Development of Index Netting Standards for Ontario Lakes. Ontario Ministry of Natural Resources. Fisheries Assessment Unit Network Report 1994-1. 10p.
Appendix A. SLIN net specifications and suppliers.
Biological Equipment
The mesh is made from double-knotted monofilament: the filament diameter is 0.20 mm (38 and 51 mm meshes) or 0.25 mm (64 mm mesh). Each panel measures 15.2 m (50 ft) in length by 2.4 m (8 ft) in height. The nets are dyed light green (Miracle R-13L). They are hung on a 2:1 basis, meaning that there is twice as much web as lead/cork line and that the ratio of diagonals in the meshes is 1.73:1. They have a braided lead line of 75 g/m (0.3 lbs/fathom) and braided nylon cork line with corks 15 - 20 cm (6 - 8 in) apart. Nylon gables (side lines) are approximately 18 kg (40 lb) test.
Note: When placing an order for SLIN nets ensure the above specifications (colour and dimensions) are listed in full on your purchase order. When you receive a shipment, check immediately to verify the nets meet the required specifications. Nets which do not meet all of the specifications should be returned to the supplier immediately.
Appendix B. Equipment checklist for Spring Littoral Index Netting programs.
- Boat - minimum length required 4.3 m (14 ft) but 4.9 m (16 ft) is better
- Outboard motor - minimum 9.9 hp but 15 hp is better
- Motor repair kit - includes:
- spark plugs
- spark plug wrench
- large screwdriver
- pliers
- cotter pins
- shear pins
- wire
- manual pull cord
- duct tape
- a whistle
- Gas - plan on enough gas for the days requirements
- Spare gas line (just in case)
- Paddles or oars
- Bailing bucket or bilge pump
- Anchor/Throw line (for the boat) – 30.5 m (100 ft) long
- The required number of approved personal flotation devices (e.g.., life jackets, flotation jackets, or survival suits)
- Rainsuits, rubber boots (or waders), and a change of warm clothes
- The required number of Nordic nets and 1 spare Nordic net (in case of damage) with attached bridles in their storage containers
- The required number of marker buoys, and anchor-marker buoy lines in a separate storage container for the nets
- Depth sounder and battery
- Watch
- YSI dissolved oxygen meter with spare batteries, membranes, and KCI solution
- Hand held thermometer
- Fish sampling kit - includes:
- measuring board
- measuring tape
- hand held spring scales with a weigh sock (the recommended range of spring scales is 10 g, 25 g, 100 g, 1 kg, 3 kg, and 10 kg) or an electronic digital balance with a weigh pan (the recommended scale should read to the nearest 0.01 g)
- fillet knifes (two are better than one)
- scale envelopes (many)
- whirl-pak bags (many)
- vials or empty film canisters (many)
- scissors (two are better than one)
- forceps (two are better than one)
- HB pencils (ten or more)
- permanent waterproof felt tip markers (at least two of each: fine, medium and thick tips)
- Landing net
- Sampling forms - includes:
- field norebook with waterproof paper
- standard SLIN Sampling Forms (provided in this manual)
- Plastic bags - various sized grocery bags and are useful
Appendix C.
The recommended way to set up SLIN nets. It is important to ensure that both ends are weighted with an anchor and have a lift line securely attached to a float. This diagram is not to scale.

Appendix D: Master list of species codes and common names of Ontario fish (May 1998)
- Petromyzontidae - Lampreys
- American brook lamprey - Lampetra appendix
- northern brook lamprey - Ichthyomyzon fossor
- silver lamprey - Ichthyomyzon unicuspis
- sea lamprey - Petromyzon marinus
- Ichthyomyzon
- chestnut lamprey - Icthyomyzon castaneus
- Polyodontidae - Paddlefishes
- paddlefish - Polyodon spathula
- Acipenseridae - Sturgeons
- lake sturgeon - Acipenser fulvescens
- caviar
- Lepisosteidae – Gars
- longnose gar - Lepisosteus osseus
- spotted gar - Lepisosteus oculatus
- Lepisosteus sp.
- Amiidae - Bowfins
- bowfin - Amia calva
- Clupeidae – Herrings
- alewife - Alosa pseudoharengus
- American shad - Alosa sapidissima
- Gizzard shad - Dorosoma cepedianum
- Alosa sp.
Salmonidae - Trouts:
- Salmoninae - Salmon and Trout subfamily
- pink salmon - Oncorhynchus gorbuscha
- chum salmon - Oncorhynchus keta
- coho salmon - Oncorhynchus kisutch
- sockeye salmon - Oncorhynchus nerka
- chinook salmon - Oncorhynchus tshawytscha
- rainbow trout - Oncorhynchus mykiss
- Atlantic salmon - Salmo salar
- brown trout - Salmo trutta
- Arctic char - Salvelinus alpinus
- brook trout - Salvelinus fontinalis
- lake trout - Salvelinus namaycush
- splake - Salvelinus fontinalis x Salvelinus namaycush
- Aurora trout - Salvelinus fontinalis timagamiensis
- Oncorhynchus sp.
- Salmo sp.
- Salvelinus sp.
- Coregoninae - Whitefish subfamily
- lake whitefish - Coregonus clupeaformis
- longjaw cisco - Coregonus alpenae
- cisco (lake herring) - Coregonus artedi
- bloater - Coregonus hoyi
- deepwater cisco - Coregonus johannae
- kiyi - Coregonus kiyi
- blackfin cisco - Coregonus nigripinnis
- Nipigon cisco - Coregonus nipigon
- shortnose cisco - Coregonus reighardi
- shortjaw cisco - Coregonus zenithicus
- pygmy whitefish - Prosopium coulteri
- round whitefish - Prosopium cylindraceum
- chub - Coregonus (Cisco species other than C. artedi)
- Coregonus sp.
- Prosopium
- Thymallinae - Grayling subfamily
- Arctic grayling - Thymallus arcticus
- Osmeridae - Smelts
- rainbow smelt - Osmerus mordax
- Esocidae - Pikes
- northern pike - Esox lucius
- muskellunge - Esox masquinongy
- grass pickerel - Esox americanus vermiculatus
- Esox sp.
- chain pickerel - Esox niger
- Umbridae - Mudminnows
- central mudminnow - Umbra limi
- Hiodontidae - Mooneyes
- goldeye - Hiodon alosoides
- mooneye - Hiodon tergisus
- Catostomidae - Suckers
- quillback - Carpiodes cyprinus
- longnose sucker - Catostomus Catostomus
- white sucker - Catostomus commersoni
- lake chubsucker - Erimyzon sucetta
- northern hog sucker - Hypentelium nigricans
- bigmouth buffalo - Ictiobus cyprinellus
- spotted sucker - Minytrema melanops
- silver redhorse - Moxostoma anisurum
- black redhorse - Moxostoma duquesnei
- golden redhorse - Moxostoma erythrurum
- shorthead redhorse - Moxostoma macrolepidotum
- greater redhorse - Moxostoma valenciennesi
- river redhorse - Moxostoma carinatum
- black buffalo - Ictiobus niger
- Catostomus sp.
- Moxostoma sp.
- Ictiobus sp.
- Cyprinidae - Carps and Minnows
- goldfish - Carassius auratus
- northern redbelly dace - Phoxinus eos
- finescale dace - Phoxinus neogaeus
- redside dace - Clinostomus elongatus
- lake chub - Couesius plumbeus
- common carp - Cyprinus carpio
- gravel chub - Erimystax x punctatus
- cutlips minnow - Exoglossum maxillingua
- brassy minnow - Hybognathus hankinsoni
- eastern silvery minnow - Hybognathus regius
- silver chub - Macrhybopsis storeriana
- hornyhead chub - Nocomis biguttatus
- river chub - Nocomis micropogon
- golden shiner - Notemigonus crysoleucas
- pugnose shiner - Notropis anogenus
- emerald shiner - Notropis atherinoides
- bridle shiner - Notropis bifrenatus
- common shiner - Luxilus cornutus
- blackchin shiner - Notropis heterodon
- blacknose shiner - Notropis heterolepis
- spottail shiner - Notropis hudsonius
- rosyface shiner - Notropis rubellus
- spotfin shiner - Cyprinella spiloptera
- sand shiner - Notropis stramineus
- redfin shiner - Lythrurus umbratilis
- mimic shiner - Notropis volucellus
- pugnose minnow - Opsopoeodus emiliae
- bluntnose minnow - Pimephales notatus
- fathead minnow - Pimephales promelas
- blacknose dace - Rhinichthys atratulus
- longnose dace - Rhinichthys cataractae
- creek chub - Semotilus atromaculatus
- fallfish - Semotilus corporalis
- pearl dace - Margariscus margarita
- silver shiner - Notropis photogenis
- central stoneroller - Campostoma anomalum
- striped shiner - Luxilus chrysocephalus
- ghost shiner - Notropis buchanani
- grass carp - Ctenopharyngodon idella
- rudd - Scardinius erythrophthalmus
- Phoxinus sp.
- Hybognathus sp.
- Nocomis sp.
- Notropis sp.
- Pimephales sp.
- Rhinichthys sp.
- Semotilus sp.
- Hybopsis sp.
- Luxilus sp.
- Ictaluridae - Bullhead Catfishes
- black bullhead - Ameiurus melas
- yellow bullhead - Ameiurus natalis
- brown bullhead - Ameiurus nebulosus
- channel catfish - Ictalurus punctatus
- stonecat - Noturus flavus
- tadpole madtom - Noturus gyrinus
- brindled madtom - Noturus miurus
- margined madtom - Noturus insignis
- flathead catfish - Pylodictis olivaris
- Ictalurus sp.
- Noturus sp.
- Ameiurus sp.
- northern madtom - Noturus stigmosus
- Anguillidae - Freshwater Eels
- American eel - Anguilla rostrata
- Cyprinodontidae - Killifishes
- banded killifish - Fundulus diaphanus
- blackstripe topminnow - Fundulus notatus
- Gadidae - Cods
- burbot - Lota lota
- Gasterosteidae - Sticklebacks
- brook stickleback - Culaea inconstans
- threespine stickleback - Gasterosteus aculeatus
- ninespine stickleback - Pungitius pungitius
- fourspine stickleback - Apeltes quadracus
- Percopsidae - Trout-perches
- trout-perch - Percopsis omiscomaycus
- Percichthyidae - Temperate Basses
- white perch - Morone americana
- white bass - Morone chrysops
- Morone sp.
- Centrarchidae - Sunfishes
- rock bass - Ambloplites rupestris
- green sunfish - Lepomis cyanellus
- pumpkinseed - Lepomis gibbosus
- blue gill - Lepomis macrochirus
- longear sunfish - Lepomis megalotis
- smallmouth bass - Micropterus dolomieu
- largemouth bass - Micropterus salmoides
- white crappie - Pomoxis annularis
- black crappie - Pomoxis nigromaculatus
- Lepomis sp.
- Micropterus sp.
- Pomoxis sp.
- warmouth - Lepomis gulosus
- orangespotted sunfish - Lepomis humilis
- Percidae - Perches
- yellow perch - Perca flavescens
- sauger - Stizostedion canadense
- blue pike (blue pickerel) - Stizostedion vitreum glaucum
- walleye (yellow pickerel) - Stizostedion vitreum
- eastern sand darter - Ammocrypta pellucida
- greenside darter - Etheostoma blennioides
- rainbow darter - Etheostoma caeruleum
- Iowa darter - Etheostoma exile
- fantail darter - Etheostoma flabellare
- least darter - Etheostoma microperca
- johnny darter - Etheostoma nigrum
- logperch - Percina caprodes
- channel darter - Percina copelandi
- blackside darter - Percina maculata
- river darter - Percina shumardi
- tessellated darter - Etheostoma olmstedi
- Stizostedion sp.
- Etheostoma sp.
- Percina sp.
- ruffe - Gymnocephalus cernuus
- Atherinidae - Silversides
- brook silverside - Labidesthes sicculus
- Gobiidae – Gobies
- round goby - Neogobius melanostomus
- tubenose goby - Proterorhinus marmoratus
- Sciaenidae - Drums
- freshwater drum - Aplodinotus grunniens
- Cottidae - Sculpins
- mottled sculpin - Cottus bairdi
- slimy sculpin - Cottus cognatus
- spoonhead sculpin - Cottus ricei
- deepwater sculpin - Myoxocephalus thompsoni
- Cottus sp.
- Myoxocephalus sp.
- fourhorn sculpin - Myoxocephalus quadricornis
- Cyclopteridae - Lumpfishes
- lumpfish - Cyclopterus lumpus
- Pleuronectidae - Righteye Flounders
- European Flounder - Platichthys flesus
- Salmonidae - Hybrids
- Salmoninae - Hybrids
- Coregoninae - Hybrids
- Esocidae - Hybrids
- Esox lucius x Esox americanus vermiculatus
- Esox lucius x Esox masquinongy
- Catostomidae - Hybrids
- Ictiobus hybrids
- Cyprinidae - Hybrids
- Carassius auratus x Cyprinus carpio
- Phoxinus hybrids Phoxinus eos x Phoxinus neogaeus
- Phoxinus eos x Margariscus margarita
- Phoxinus neogaeus x Margariscus margarita
- Notropis hybrids
- Luxilus cornutus x Notropis rubellus
- Luxilus cornutus x Semotilus atromaculatus
- Pimephales promelas x Pimephales notatus
- Ictaluridae - Hybrids
- Ameiurus melas x Ameiurus nebulosus
- Centrarchidae - Hybrids
- Lepomis hybrids
- Lepomis gibbosus x Lepomis macrochirus
- Lepomis cyanellus x Lepomis gibbosus
- Lepomis cyanellus x Lepomis megalotis
- Lepomis cyanellus x Lepomis macrochirus
- Pomoxis annularis x Pomoxis nigromaculatus
- Percidae – Hybrids
- Stizostedion canadense x Stizostedion vitreum
- Cottidae - Hybrids
- Cottus bairdi x Cottus cognatus
Appendix E. SLIN sampling form
The following blank copy of the SLIN Sampling Form is required to record the results from your netting project. To facilitate direct photocopying for field use these forms are full size. Save them as master copies for use in future SLIN projects.
Footnotes
- footnote[1] Back to paragraph The use of supplier names or brand names is not an endorsement by MNR for these companies or products.