Vermicasting (or vermicomposting)
Learn about processing organic wastes using earthworms. This is technical information for Ontario producers and rural residents.
ISSN 1198-712X, Published February 2010
Introduction
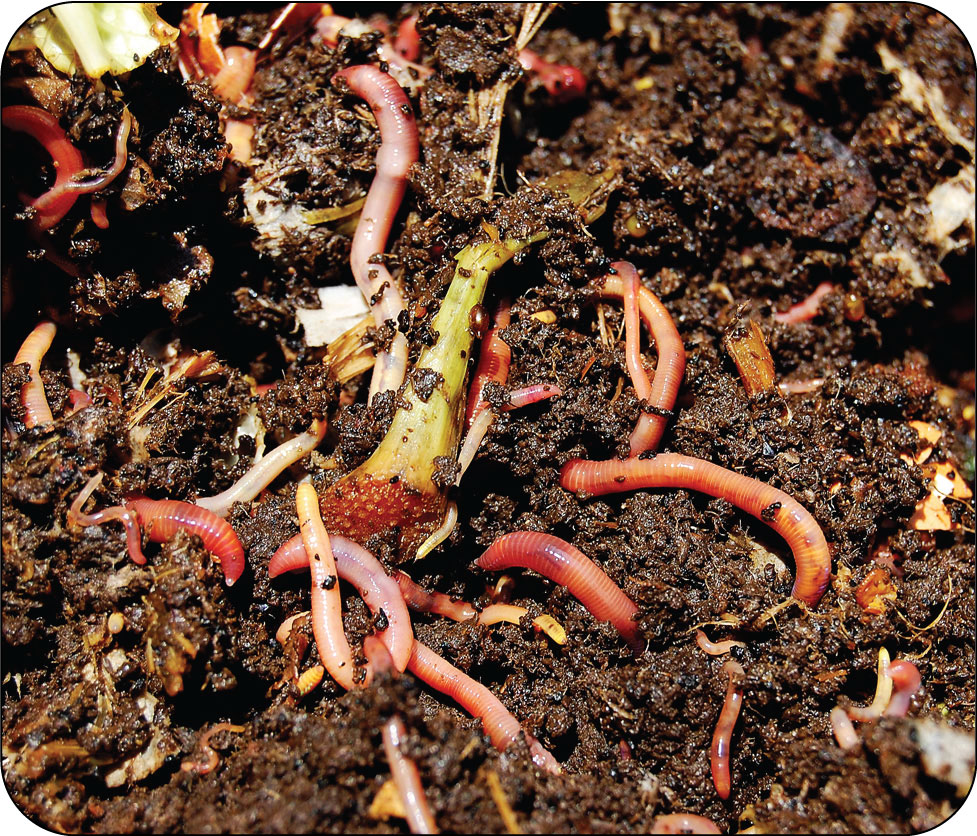
Vermicasting, also called vermicomposting, is the processing of organic wastes through earthworms (Figure 1). It is a natural, odourless, aerobic process, much different from traditional composting. Earthworms ingest waste then excrete casts — dark, odourless, nutrient- and organically rich, soil mud granules that make an excellent soil conditioner. Earthworm casts are a ready-to-use fertilizer that can be used at a higher rate of application than compost, since nutrients are released at rates that growing plants prefer.
Vermicasting can be done on a small scale by homeowners with household organic wastes, on a large-scale by farmers with manure or by the food industry using organic wastes such as fruit and vegetable cull materials. Through proper design, vermicasting is a method of waste handling that:
- is clean, socially acceptable, with little to no odour
- requires no energy input for aeration
- reduces the mass of waste by 30%
- produces a valuable vermicast byproduct
- even generates worms as fishing bait
Important facts about vermicasting:
- Turning organic wastes into casts takes 22–32 days, depending on density of waste and earthworm maturity (regular composting requires 30–40 days, followed by 3–4 months curing).
- Vermicast does not need curing, but fresh casts undergo 2 weeks of nitrification where ammonium transforms to nitrate, a form that plants can uptake.
- Use organic materials that meet the earthworm’s feed preferences, including a material density of 350–650 g/L.
- Worms should not be crowded, so the ideal stocking density is 150 earthworms/L of wastes.
- Earthworms ingest about 75% of their body weight/day; a 0.2 g worm eats about 0.15 g/day.
- If you discover earthworms trying to escape any system, it is a good indication that something is wrong with their feed or environment
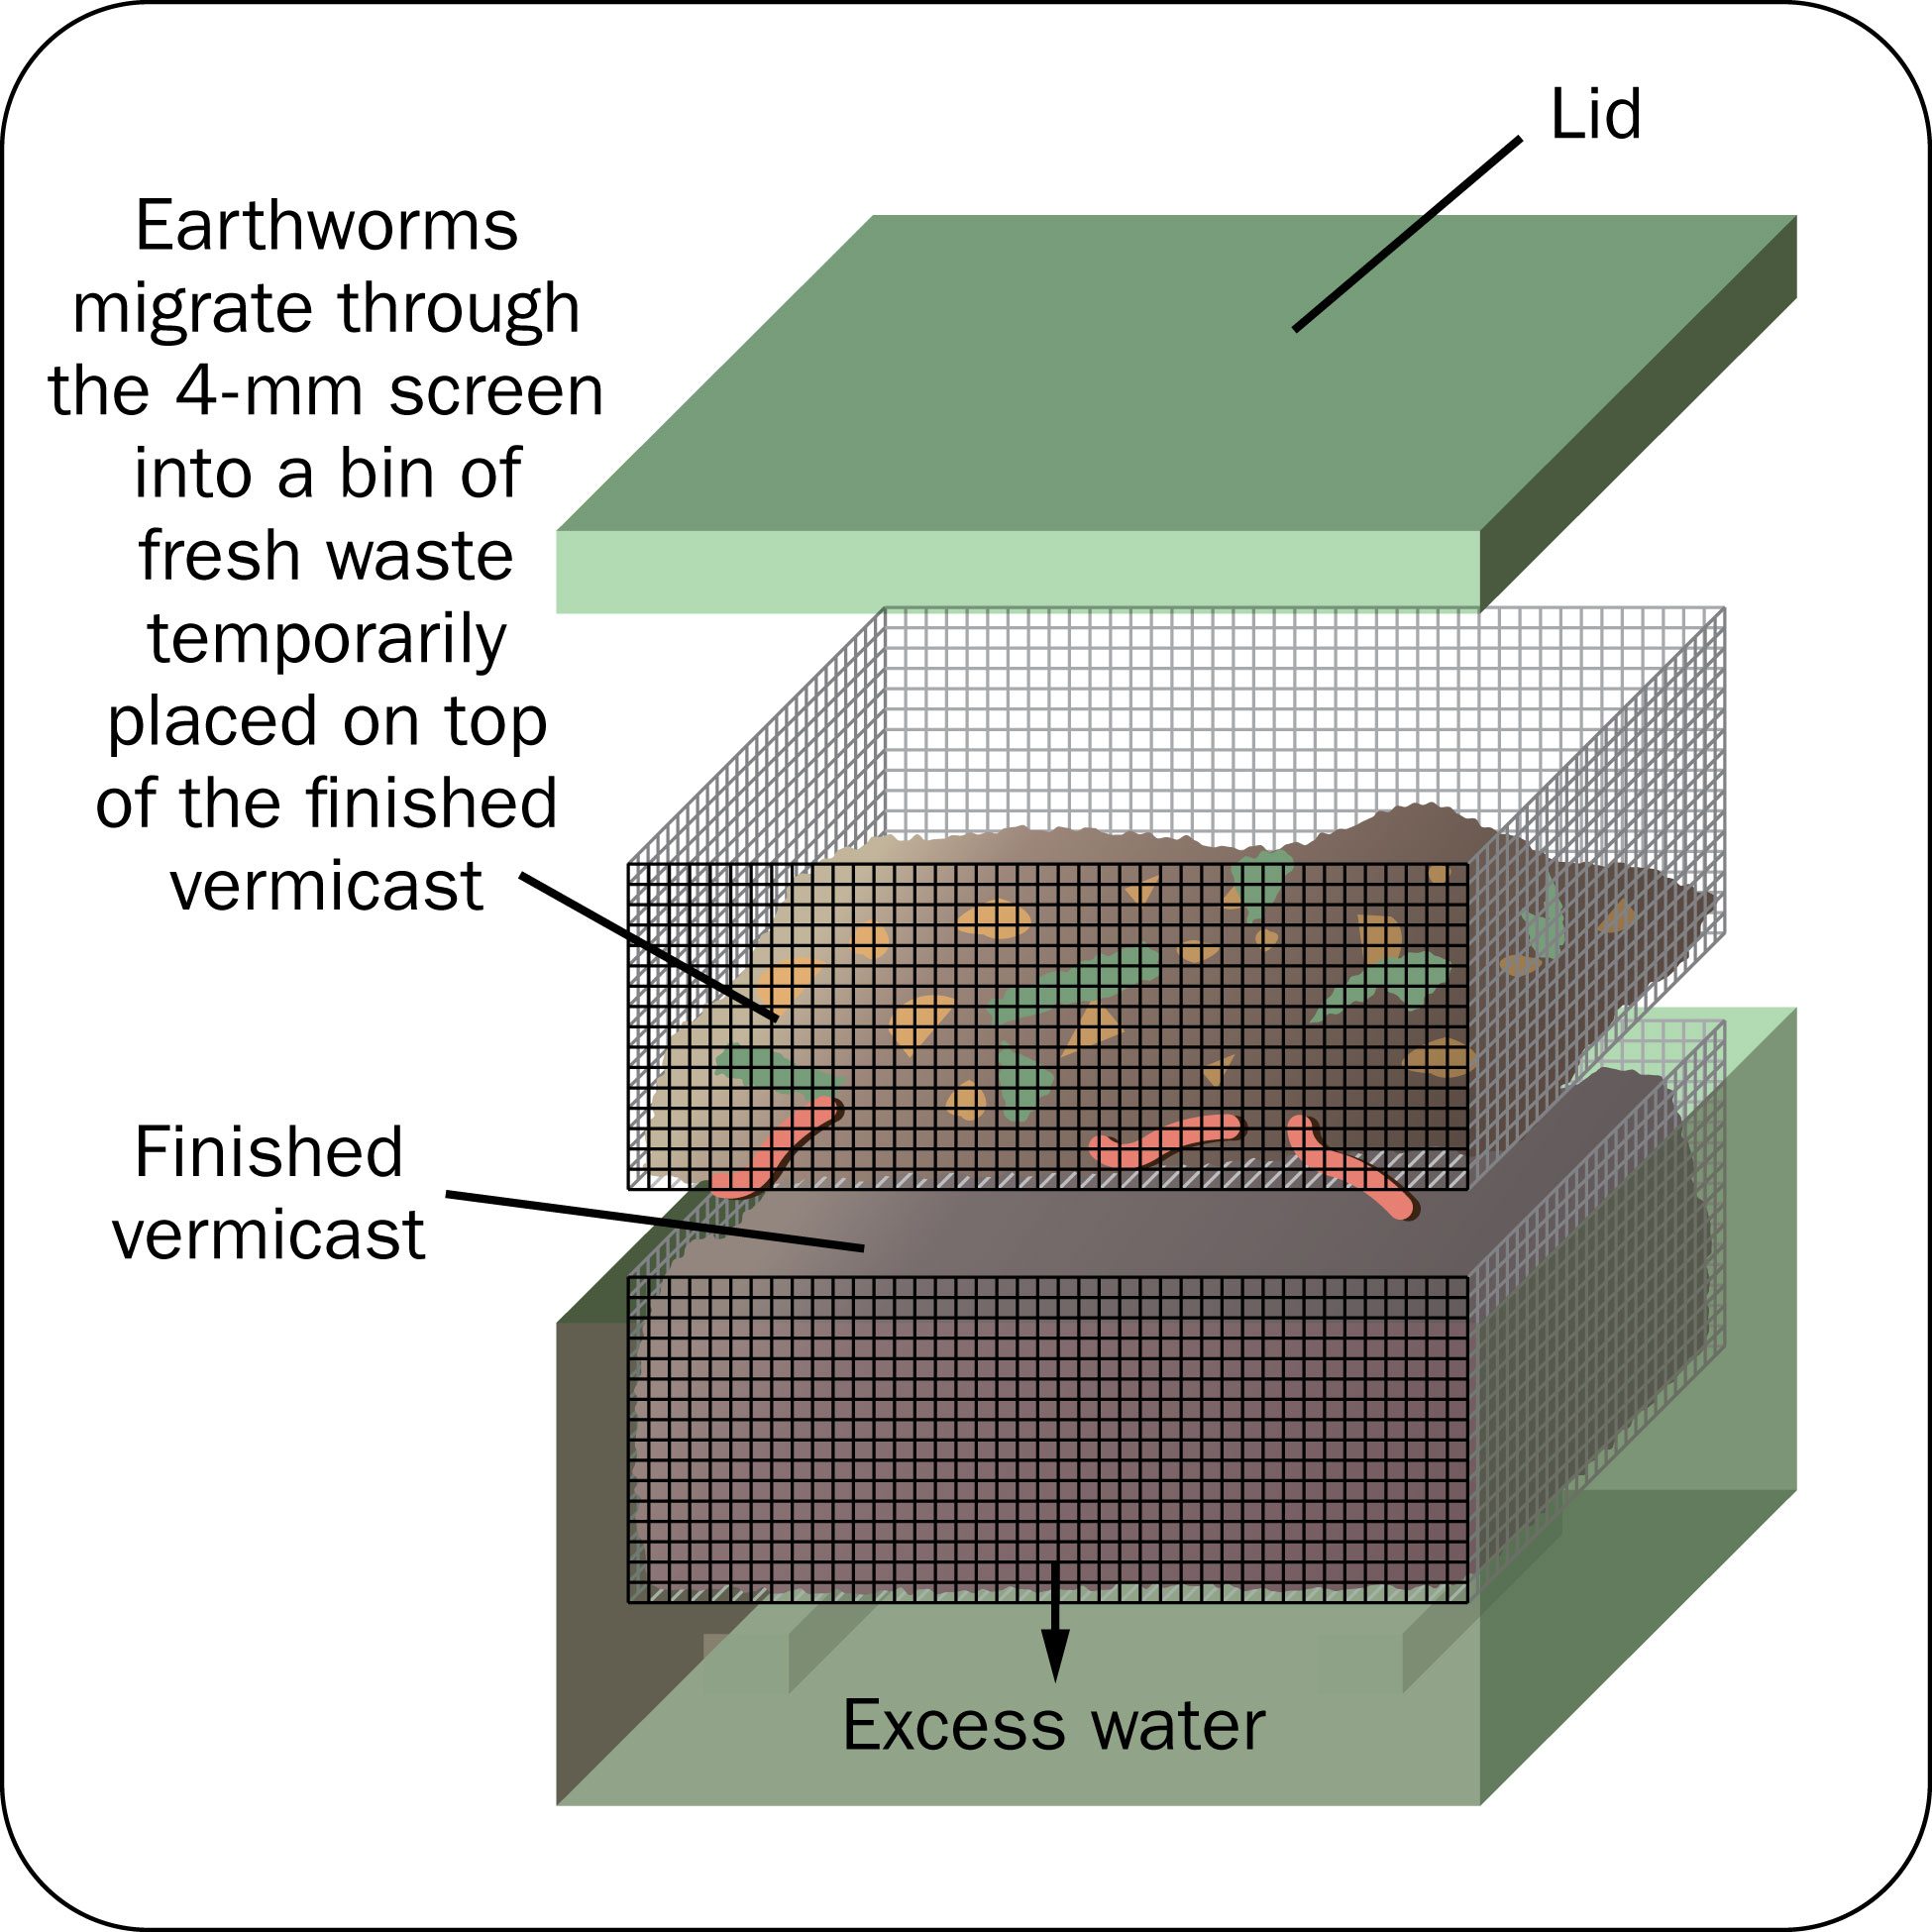
- Earthworms should be allowed about 1 week to migrate from finished vermicast to fresh waste.
Vermicast fertilizer characteristics
Nutrients
Vermicast nutrient content varies with earthworm feed type, but feeding waste to earthworms does cause nitrogen mineralization, followed by phosphorous and sulphur mineralization after egestion. A typical nutrient analysis of casts is C:N ratio 12–15:1; 1.5%–2.5% N, 1.25%–2.25% P2O5 and 1%–2%, K2O at 75%–80% moisture content. The slow-release granules structure of earthworm casts allows nutrients to be released relatively slowly in sync with plant needs.
Salinity
Ammonium is the main contributor to salinity levels. Earthworms are repelled by salinity levels above 5 mg/g. Therefore, if the starting material is low in salt, the resulting vermicast will be as well. In fresh vermicast, ammonium mineralized in the earthworm gut is nitrified over 2 weeks.
Pathogens
Pathogen levels are low in vermicast, which is considered a Type A biosolid when excreted by earthworms. This is a lower pathogen level than in typical composts. Vermicast is low in pathogens because earthworms consume fungi, and aerobic bacteria do not survive low oxygen levels in the gut. Low pathogen levels could also be due to the fact that vermicasting does not build up heat, which allows disease-suppressing organisms to survive the vermicasting process and outcompete pathogens.
Earthworms 101
Earthworms are epigeic (surface dwellers), endogeic (burrow up to 15 cm deep) or anecic (burrow vertical channels, about 1 m deep). Epigeic earthworms such as Eisenia fetida (red wigglers) are the best adapted to ingest organic wastes. Earthworms can double their population in 60 days.
Digestion
Red wigglers can consume 75% of their body weight per day. Earthworms weigh about 0.2 g and require oxygen and water, both exchanged through their skin.
As organic matter passes through the earthworm gut, it is mineralized into ammonium (later nitrified) and other plant nutrients. The grinding effect of its gizzard and the effect of its gut muscle movement result in the formation of casts. Most pathogens are consumed in the earthworm gut, since earthworms feed on fungi, and pathogenic bacteria cannot survive in the low-oxygen environment inside the earthworm gut.
Feed preferences
The ideal feed for earthworms is food or animal waste and fresh, green, plant waste, rich in nitrogen or precomposted (for up to 2 weeks to make it easier to digest). Ideally, earthworm feed has a 25:1 carbon-to-nitrogen (C:N) ratio and a pH between 6.5 and 8 (close to neutral) — sudden pH fluctuations repel earthworms.
Ideal earthworm feed is:
- porous, allowing oxygen to penetrate
- warm (25°C): worms can survive in temperatures 0°C–35°C, but at lower temperatures they are not as active and die at freezing temperatures
- moist, but not wet: 75% moisture is ideal, like wet soil at field capacity (earthworms migrate out of wet materials)
- not too dense: below 640 kg/m3 (40 lb/ft3) — like the fluffy density of peat moss
- not salty: below 0.5% salinity — higher is too toxic
- devoid of toxins such as de-worming medicine, detergent cleansers, pesticides and tannins
Online calculators for optimizing worm feeds are available. Search online for “vermicasting, feed mixtures with optimal characteristics.” The calculation uses the percentage nitrogen, percentage carbon, water content and density of each feed material, plus the total desired feed quantity.
Light sensitivity
Earthworms have eye-cells on their skin that trigger pain when exposed to any light but blue light, keeping them underground during daylight. They will try to leave any material if it does not meet their feed requirements, but if a light is shining at the surface of the material, they will stay where they are.
Bin or reactor design
The goal for any vermicasting system is to:
- provide worms with a palatable feed
- have worms digest waste at the highest rate possible
- keep worms from migrating out of or to the edge of the windrows, raised beds or bins (Figure 2)
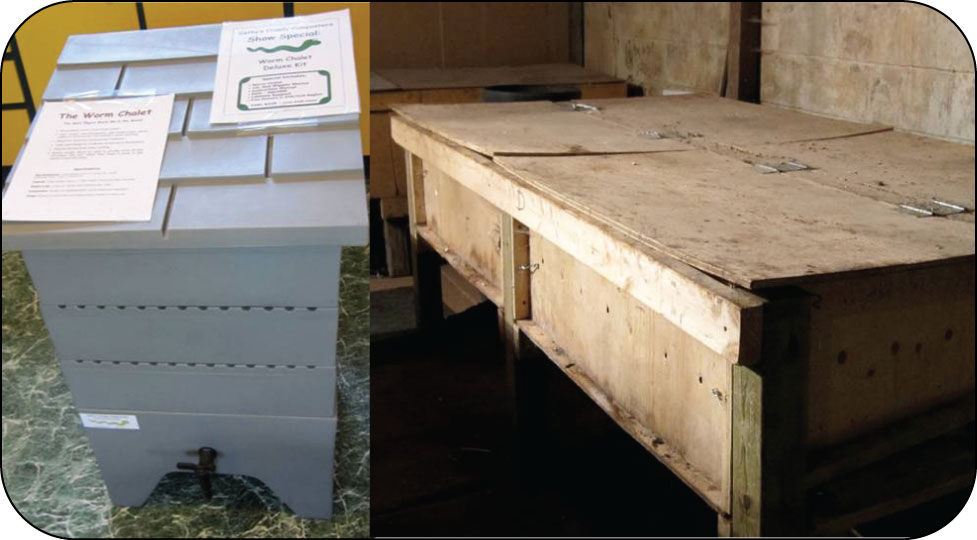
Source: Cathy’s Crawly Composters, Toronto
Waste must:
- have the required pH and salinity levels
- be moist but drained of excess water
- be neither too cold nor too hot
- be stacked in thin layers that diffuse air
Drainage and aeration
For appropriate drainage and aeration, container walls, bottom and side walls must be made of a perforated material. Many commercially available vermicasting bins have a few holes at the bottom for drainage, but this is not enough. A screen-type floor surface allows drainage, unlike common bedding materials. A screen size of 4 mm (5/32 in.) will keep most waste particles in.
Earthworms will not fall through this size of hole but they can burrow through this size of hole to get to fresh wastes if need be.
Some commonly used bedding types are dense and can become waterlogged, not allowing air to diffuse through the drainage/aeration holes in the bin bottom. Instead, consider using a layer of finished vermicast on the bin bottom for the start-up period because worms will burrow through it, resulting in good aeration and drainage. Starting with a vermicast layer also provides room to keep the worm stocking density lower than the maximum 300 worms/L of material. Higher densities reduce worm efficiency. Keep an air space of at least 5–10 cm depth (2–4 in.) below the screen floor for free drainage. Earthworms could burrow through the 4-mm screening on the bottom of the bin, but they choose not to because there is no food there, just open air. Leachate draining through can be collected and reintroduced to the bin.
Moisture
Waste materials should have a moisture content of 75% (field capacity), never more than 85%. Regular watering, or automatic sprinkling in the case of large-scale systems, is usually needed. If waste materials with elevated levels of water content are added, such as food waste (fruits and vegetables are about 90% moisture), watering is not necessary, and drainage will correct the moisture level if it exceeds 75%.
Thickness of the waste layer
To prevent anaerobic conditions (lack of oxygen), which can result in fermentation and heat build-up, design the vermicasting bin, raised bed or windrow pile to keep the waste layer at a thickness of 30 cm (1 ft) or less. This thickness allows air to passively diffuse into the material, aided by the canals burrowed by earthworms. This keeps the pile aerated and cool, which earthworms prefer. A thin layer of waste helps prevent compaction of the bottom of the waste pile, which might cause poor aeration, fermentation and heat, all of which repel earthworms.
Active aeration, mixing and temperature control of such a thin layer of waste occurs through the burrowing action of the earthworms. The earthworms do the work, unlike an active composting system where aeration, mixing and temperature control are accomplished by fans and/or machinery.
Temperature
Since earthworms require a temperature range of 0°C–35°C (optimum is 25°C), year-round vermicasting systems must be designed carefully for the Ontario climate. The process is odourless but does not generate heat on its own, so one option is to place the bin indoors. If this is not possible, insulate bins and place them partly underground in a sheltered location to help temper outside temperature fluctuations.
Odours and flies
Odorous gases (volatile organic compounds) and heat are produced during fermentation, which can occur in poorly aerated (anaerobic) organic materials. This is often a problem in compost piles if they are not aerated or mixed. However, earthworms thrive in aerobic conditions, where fermentation and the resulting heat and odours do not occur. If designed properly, vermicasters do not produce odours.
When a vermicaster does produce odours and flies, it is likely due to excess water. Proper drainage using raised screen surfaces (4 mm) at the bottom of the container and/or reducing the thickness of the waste to no more than 30 cm should resolve this situation.
Batch systems
The system can be designed as batch or continuous flow. In a batch system, the waste is inoculated with earthworms, which then process the entire quantity of waste into vermicast. The casts are collected and separated from the earthworms, ending the process.
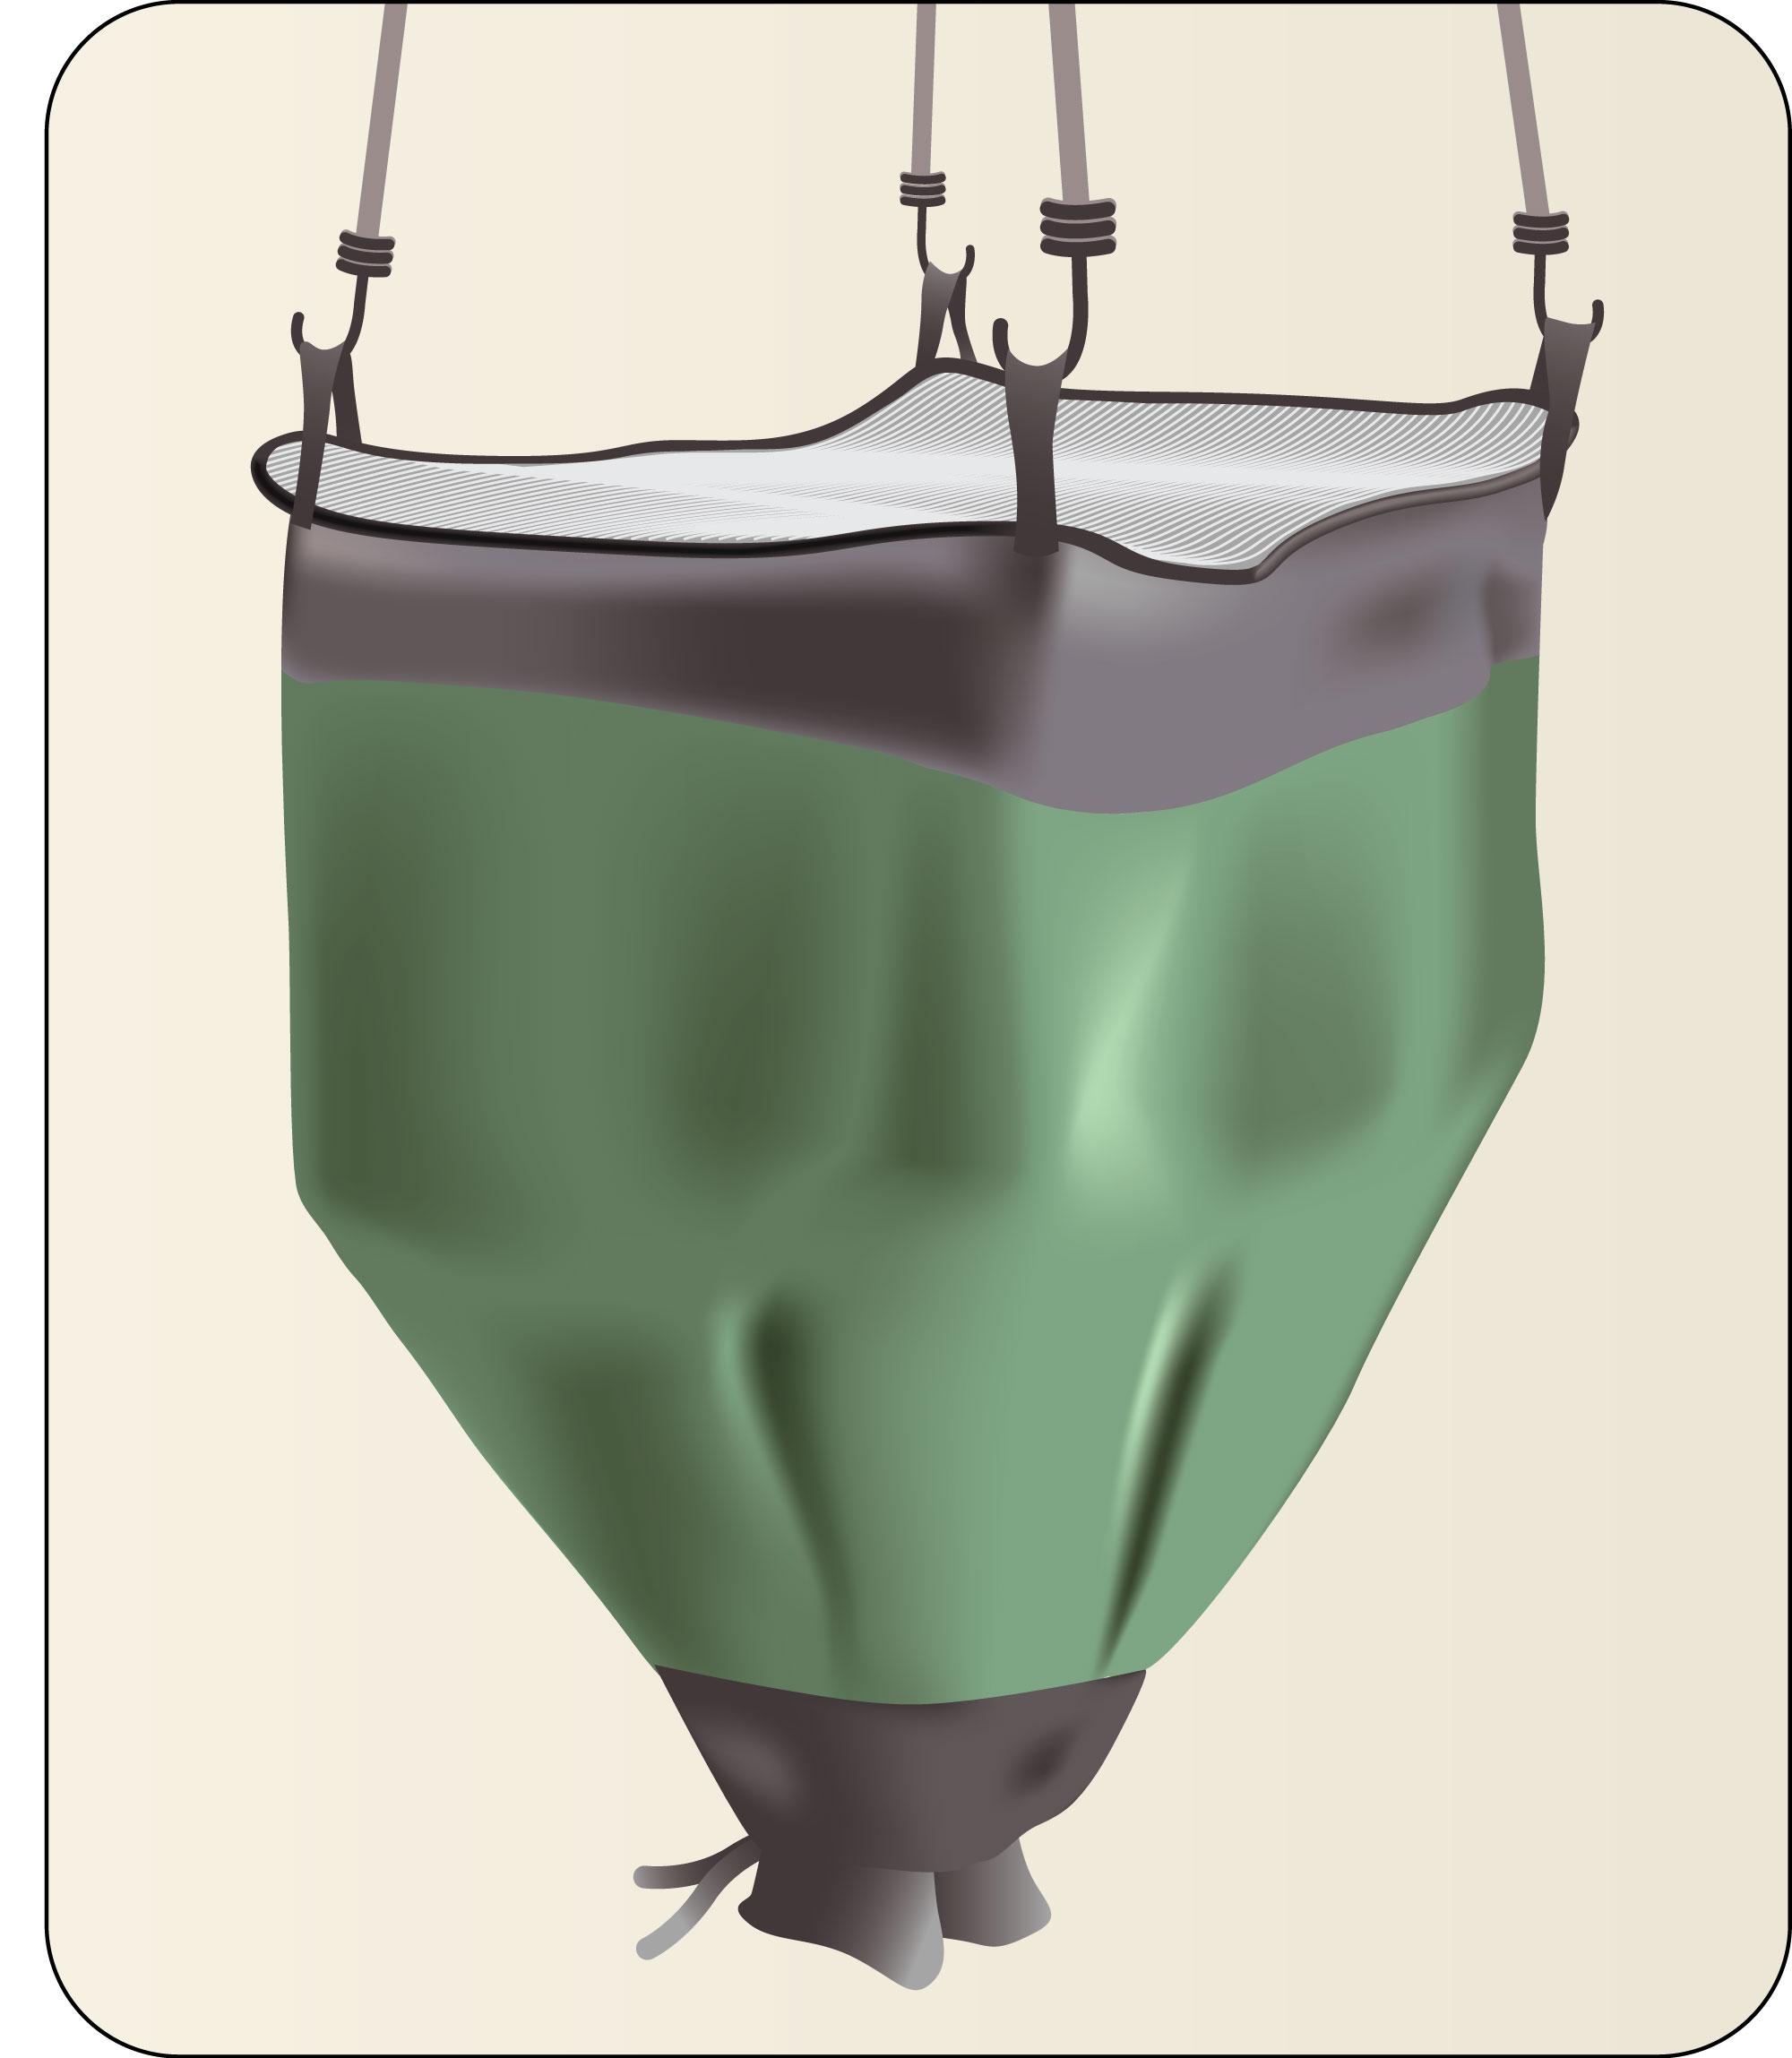
In a continuous-flow vermicaster, fresh waste is added at one end of the process, while finished vermicast is collected from the other. This can happen at opposite ends or opposite heights of a windrow, bin or raised bed (Figure 2). Current industrial vermicasting machinery features mechanized beds where two adjacent moving surfaces cause finished vermicast at the bottom of the bed to fall through its perforated surface, as fresh waste is added at the top. On a domestic scale, the same vertical continuous flow system is used in suspended bags (Figure 3) whereby the user can collect finished vermicast from a closable opening at the bottom of the bag. Fresh waste is added from an opening at the top.
Continuous flow systems
A vermicast system is dynamic. What happens in a typical two-bin system, over time, determines its optimum dimensions, the required starting amount of earthworms, the amount of starting medium required for the earthworms to burrow in and the bin cycle time.
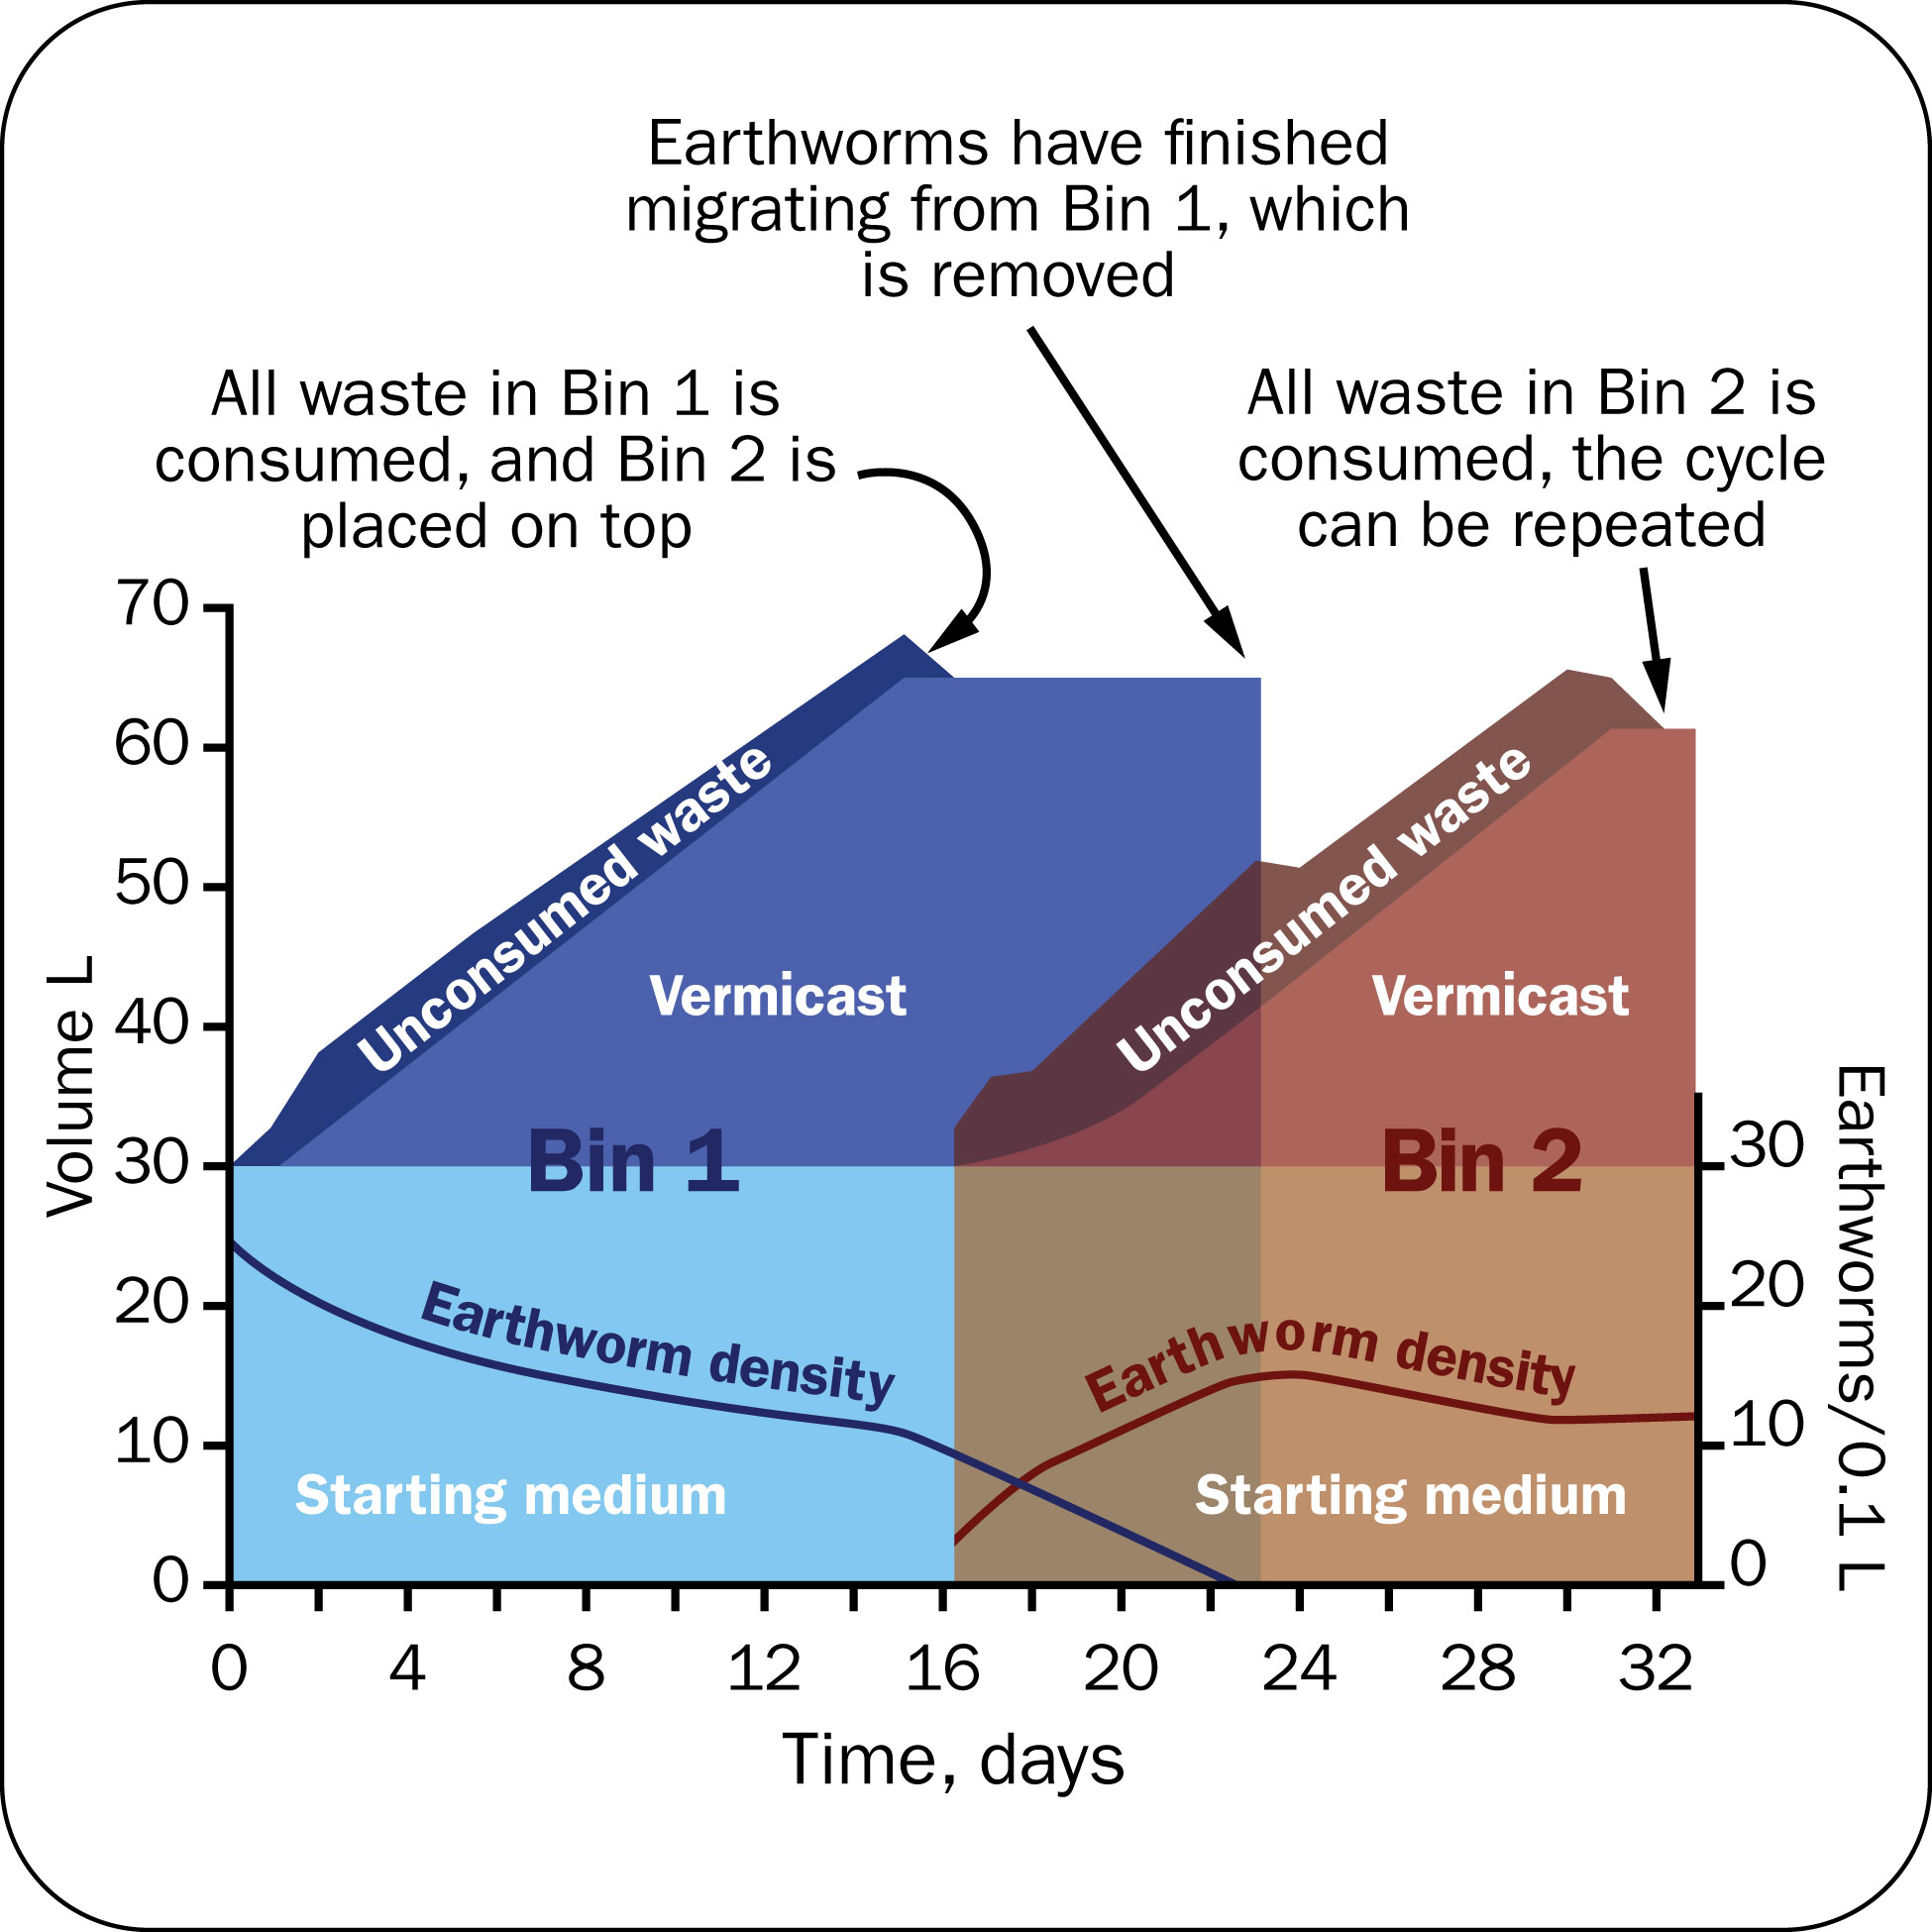
Figure 4 was created using simulation software and shows how much waste is consumed over time, how much volume the waste and earthworm casts take up and how crowded the worms are over time.
- At Day 0, all earthworms are in Bin 1 (blue) where waste is added daily and entirely consumed by Day 16. This is where the unconsumed waste area tapers off in the graph.
- At Day 16, Bin 2 (brown) is placed on top of Bin 1. Bin 2 is partially filled with fresh waste and starting medium, side-by-side, on its 4-mm screened floor in order to attract earthworms from Bin 1 below to burrow up into Bin 2. See Figures 2 (left), 4 and 5.
- All earthworms move into Bin 2 over 1 week, as shown by overlapping earthworm density curves between Days 16 and 23.
- After Day 16, all fresh waste is added daily to Bin 2 and consumed by Day 32.
- The two “dips” in the brown area of unconsumed waste are due to not having waste put into the bin for 2 days out of the cycle, which commonly happens, for example, when people are away from home for a day or two.
- The peak volume values occur on Days 15 and 30 at 68 L (68,000 cm3), which is the minimum bin volume required for one cycle.
- 5 kg of earthworms will consume 30 days’ worth of household waste from a two-person household (3 L/day) over a one-month period.
- 5 kg of earthworms is 7,500 worms at 0.2 g each.
- To prevent worms from being densely packed, divide the number of worms (7,500) by a maximum stocking density of 250 worms/L = 30 L of starting medium required. Finished worm cast works well as a medium and will be needed in each bin. 250 worms/L is high, but drops over time as fresh wastes are added daily.
- Figure 4 shows that 15 days’ worth of waste would be added to the original starting medium of 30 L of casts.
- Since the depth of materials should never exceed 30 cm, while the minimum bin volume must be 68 L (68,000 cm3), a square bin width and length of 50 cm x 50 cm will give more than enough room (30 cm x 50 cm x 50 cm = 75,000 cm3, or 75 L)
The result is a one-month cycle and an easy separation of earthworms from the waste. As shown in Figure 4, the cycle includes points in time where a second bin is added on top of the first and where earthworms finish migrating out of the first bin into the second, allowing finished vermicast to be collected. Online calculators are available to determine time and bin volume requirement for any daily rate of waste. Search online for “vermicasting, optimal bin size.”
A throughput system (Figure 3) would be similar to two superimposed bins, except that earthworms would continuously transition from finished vermicast at the bottom to fresh waste at the top. Based on the graph in Figure 4, 5 L of vermicast could be removed from a throughput system only five days into the process, then about 1 L per day after, assuming an ideal earthworm stocking density. This creates space for more fresh waste.
Example bin design for two-person household
Figure 5 shows a solid container housing two smaller containers built of 4-mm mesh screen, which are propped up to allow air to circulate underneath while keeping waste particles and earthworms inside. Once earthworms transform the contents of the first container, a second one containing 6–10 L of fresh, moist organic material is placed on top of it. Earthworms are allowed to migrate up into the fresh waste before the lower bin of finished vermicast is removed, and the top bin takes its place. Containers can also be placed side by side, with wastes placed horizontally between the tops of the containers to entice worms to move to a new bin.
Separating earthworms from the vermicasts
Earthworms can be separated from their vermicasts by:
- placing fresh feed at the opposite end of the continuous flow system, attracting them away from the finished vermicast
- mechanical sieving by a drum screen or a moving grate at the bottom of a bin or raised bed (Figure 2)
- mild heating
- drying the vermicast materials with a fan in a batch process, diverting worms to moister material
- repelling them by using low-level electric current (this method is in the research stage and requires careful design because of safety concerns)
Conclusion
A properly designed vermicasting system will process organic waste into vermicast in 22–30 days. This process self-aerates and does not require mechanical aeration or mixing. Earthworm beddings commonly used in earthworm bins can be replaced with a screen or mesh raised bottom surface and enough finished vermicast to prevent excessive earthworm stocking density and provide proper drainage. Adequate drainage and aeration prevent odours, flies or the migration of earthworms out of the waste. Vermicasting can be done on a domestic, farm or industrial scale in waste-processing facilities and could be sited near residential areas, minimizing waste and fertilizer transportation costs. When added to plants, vermicast has been shown to improve resistance to disease, yield and protein content of plants relative to other commercial fertilizers.
This Factsheet was written by Hala Chaoui, PhD, Agricultural Engineer, Urban Farms Organic, and reviewed by Hugh W. Fraser, P.Eng., Agricultural Engineer, OMAFRA.