Grain aeration
Learn how to aerate grain and the equipment used in the process. This technical information is for commercial crop producers in Ontario.
ISSN 1198-712X, Published August 2023
Introduction
Aeration is the practice of moving ambient air through stored grain to reduce grain deterioration and prevent storage losses. Aeration is a management tool that is essential to maintaining grain quality in both short-term and long-term storage. Aeration controls the temperature of the bin contents by using ambient air. This fact sheet discusses the method to aerate grain and the equipment used in the process.
The benefits of grain aeration include:
- harvesting a crop that is above a safe moisture content and air drying it to safe storage levels
- starting the harvest earlier to prevent field losses and dry the crop to safe moisture levels
- managing grain in storage to maintain quality
- minimizing storage pests
Purpose of aeration
Grain aeration provides four main functions for farm crops that are stored in bins or silos:
- removes field heat after harvest
- equalizes moisture content of grain throughout the bin
- maintains proper long-term storage temperature
- prevents convective air movement in the grain mass
Remove field heat after harvest
If the storage is filled with a warm or hot grain, problems can occur even if the moisture content is low. High field heat or inadequately cooled grains from a dryer are the two main sources of warm or hot grain. Hot grain will stay hot for a considerable length of time because the air spaces between the kernels insulate the mass and prevent cooling by conduction.
Equalize moisture content within the grain mass
As the storage is filled, the incoming grain will have varying moisture content due to changes in grain maturity, weather conditions and drying fluctuations. Hot, spoiled zones can develop in the bin even though the average condition of the grain may be good. Aeration is the only way to bring all the grain to the same moisture content (Figure 1).
Maintain proper long-term storage temperature
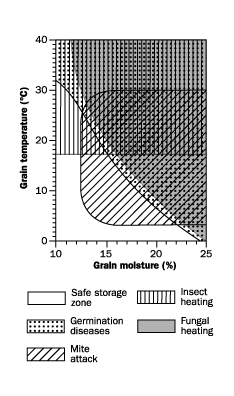
Keeping grain in good condition involves getting the grain to a temperature that is safe for long-term storage. In Figure 2, the lower left section of the graph indicates the grain is cool or cold and dry, which is considered safe for storage. As grain temperature or grain moisture content increases, problems can develop. When grain temperature is above 17°C, there is a risk of insect heating. Insects respond to temperature and become active above this temperature.
Grain with characteristics found in the top right section of Figure 2 (warm or hot and high in moisture) will see a reduction in germination. This is a concern because a kernel that is not viable and able to germinate is dead. Dead organisms do not respire and are more difficult to store long term. Fungi will develop on the dead grain and numerous grain storage pests will feed on the fungi.
Understanding the temperature-to-moisture relationship in Figure 2 is crucial for effective long-term grain storage with minimal problems.
Source: Managing an Aeration System in Your Grain Storage. Farm Information Service, United Grain Growers, Winnipeg.
Prevent convective air movement in the grain mass
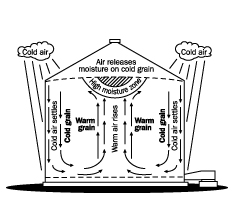
Temperature variations between the grain mass and the average ambient air will allow convective air cells to form. Left unchecked, this uncontrolled air movement can cause moisture migration problems and spoilage. Figure 3 shows a typical fall moisture migration that occurs when ambient temperatures are lower than the grain inside the bin. Keep grain mass temperatures within 5°C of the average weekly outside temperature.
Source: Movement of Natural Air Through Grain. O.H. Friesen & H.P. Harnes. Engineering Section, Manitoba Agriculture.
In the fall, differences in temperature between the stored grain and the outside air will create convective air movement. Air drops through the cold grain along the outside walls and rises through the warm grain in the centre of the bin. As the air rises it warms and picks up moisture from the grain. When the air nears the upper surface, it cools, and the moisture condenses on the grain. A high-moisture area is formed in the top centre of the bin, creating a potential for spoilage.
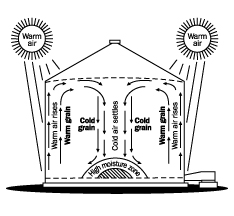
In the spring, the convective air flow moves in the opposite direction (Figure 4) because of a differential between the warmer ambient air and the cold grain. Condensation of moisture provides the right environment for spoilage to occur at the bottom centre of the bin. This is a problem since this area is out of reach for monitoring purposes.
Source: Movement of Natural Air Through Grain. O.H. Friesen & H.P. Harnes. Engineering Section, Manitoba Agriculture.
When to aerate
Aerate grain as soon as possible after placing it into storage. This is especially important if large moisture and/or temperature variations exist or if the whole mass is warm. During the fall, cool the grain to match average ambient temperatures. Begin aeration whenever there is more than a 5°C difference between the average outside air temperatures and the grain in the bin. Continue cooling in stages into the winter until the grain is frozen. During spring, warming of the grain is necessary if extended storage (after June) is required. If needed, start the aeration as soon as the average outside temperature is 5°C–7°C higher than the grain temperature. Do not rush to follow average ambient temperatures through the spring and summer months. Remember that insect activity increases with grain temperatures above 17°C (Figure 5). One suggestion is to try to maintain bin temperatures close to the average nighttime temperatures during warm months. Shorten the bin monitoring schedule during these warm months to every 2 weeks.
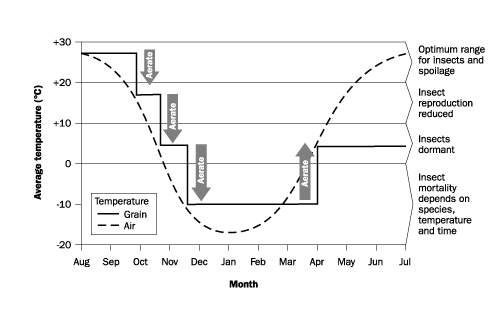
Source: Adapted from Dr. Kenneth Helevang, P. Eng., North Dakota State University Extension Service.
Carefully choose when to run the fans for aerating beans or cereals to avoid adding moisture to the stored crop. Beans and cereals can easily take on moisture when aerated under humid conditions. Follow the equilibrium moisture charts for the crops stored. Invest in an accurate device to measure relative humidity to help determine fan run times.
Equilibrium moisture charts
When grain is aerated with air at a certain temperature and humidity, the grain moisture level will eventually reach a state of equilibrium with the environment. In other words, the outdoor air conditions during aeration will impact the final moisture content of the grain. This is the Equilibrium Moisture Content (EMC), and it differs for every grain type. EMC has been tabulated for numerous grains in equilibrium moisture charts, which are readily available both online and in print. Look up the outdoor air temperature and humidity on the chart for a specific grain to identify the moisture level the grain will reach when aerated at those conditions.
Use these charts to determine when to aerate based on outdoor air conditions. Aerate grain when the EMC is low and avoid aeration when the EMC is high due to risk of re-wetting the grain. Online tools are available that provide a weather forecast correlated to the EMC for specific grains, such as Weather Central’s BinCAST.
How to aerate
Time required for aeration
Aeration cools or warms grain similar to the way a bin dryer dries grain through a drying front. An aeration front moves up through the grain mass. Table 1 shows the time it takes for the aeration front to completely move through the grain. This time depends on the air-flow rate per unit of grain or L/sec/m3 (cfm/bu) and whether cooling in fall, winter or spring.
| Air-flow rate | Grain cooling during fall | Grain cooling during winter | Grain cooling during spring |
|---|---|---|---|
| 0.65 L/s/m3 (1⁄20 cfm/bu) | 300 hours | 400 hours | 240 hours |
| 1.3 L/s/m3 (1⁄10 cfm/bu) | 150 hours | 200 hours | 120 hours |
| 2.6 L/s/m3 (1⁄5 cfm/bu) | 75 hours | 100 hours | 60 hours |
| 3.2 L/s/m3 (1⁄4 cfm/bu) | 60 hours | 80 hours | 48 hours |
| 4.3 L/s/m3 (1⁄3 cfm/bu) | 45 hours | 61 hours | 36 hours |
| 6.5 L/s/m3 (1⁄2 cfm/bu) | 30 hours | 40 hours | 24 hours |
| 9.7 L/s/m3 (3⁄4 cfm/bu) | 20 hours | 27 hours | 16 hours |
| 13.0 L/s/m3 (1 cfm/bu) | 15 hours | 20 hours | 12 hours |
Aeration air-flow rates
For corn that has been dried using heat, continue aeration even through high-humidity periods until the aeration front has moved completely through the grain mass. However, once the first front is through, the grain will be relatively uniform and continued aeration will create a new front.
Normal aeration air-flow rates for storage bins have a range of 1–2 L/s/m3 (0.08–0.16 cfm/bu). Use higher rates (2–6 L/s/m3 (0.16–0.5 cfm/bu)) if grain is stored at higher moisture levels or if hot grain from a dryer is being cooled in a bin.
Aeration requirements will differ depending on the use of the bin. Ensure that the company designing the aeration system is fully aware of the various uses of that bin. Specify the aeration requirements, fan type and size, and the system for these possible uses:
- storage bin
- drying bin
- cooling bin
- hopper bottom bin
- flat storage
An aeration system will not work as a drying system if the bin is full. Natural air drying requires considerably higher air-flow rates (up to 10 times higher) than typical aeration systems.
Preparing grain for aeration
Fines, weed seeds and other foreign materials will adversely affect aeration, especially if these materials are concentrated in one location. Since aeration uses low air-flow rates, any increased resistance will have a large effect on air-flow patterns through the grain mass. As a result, it will take a much longer time to move the aeration front through an area containing a lot of fines. Air always takes the path of least resistance, so it will go around areas of concentrated fines. Areas that are not aerated because air cannot move through them could start to spoil. Make an effort to have stored grain cleaned to remove fines and other materials. Since this is not always possible, core the bins after they are filled. Coring the bin removes the majority of fines accumulated in the centre of the bin. Ideally, sell or feed this material to livestock. A second option is to clean the cored material and put it back in the bin. A third option is to put the cored material right back in the same bin (without cleaning). This last method still has some merit in that it moves most of the material containing fines and redistributes them when they are put back into the bin. The centre now has reduced resistance to air flow but this is not as effective as the first 2 options.
Ways to increase aeration success:
- Clean grain before placing it in storage.
- Minimize the velocity of grain entering the storage to avoid breakage.
- Spread grain (including fines) as uniformly as possible across the whole bin. The fines mixed in the grain will still cause a higher resistance to air flow.
- Core the bin to remove accumulated fines in the centre. The removed centre core is again filled with clean grain.
- Make sure aeration fronts make it through all the grain. Aerating for a longer period of time, increasing fan size or decreasing grain depth might be necessary if the aeration front stalls.
Monitoring stored grain
To properly manage stored grain, the operator should measure temperatures of the grain throughout the bin, especially at the last location of the aeration front. On smaller bins, probes work quite effectively. With larger bins, a remote monitoring system using temperature sensors is often necessary.
Monitor stored grain routinely to evaluate its condition and to notice any problems that are developing. Through the cold months, the monitoring interval can stretch to every 4–6 weeks. During warm months, monitor monthly, or preferably, every 2 weeks. When checking bins, use your eyes and your nose to “see” problems.
Monitor bins for the following:
- Check the visual appearance of the grain. It should look bright not dusty or dull.
- Look for moisture on the underside of the roof. Signs of moisture indicate air movement in the bin.
- With the fan running, take a deep breath of the exhaust air. It should smell sweet. Musty odours require immediate corrective action.
- Check exhaust air temperature as it exits the bin.
- Look for signs of insects or insect activity in the stored grain.
- Note depth of grain in the bin.
- Measure static pressure of the running fan and make note in farm records.
If the operator has to enter the bin for monitoring, ensure safety measures are taken:
- Always wear a 5-point safety harness when entering bins.
- Never enter a bin that is being unloaded.
- Lock-out and tag-out unloading equipment before entering a bin.
- Never enter a bin alone. Always work in teams with the second person acting as a spotter and calling for help if necessary.
- If part of the bin has been unloaded, beware of bridged grain that could hide a cavity.
- Install ladders and safety anchors in the bins to allow easy and safe access. Use a safety line and lanyard if the operator leaves the ladder.
- Develop entry protocols for each and every bin. This is a written step-by-step procedure that everyone follows.
Aeration systems
There are different types of aeration systems commonly used in grain storage bins. For large-diameter storages, a more complex system is required. With these larger storage bins, single fans are sometimes not suitable, so multiple fans are required to move sufficient air. Round bins use one of the following systems:
- single perforated duct
- cross, Y or T-duct
- full floor aeration
- flush floor system
Some of these systems are located above or below floor level. Above-the-floor systems are normally easier to clean and inexpensive. Under-floor systems allow a sweep auger to rotate without obstruction, greatly reducing labour requirements.
Rectangular storages use one or more parallel ducts located above or below floor level.
Design of aeration duct systems
Table 2 is a system-sizing guideline used to design the aeration duct system.
To size the aeration duct system:
- Determine the amount of bin storage in m3.
- Choose a desired aeration air-flow rate in L/s/m3.
- Determine total air flow: (amount of bin storage) × (air-flow rate) in L/s.
- From Table 2, find the minimum duct area (m2), minimum floor area (m2) and minimum roof vent area (m2).
- Design the system using components that meet or exceed the above minimums.
| Air flow | Minimum cross-sectional duct area | Minimum perforated floor area | Minimum roof vent area |
|---|---|---|---|
| 250 L/s | 0.03 m2 | 2.5 m2 | 0.05 m2 |
| 500 L/s | 0.07 m2 | 5.0 m2 | 0.10 m2 |
| 750 L/s | 0.10 m2 | 7.5 m2 | 0.15 m2 |
| 1,000 L/s | 0.13 m2 | 10.0 m2 | 0.20 m2 |
| 1,250 L/s | 0.17 m2 | 12.5 m2 | 0.25 m2 |
| 1,500 L/s | 0.20 m2 | 15.0 m2 | 0.30 m2 |
| 1,750 L/s | 0.23 m2 | 17.5 m2 | 0.35 m2 |
| 2,000 L/s | 0.27 m2 | 20.0 m2 | 0.40 m2 |
| 2,250 L/s | 0.30 m2 | 22.5 m2 | 0.45 m2 |
| 2,500 L/s | 0.33 m2 | 25.0 m2 | 0.50 m2 |
| 3,000 L/s | 0.40 m2 | 30.0 m2 | 0.60 m2 |
| 3,500 L/s | 0.47 m2 | 35.0 m2 | 0.70 m2 |
| 4,000 L/s | 0.53 m2 | 40.0 m2 | 0.80 m2 |
| 4,500 L/s | 0.60 m2 | 45.0 m2 | 0.90 m2 |
| 5,000 L/s | 0.67 m2 | 50.0 m2 | 1.00 m2 |
| 5,500 L/s | 0.73 m2 | 55.0 m2 | 1.10 m2 |
| 6,000 L/s | 0.80 m2 | 60.0 m2 | 1.20 m2 |
| 6,500 L/s | 0.87 m2 | 65.0 m2 | 1.30 m2 |
| 7,000 L/s | 0.93 m2 | 70.0 m2 | 1.40 m2 |
| 7,500 L/s | 1.00 m2 | 75.0 m2 | 1.50 m2 |
| 8,000 L/s | 1.07 m2 | 80.0 m2 | 1.60 m2 |
| 8,500 L/s | 1.13 m2 | 85.0 m2 | 1.70 m2 |
| 9,000 L/s | 1.20 m2 | 90.0 m2 | 1.80 m2 |
| 9,500 L/s | 1.27 m2 | 95.0 m2 | 1.90 m2 |
| 10,000 L/s | 1.33 m2 | 100.0 m2 | 2.00 m2 |
Source: Movement of Natural Air Through Grain. O.H. Friesen & H.P. Harnes. Engineering Section, Manitoba Agriculture.
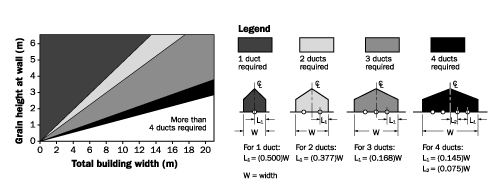
Another factor to consider is the variation in the distance that aeration air must travel through the grain. This is especially true with rectangular storages. A good guideline to follow is to keep the longest air path from the duct to the grain surface no more than 1.5 times the shortest air path. Figure 6 shows the number and location of ducts required in a rectangular building.
Source: Movement of Natural Air Through Grain. O.H. Friesen & H.P. Harnes. Engineering Section, Manitoba Agriculture.
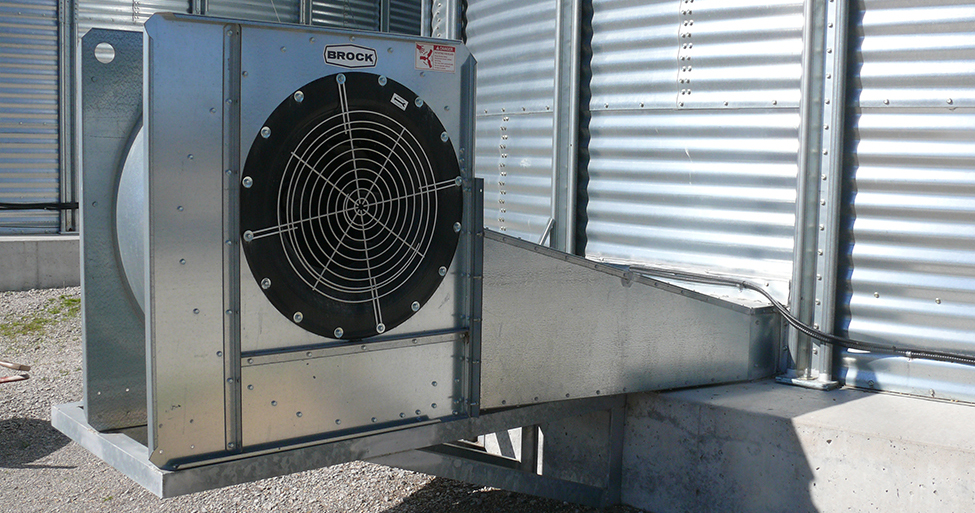
Selection of aeration fans
Aeration fans are available in many styles and sizes from a number of manufacturers. Not all fans are suitable for all jobs: the amount of noise produced by various fans will vary, and each fan has a unique air-moving ability, described in its fan performance curve, which shows the output of the fan in m3/min (ft3/min) at various static pressures. Figure 7 illustrates the fan performance curve for some common fan sizes.
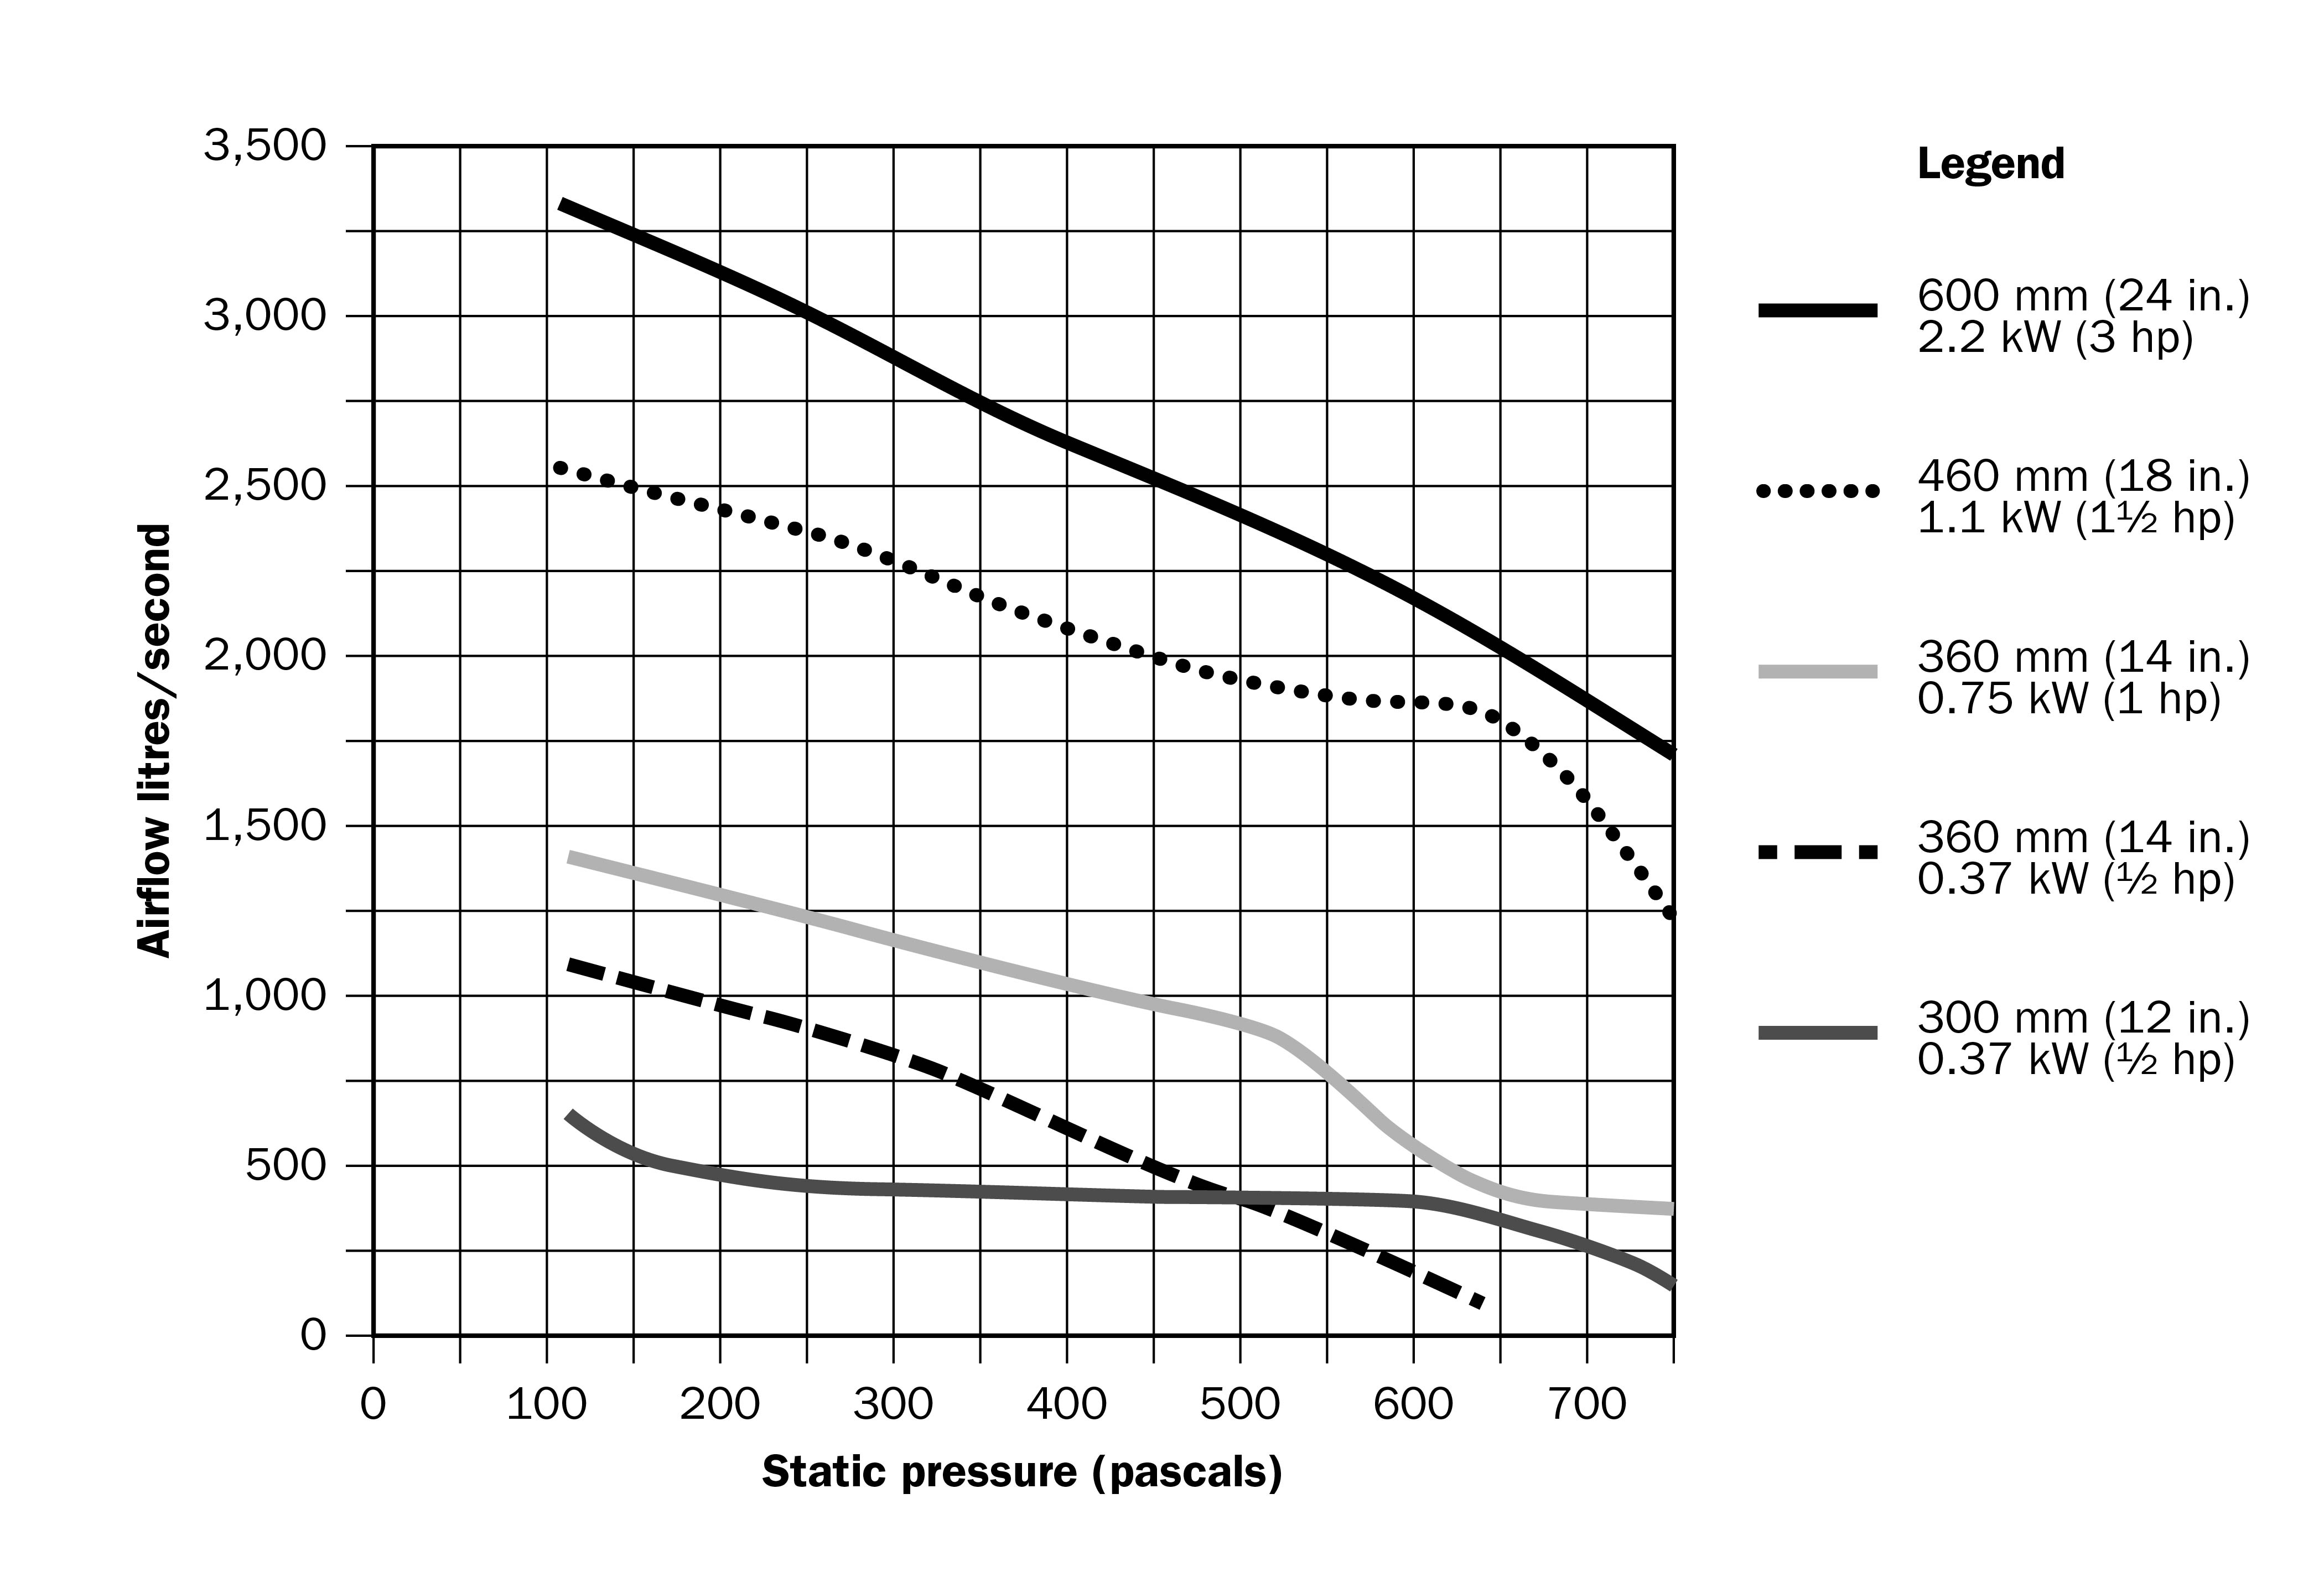
Static pressure is a measure of the pressure that the fan is working against, measured in pascals (Pa) or inches of water column (in. W.C.). Static pressure (Table 3) is affected by seed or kernel size; pore space size; depth of grain; and amount of air moved in m3/min/bu (cfm/bu).
| Grain stores | Grain depth | Aeration rate 2.6 L/s/m3 (0.2 cfm/bu) | Aeration rate 1.3 L/s/m3 (0.1 cfm/bu) | Aeration rate 0.65 L/s/m3 (0.05 cfm/bu) |
|---|---|---|---|---|
| Corn and soybeans | 3 m (10 ft) | 125 Pa (0.5 in. W.C.) | 110 Pa (0.45 in. W.C.) | 100 Pa (0.4 in. W.C.) |
| Corn and soybeans | 4.5 m (15 ft) | 150 Pa (0.6 in. W.C.) | 140 Pa (0.55 in. W.C.) | 125 Pa (0.5 in. W.C.) |
| Corn and soybeans | 6 m (20 ft) | 190 Pa (0.75 in. W.C.) | 160 Pa (0.65 in. W.C.) | 140 Pa (0.55 in. W.C.) |
| Corn and soybeans | 7.5 m (25 ft) | 250 Pa (1.0 in. W.C.) | 200 Pa (0.8 in. W.C.) | 160 Pa (0.65 in. W.C.) |
| Wheat, oats and sorghum | 3 m (10 ft) | 290 Pa (1.15 in. W.C.) | 250 Pa (1.0 in. W.C.) | 240 Pa (0.95 in. W.C.) |
| Wheat, oats and sorghum | 4.5 m (15 ft) | 380 Pa (1.5 in. W.C.) | 310 Pa (1.25 in. W.C.) | 260 Pa (1.05 in. W.C.) |
| Wheat, oats and sorghum | 6 m (20 ft) | 540 Pa (2.15 in. W.C.) | 400 Pa (1.6 in. W.C.) | 300 Pa (1.2 in. W.C.) |
| Wheat, oats and sorghum | 7.5 m (25 ft) | 750 Pa (3.0 in. W.C.) | 510 Pa (2.05 in. W.C.) | 360 Pa (1.45 in. W.C.) |
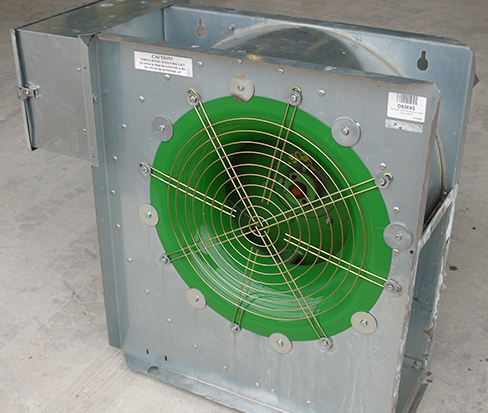
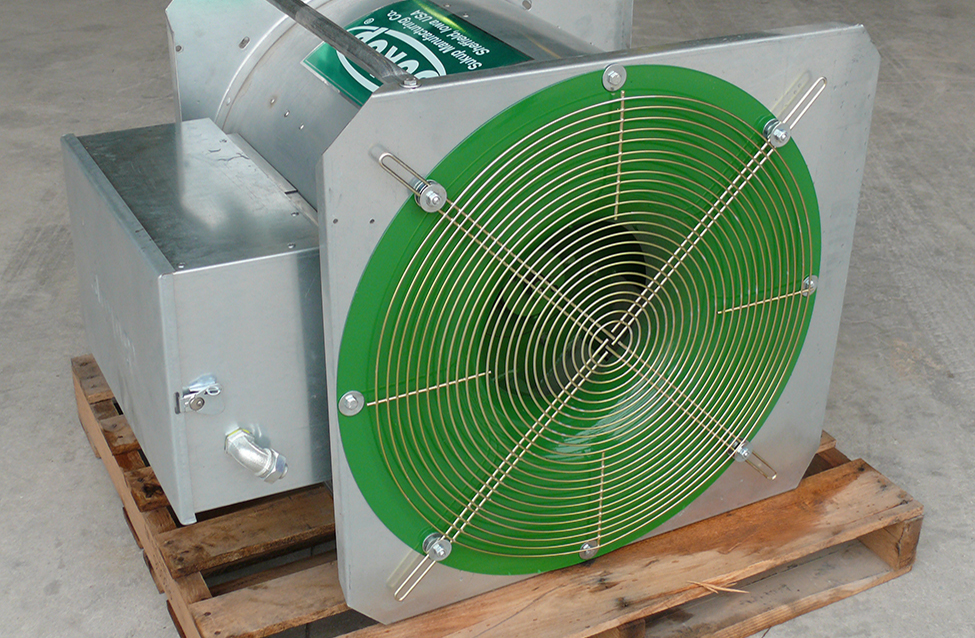
Types of aeration fans
Axial fan
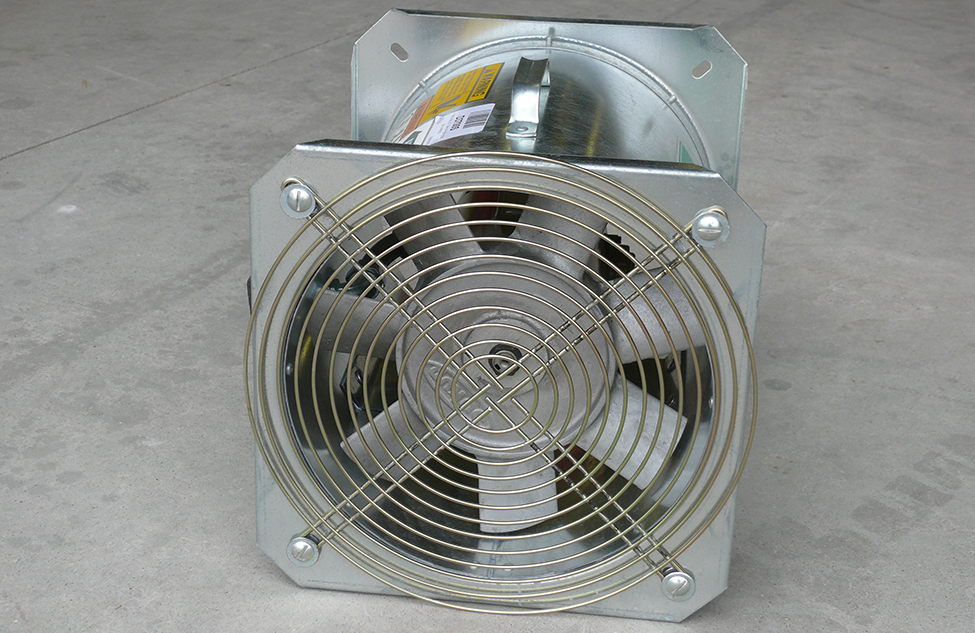
- 3,500 RPM
- suited to applications with low static pressures, 750 Pa (3 in. W.C.) or less
- uses a hub with multiple blades to move air in an axial direction through a cylindrical housing
- typically high flow and low pressure
- noisier than centrifugal fans
Low-speed centrifugal fan
- 1,750 RPM
- medium static pressure capability, up to 2,500 Pa (10 in. W.C.)
- quieter than axial fans
- fan housing greater than 1 m2 (4 ft2)
- air enters fan axially and discharges perpendicular to the fan axis
- motor is outside the fan housing
High-speed centrifugal fan
- 3,500 RPM
- high static pressure capability, up to 5,000 Pa (20 in. W.C.)
- suited to deep grain depths such as found in silos
- fan housing less than 1 m2 (3 ft2)
- fan wheel less than 10 cm (4 in.) wide
- air enters fan axially and discharges perpendicular to the fan axis
- motor is outside the fan housing
In-line centrifugal fan
- 3,500 RPM
- static pressure capability up to 2,500 Pa (10 in. W.C.)
- fan wheel attached to an air over motor
- end air inlet moving air through a cylindrical housing
- applicable where vane axial fans start to fall short
Fan venting requirements
Install vents on the bin roof to allow exhaust air to exit while not adding undue static pressure to the fan. Increases in static pressure will always result in reduced fan performance. Ensure there are sufficient vents to allow air to exit the bin. A general rule of thumb is to allow 0.1 m2 of unobstructed exhaust vent for every 470 L/s of fan output (1 ft2 of unobstructed exhaust vent for every 1,000 CFM). Place multiple vents uniformly around the roof.
Vent placement
For bins less than 14.6 m (48 ft) in diameter:
- Place one ring of vents as high up the roof as possible.
- Space vents uniformly around the roof.
For bins 14.6 m (48 ft) and larger in diameter:
- May need multiple rings of vents.
- Place bottom ring no closer than 2 m (6 ft) from eave, leave odd number of sheets between vents.
- Space top ring of vents as close to the peak as possible.
- Place middle ring (if needed) mid-way up the roof, centred between bottom ring vents.
Powered roof ventilators
Powered roof ventilators are designed to move large amounts of air from the attic space of a bin. These fans are sized to move up to 2.5 times more air than the aeration fans at the bottom of the bin. This unbalanced air flow is intentional so that the roof ventilator “washes” the underside of the roof with air, thereby preventing moisture condensation on the underside. Place powered roof ventilators as high up the bin roof as possible. This roof fan should have a separate control from the other fan(s) on the bin. Ensure roof vents are sized and located properly to handle the air flow of the powered roof ventilators.
Siting considerations regarding noise
Fans produce noise when operating. The style, size and placement of the fan also contribute to the amount of noise produced. Fan selection and careful fan placement can reduce undesirable noise concerns. Get information from the equipment dealer to help in siting fans so as not to disrupt neighbours.
These 7 best management practices relate directly to noise nuisance from grain dryer and aeration fans:
- Use centrifugal fans with the lowest possible sound levels instead of axial flow fans. Get information from the fan manufacturer for sound levels produced by specific fans.
- Angle fans away from neighbours.
- Account for sound waves travelling farther from dryers with the fan/burner mounted high above ground.
- Place dryers and fans in areas that use existing structures to shield or mask the sound.
- Minimize night-time operation, whenever possible.
- Install silencers where practical. Silencers are custom-designed and tuned to the distinct frequency character of a noise. A good example is a car muffler. Reactive silencers are sometimes available from the original manufacturer of the grain-drying equipment.
- Minimize sounds associated with grain drying and handling: chatter from grains moving in augers, pneumatic transfer pipes, drying and cooling aeration fans.
Summary
Many components have to work together to make an effective aeration system. Adequate-sized fans and the right type of fans are needed to move air through the crops being stored. Sufficient and well-placed roof exhaust vents let air exit the bin unrestricted. Management of the aeration system and routine monitoring of the crop are the last two critical components to successful long-term grain storage. The benefits of grain aeration allow for starting the harvest earlier to prevent field losses and dry the crop to safe moisture levels. Aeration can be used to manage grain in storage to maintain quality and minimize damage from storage pests. The benefits of properly aerated grain will result in longer storage times and a higher-quality product.
This fact sheet was revised by Helmut Spieser (retired), P. Eng., field crop conditioning and environment; Steve Clarke (retired), P. Eng., energy and crop systems, Ministry of Agriculture, Food and Rural Affairs (OMAFRA), Jason Deveau, application tech specialist, OMAFRA, James Dyck, P. Eng., crop systems and environment, OMAFRA and Ralph Winfield, P. Eng., Belmont, Ontario.