Planning and building a goat milk house
Learn how to plan and build a milk house. This technical information is for Ontario dairy goat farmers.
ISSN 1198-712X, Published July 2023
Introduction
This publication summarizes the guidelines for planning and building a milk house to meet regulations under the Milk Act, 1990. It provides information on industry best management practices. These guidelines also help with designing a work space that allows the milk producer and bulk tank milk grader (BTMG, also known as the milk truck driver) to perform their work with efficiency and convenience. Whether or not the milk house satisfies all these needs depends on its location, size, design and construction.
Planning your milk house
The general state of the farm premises is important for producing a safe, wholesome, natural food product. A neat, well-planned milk house plays a particularly important role in producing a high‑quality product and helps to maintain a credible image of the dairy industry.
Meet with your building contractor, dairy equipment specialist and Ministry of Agriculture, Food and Rural Affairs (OMAFRA) raw milk quality program coordinator (refer to the contact information at the end of this fact sheet) to discuss requirements and review plans for constructing your milk house and parlour. In the planning process, dairy equipment specialists will be able to provide you with information on the different system options and layout. The system you choose will determine space requirements and the size of parlour and milk house you will need. Early engagement with the raw milk quality program coordinator will ensure regulatory requirements are clearly understood before construction begins.
Building permits will be required prior to any construction of milk houses, barns or milking centre washwater storage and treatment systems. Building permits trigger the need for a new or updated nutrient management strategy and plan depending on the size of the operation (number of nutrient units). Milk house and parlour construction plans must be approved by the OMAFRA raw milk quality program coordinator or a food safety inspector before construction starts. Allow yourself adequate time (several months) to obtain the necessary approvals before the anticipated construction date. For more information on nutrient management strategies and plans refer to the OMAFRA nutrient management strategies website.
When planning, consider whether you will include a washroom, utility room, an office or additional storage room.
When a milk house is provided with a washroom, the washroom must be located and maintained so that it does not create a potential source of contamination for the milk or equipment. If considering a washroom, discuss wastewater disposal options with your local municipality.
Constructing a separate utility room for housing vacuum pump equipment, the hot water tank and refrigeration equipment for milk cooling provides benefits for the milk house working environment.
A separate office space allows better organization and storage of farm records. A separate storage space may also be useful for things such as cleaning supplies and medications. Consider all your activities and needs related to the milking operation when planning your layout.
The National Farm Building Code (as referenced in the Ontario Building Code, Building Code Act, 1992) is the main regulation that governs farm building construction in Ontario. For all agricultural construction projects, the farm owner is responsible for obtaining a building permit. Contact your local municipality.
For more information on necessary approvals for building or renovating, refer to Building permit requirements to construct, expand or renovate farm buildings.
Purpose of the milk house
The main function of a milk house is to provide a separate sanitary area for:
- cooling and storing milk
- washing, sanitizing and storing equipment that comes in contact with milk
- protecting milk from dust, dirt, barn odours and pests
Plan for the future
A carefully planned milk house should serve most dairy farms adequately into the future. It is often more economical and convenient to plan one that will meet expansion requirements rather than trying to remodel or incorporate changes over time.
When planning your milk house, consider the changes you may want to make in the future. For example:
- installing a bigger or second bulk tank
- expanding or remodelling the milking parlour
- changing the location of the milking parlour
- installing a milk pipeline system
- adding other buildings to the farmstead (kid barn, machinery storage)
Location
Many factors influence the selection of a suitable location for a milk house. When choosing a site for your milk house, acknowledge the possibility of expansion or diversification. One method of doing this is to consider future changes, including possible housing alterations and additions, location of new silos and feed room and location of milking parlour.
The following considerations are extremely important and should be used as a guide in choosing the site for this new structure:
- Locate near or adjacent to where goats are milked: The milk house can be built inside or outside of an existing structure; however it must be attached or adjacent to buildings where animals are milked. Where it is located depends on many factors. Consider the financial and labour costs when deciding on whether to renovate an existing structure versus building it new. Items such as insulation, rodent control, ventilation and plumbing are often less expensive in new constructions and can usually be completed in a shorter time frame. Locate the milk house away from the manure storage area, silos and feed room to minimize odours, dust and pests.
- Locate close to milking area: Select a site close to the milking area, to reduce walking distance to and from the milk house, to simplify installation of milking equipment and reduce the amount of milk pipeline that must be cleaned and sanitized.
- Ensure good drainage: Good surface drainage of the building site is essential. If the preferred site is low, build it up by installing fill so that surface water drains away from the building.
- Provide easy access for trucks: Select a site that is easy to access for milk trucks and deliveries of supplies.
- Construct a proper laneway: The lane leading from the road to the milk house must be constructed with a solid base material and covered by a layer of gravel (at least 15 cm (6 in.) thick is recommended) to provide adequate drainage for all-season trucking. Use galvanized steel piping for connecting drains or culverts under the roadway. Also, consider how snow will be removed to allow milk pick-up in the winter weather. Consult with your milk marketer regarding additional requirements for farmyards and lanes.
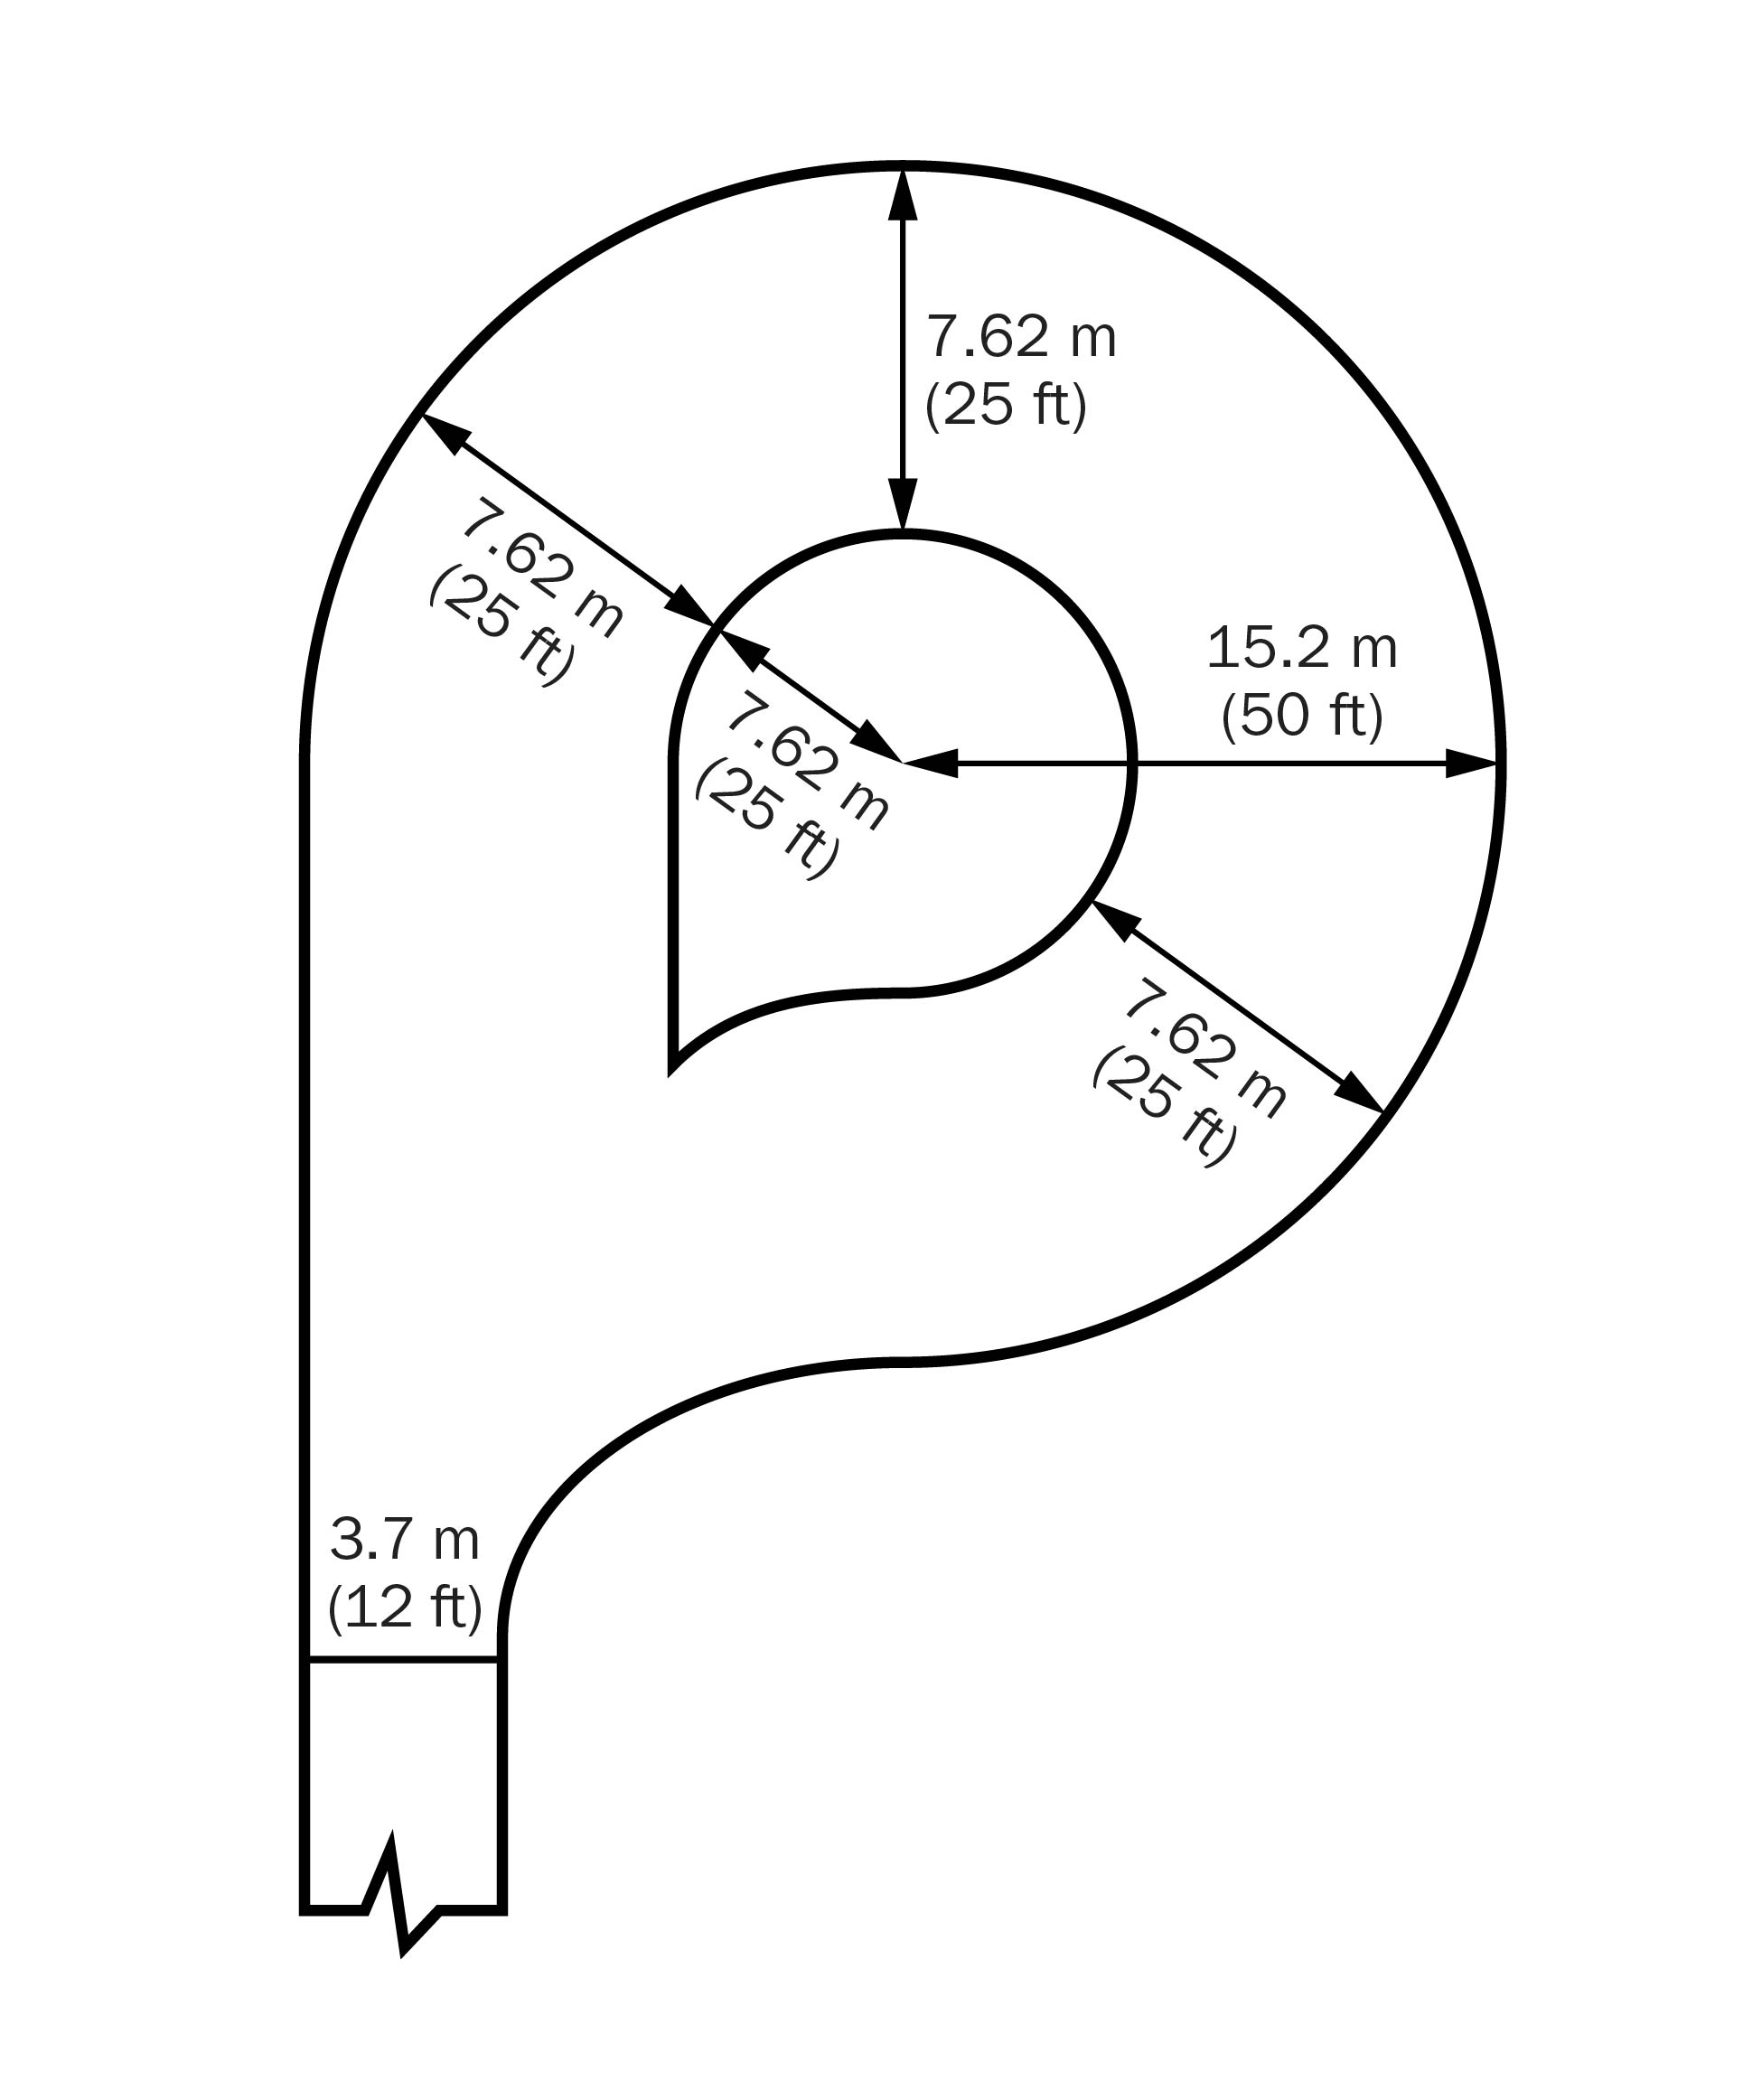
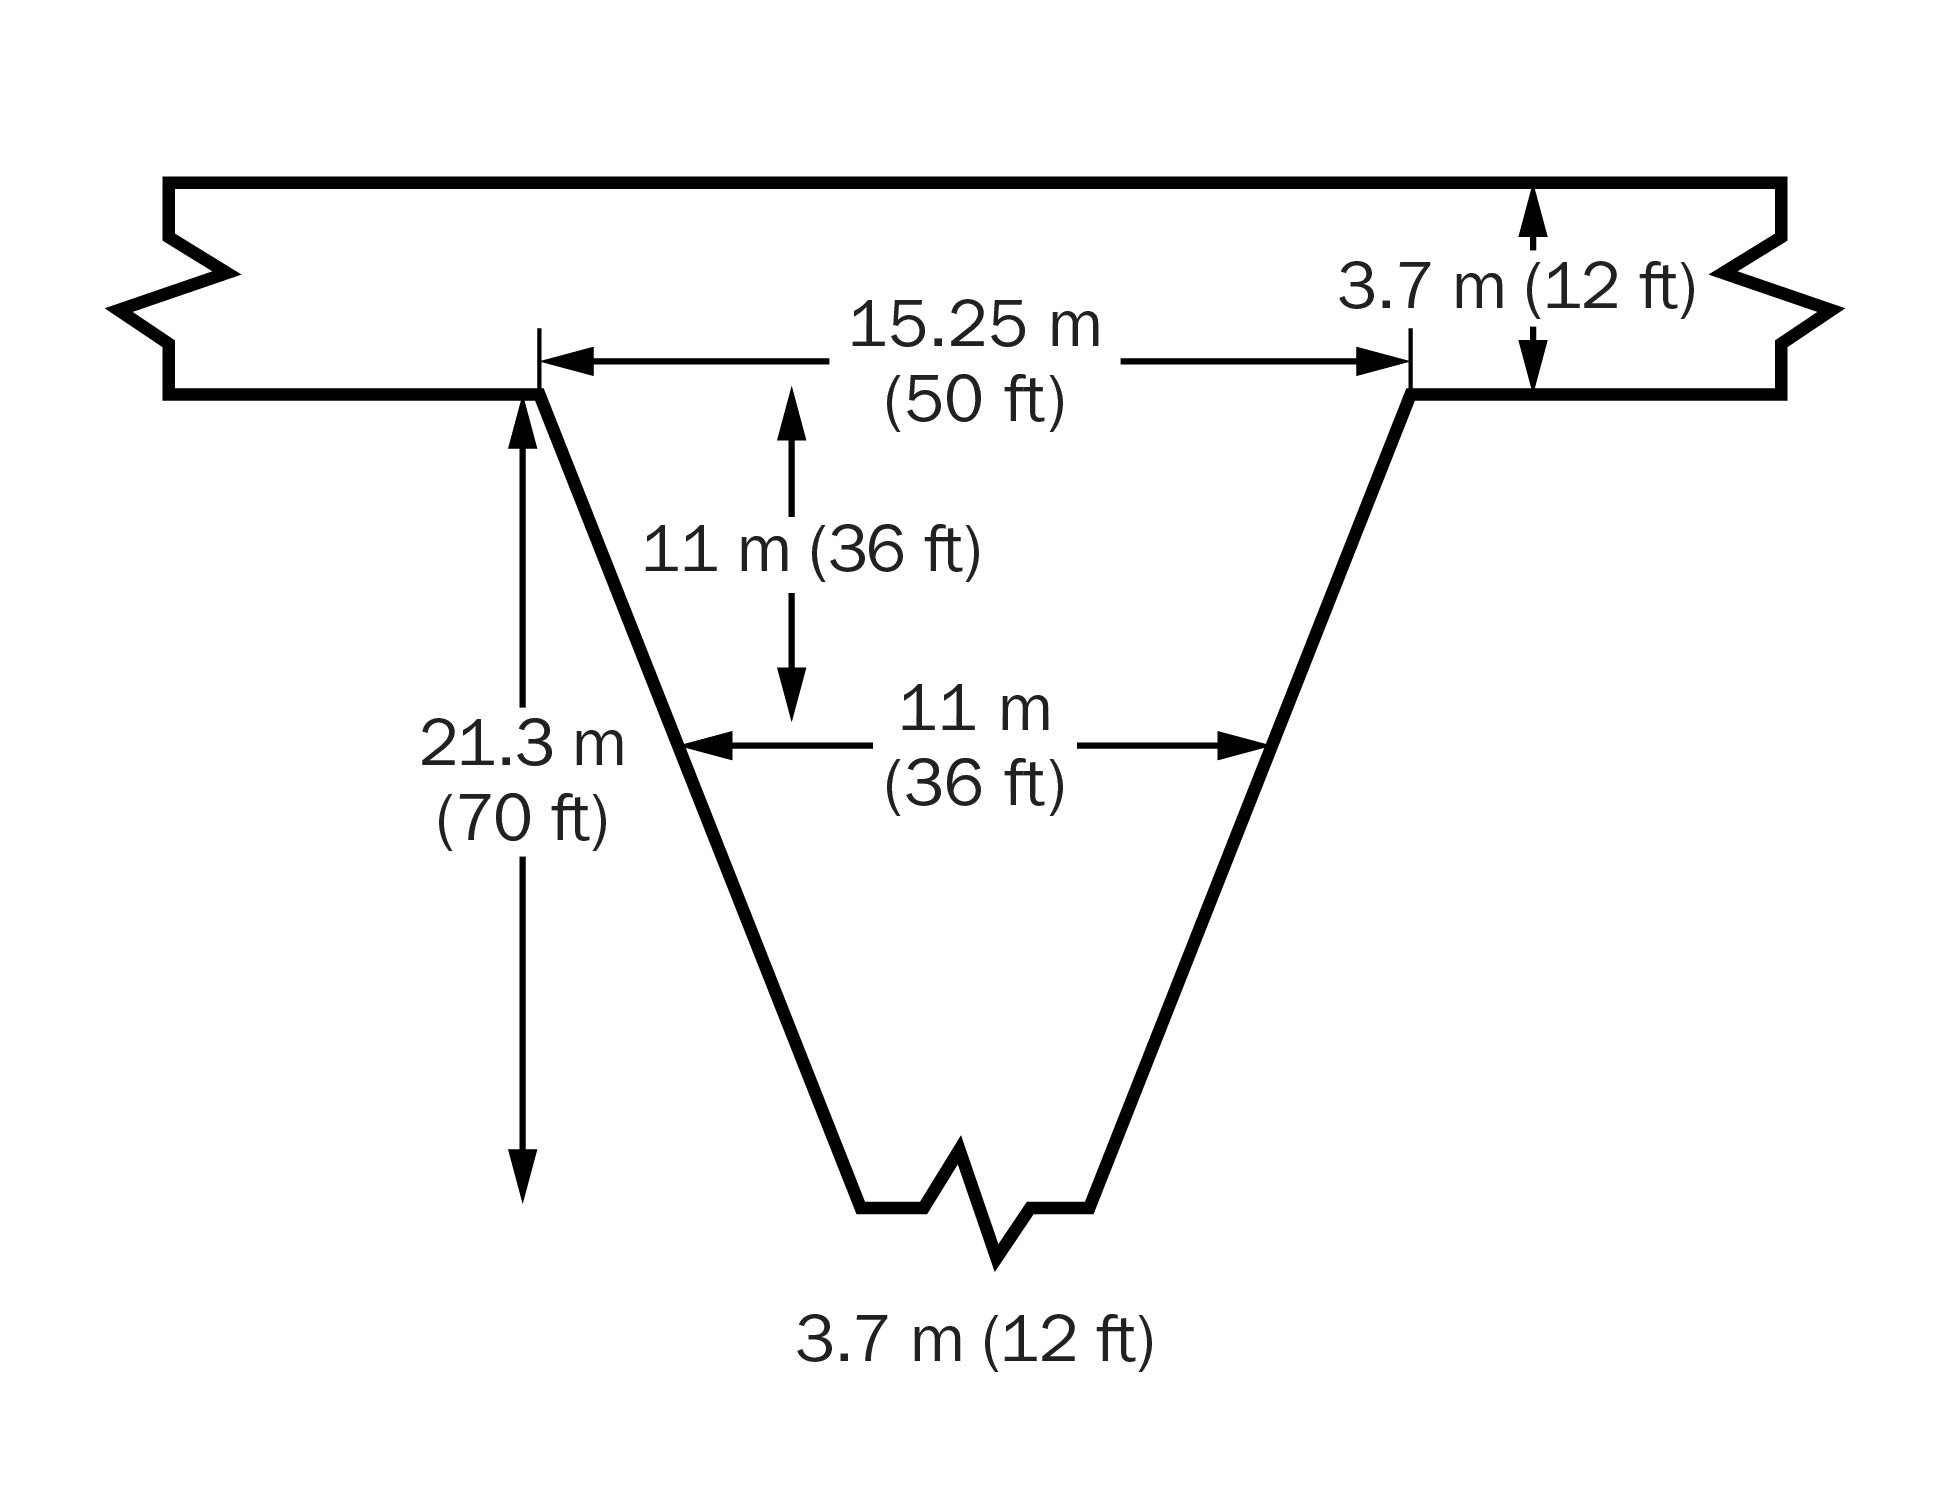
- Design a proper laneway: For safety reasons, milk trucks must not back off the highway to reach your milk house. They must drive up the laneway. A circular turnaround (Figure 1) or a large Y-type (3-point) turning area are acceptable (Figure 2).
- Provide level loading area: The truck loading area must be reasonably level and well drained. Make sure that the milk house entrance is convenient for the BTMG. Consider sheltering the entrance and access to the hose port from the weather with a roof projection and/or a proper eavestrough. A concrete or wooden wheel curb, 2–3 m (7–10 ft) from the milk house, protects both truck and building from damage when the truck backs in to load.
Size
A good milk house provides space for:
- a bulk tank with at least 60 cm (24 in.) of space between the tank and the walls or fixed objects to allow for cleaning, transfer of milk and inspection
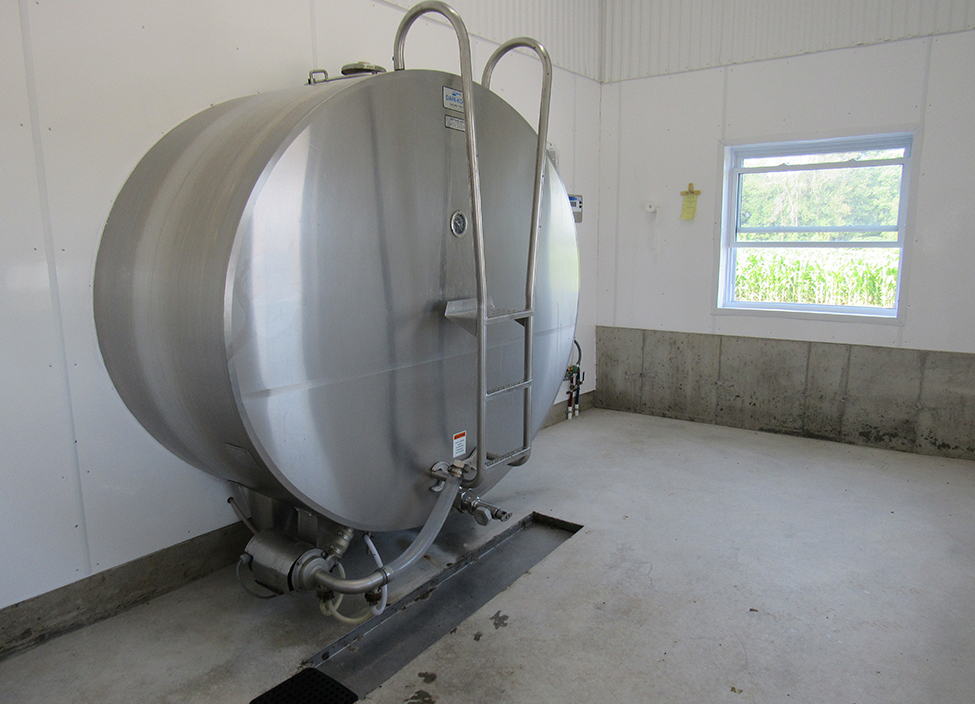
- adequate access to the bulk tank outlet with at least 120 cm (47 in.) of space between the outlet side of the bulk tank and the wall (Figure 3)
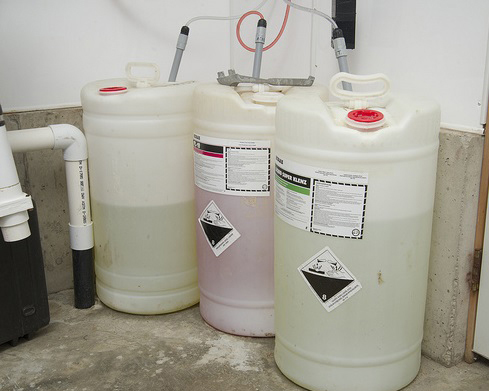
- facilities for the proper cleaning, sanitizing and storage of milking equipment; movement while cleaning and servicing equipment; storage of cleaners and sanitizers (Figure 4); and potential expansion requirements such as a bigger or second bulk tank, a heat recovery tank or a plate cooler
Work closely with your dairy equipment specialist and consider the size of your equipment to allow proper spacing before deciding on the size of the milk house. Changes that might alter size calculations include the installation of:
- larger-diameter bulk tanks
- through-the-wall or ‘bulk-headed’ bulk tanks (Figure 5), or
- a second bulk tank

Inside arrangement
Work with your dairy equipment specialist to plan the inside of the milk house in detail. Draw items such as the bulk tank, wash sinks, storage racks, cupboards, hot water heater, windows, doors, entrance steps (where necessary), hose port, drains, lights and ventilation details to scale. Proper planning will ensure a well-lit, spacious area for milk house activities.
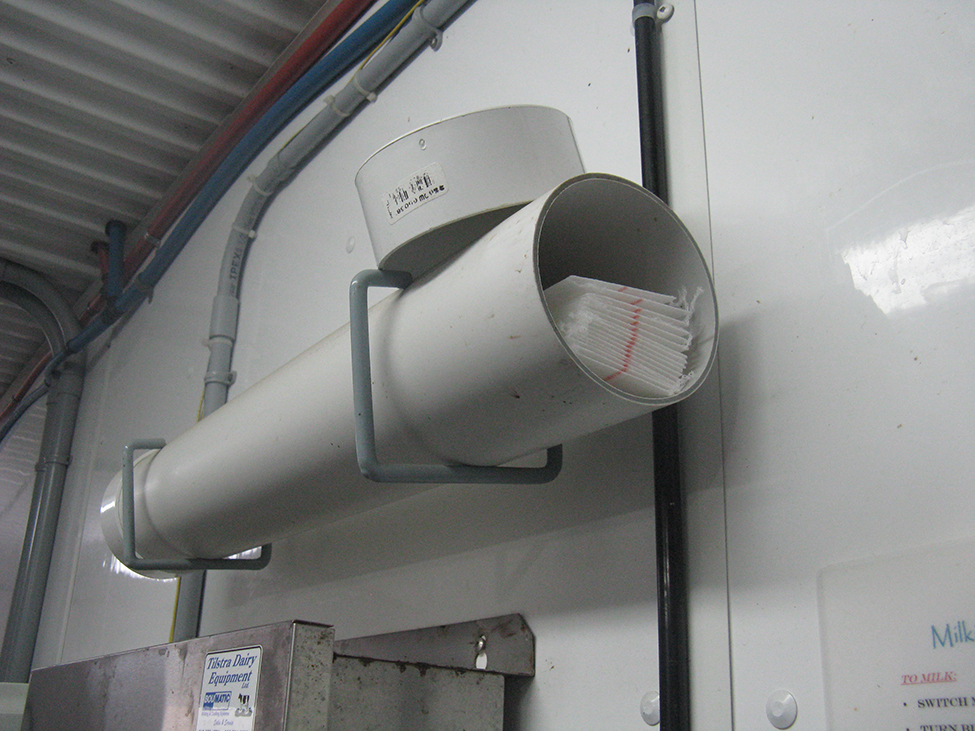
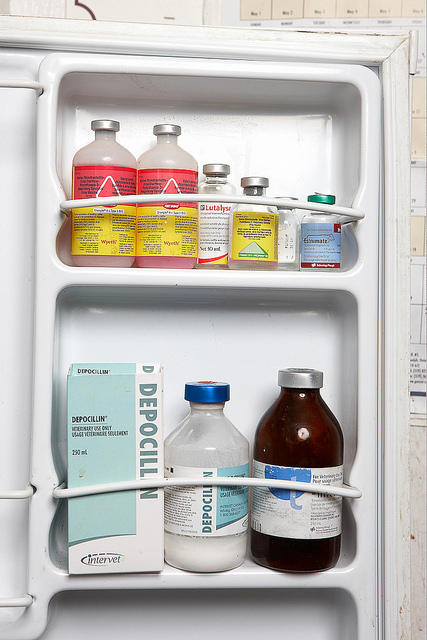
Allow adequate room for materials that will be used in day-to-day operations such as cleaning supplies. Storage cupboards for things such as milk filters and livestock medicines will protect these products and reduce clutter, thus protecting the milk. Milk filters must be kept clean and dry (Figure 6). Livestock medicines require separate storage in a clean, dry area that prevents spillage or inadvertent access by livestock that could lead to contamination of milk or meat. Read labels and always store livestock medicines according to label directions (such as in a refrigerator or cupboard) (Figure 7).
Consider building a utility room separate from the milk house for the refrigeration compressor, vacuum pump, water heater and water pump. Such equipment may leak oil, give off dust, debris and fumes, generate heat, and create ventilation difficulty in the milk house. The utility room floor should have adequate slope to a trapped and covered floor drain that may be connected to the milk house wastewater drainage system. Locate plumbing along an inside wall to protect against frost.
When drawing your plan, pay attention to traffic patterns and work arrangements in the milk house. There must be a door to allow the BTMG to access the milk house from outside without crossing through animal housing areas. This reduces the possibility of spreading biological hazards to the milk house and to other farms.
For biosecurity reasons and to minimize traffic through the milk house, consider a separate entrance from the outside to the animal housing area for visitors and barn workers. Visitors and service providers should only access areas of the barn/farm as necessary and should always follow biosecurity principles. It is best practice to plan all farm visits in advance and post visitor instructions at all entrance points.
Construction features
Footings, foundations and floors
Construction of footings, foundations and floors must be consistent with Ontario Building Code requirements. Discuss plans with your contractor and acquire the proper building permits.
Floors are to be constructed of good quality concrete or equally impervious material with a properly compacted granular subsurface. The floors should be a minimum of 10 cm (4 in.) thick and strong enough to support the weight of the bulk tank without any breaks, depressions, cracks or surface peeling. The joints between the floor and wall should be tight and impervious for easy cleaning and drainage. The floor slope to the drain must be continuous such that there are no pools of standing water in the milk house.
Drains and washwater disposal
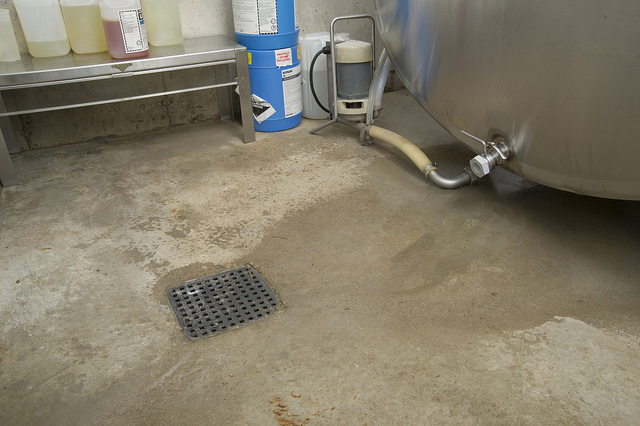
Milk Act Regulation 761 requires a 10-cm (4-in.) floor drain located at least 60 cm (24 in.) away from the bulk tank outlet valve. It must not be located under the bulk tank. The most desirable location is 60–90 cm (24–35 in.) away from and to one side of the bulk tank outlet valve and a minimum of 30 cm (12 in.) away from any wall (Figure 8). The floor drain should have a means to collect and prevent solids from clogging the drain, and it must have an easily cleaned P-type gas trap to keep waste odours out of the milk house (Figure 9). A stainless steel tray embedded in the concrete, sloping to the drain, can prevent floor erosion by collecting washwater from the bulk tank and bulk tank washer. Work closely with your equipment supplier on sizing and location of the tray (Figure 5).
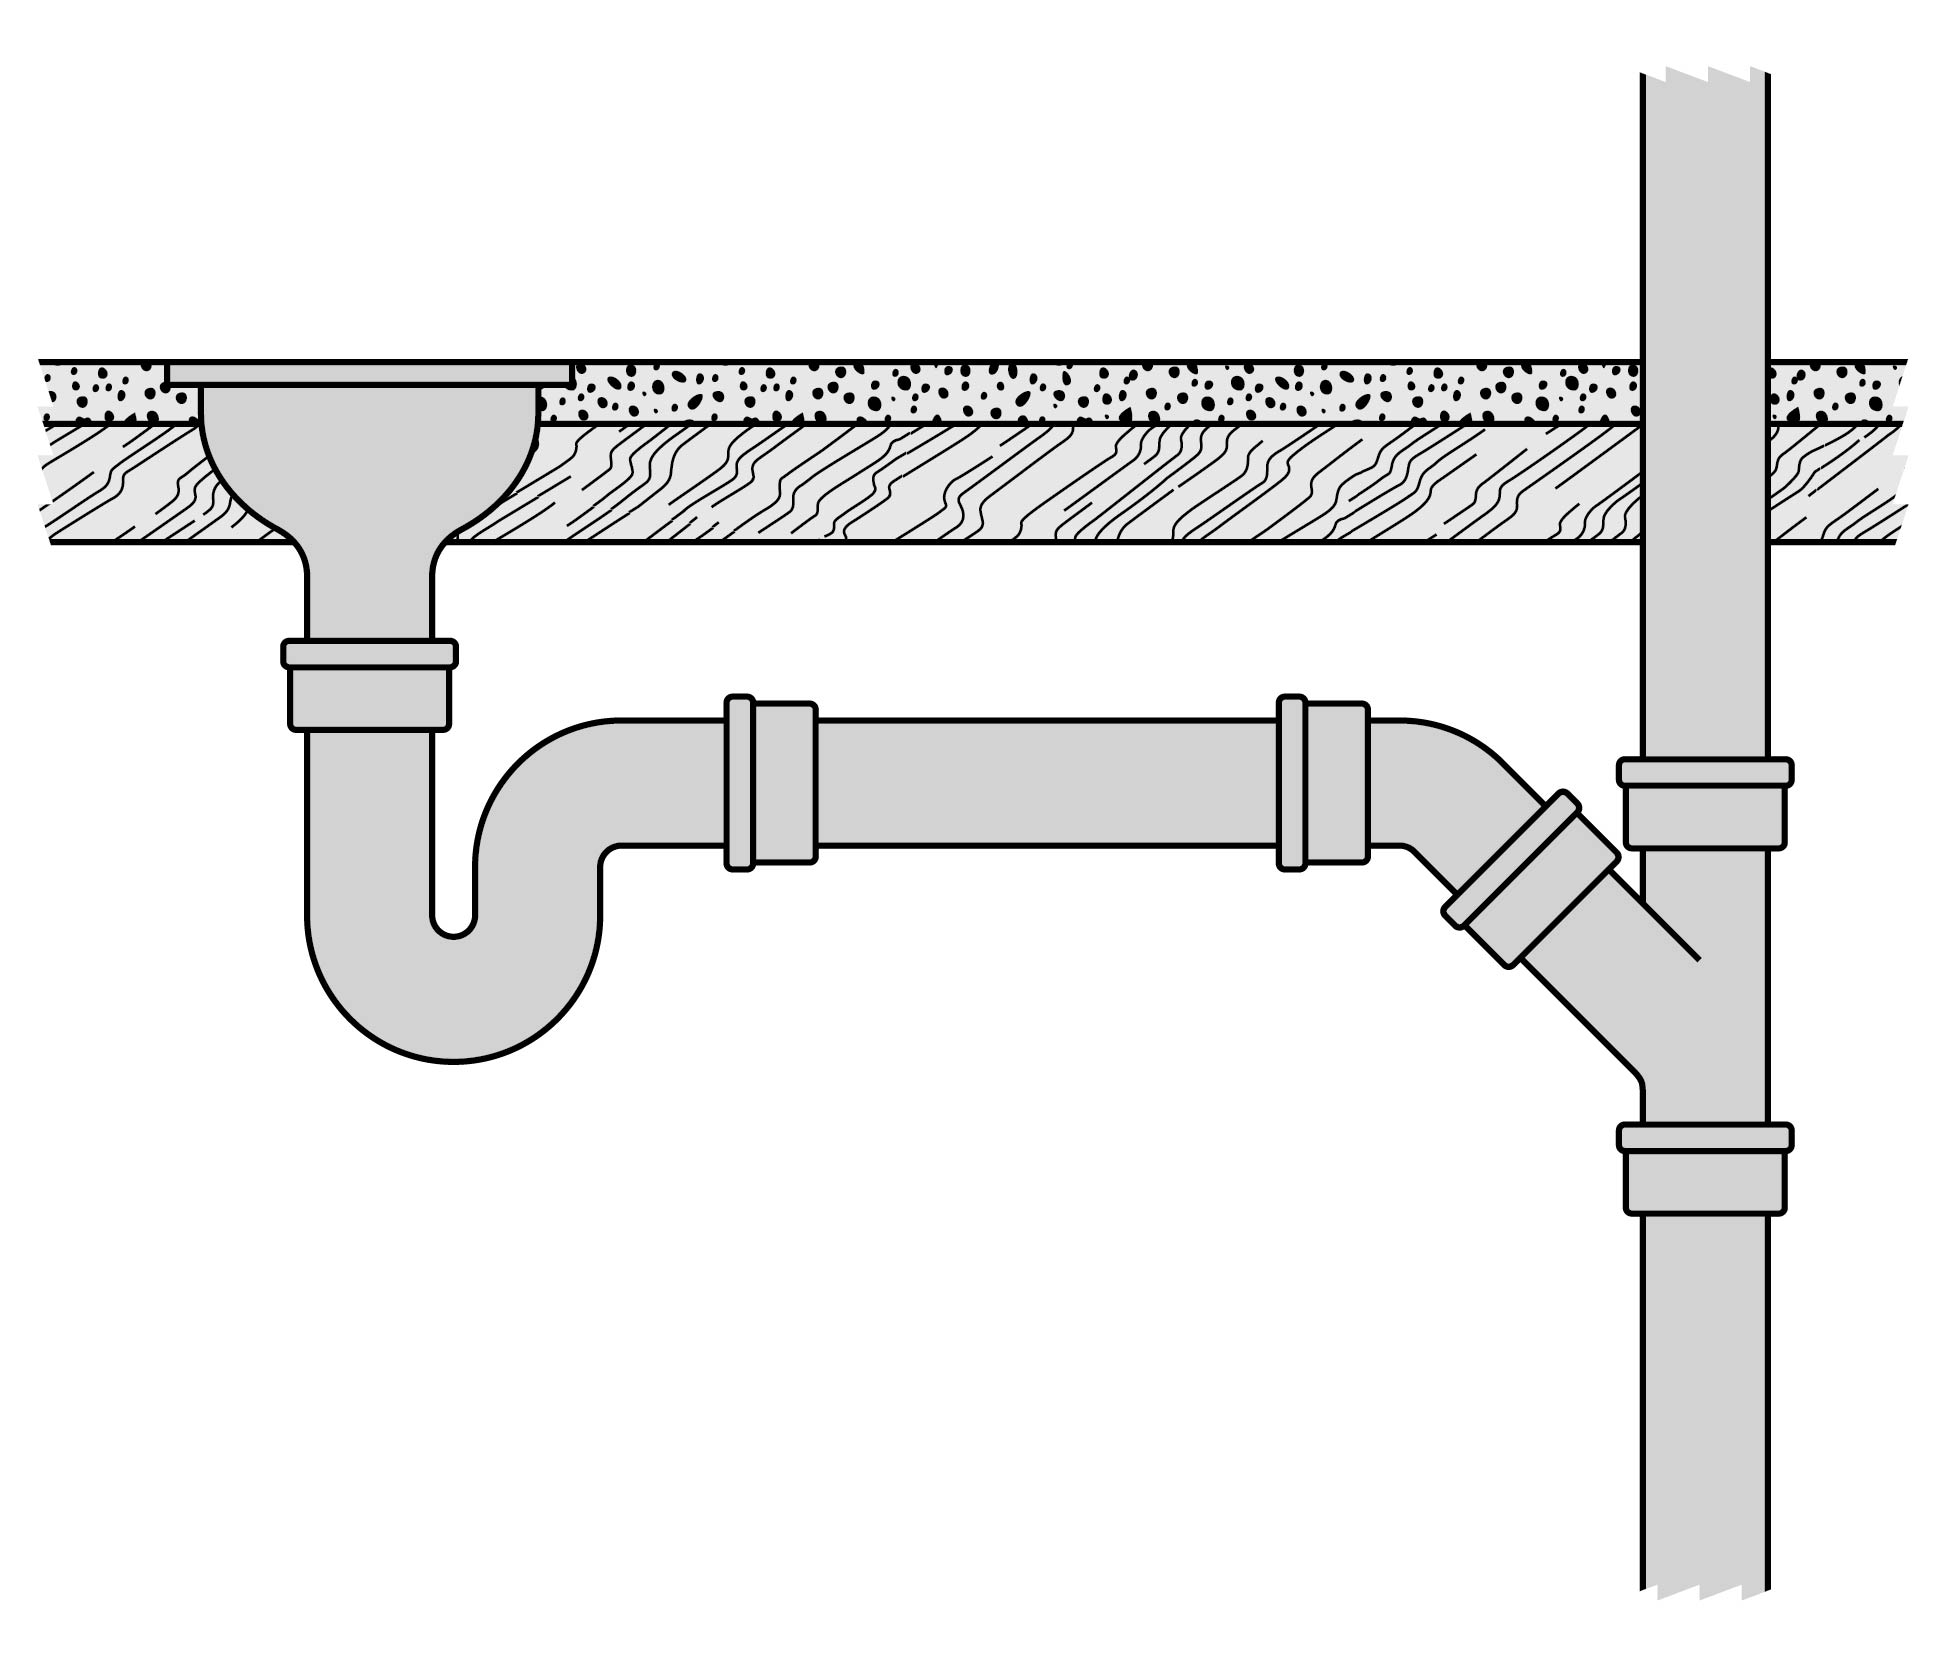
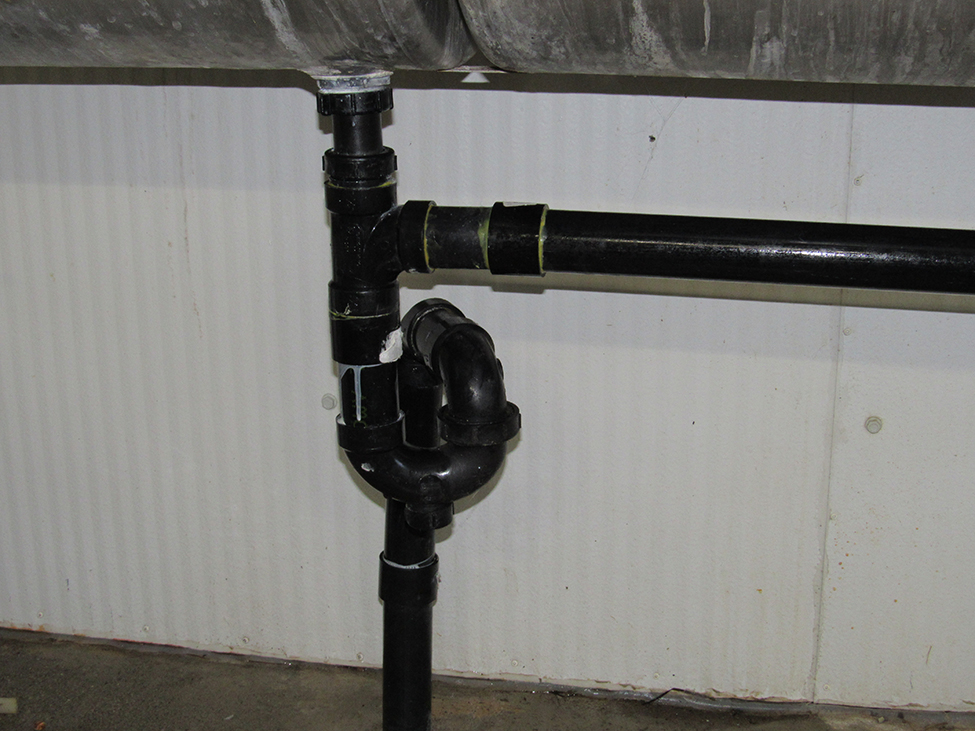
Install a separate drain and trap for the wash sinks. Connect floor and sink drains to a sewer pipe under the floor and leading to the approved storage and treatment system. Ensure all plumbing is properly vented. Figure 10 shows a conventional plumbing arrangement with the sink trap above the floor.
Handling milk house washwater and nutrient management
The Nutrient Management Act, 2002, O. Reg. 267/03, requires any building project relating to livestock housing, milk house washwater or manure storage facilities to have an approved nutrient management strategy or plan before a building permit will be issued. Nutrient management strategies are required for all farms that generate more than 5 nutrient units and are proposing to build, expand or renovate.
Learn more about:
For any questions about these topics please call the Agricultural Information Contact Centre at
Hot and cold water facilities
A two-compartment sink with an adequate supply of hot and cold potable water under adequate pressure is required. Sink compartments should be of sufficient size to accommodate the largest utensil or container used. With pipeline systems, the sink used in the clean-in-place system or the vertical wash vat, are acceptable as one compartment of a 2-compartment sink. All sinks must be constructed of non-corrodible material. Stainless steel is recommended. If possible, have the plumbing and milking equipment storage facilities situated along an inside barn wall to reduce the risk of pipes freezing in the winter.
A separate hand-washing sink with appropriate hand soap and sanitary means to dry hands is recommended to minimize contamination of the milk, milk sample and milking equipment from on‑farm and off-farm personnel. All sinks shall drain through a pipe equipped with a trap connected to a wastewater drainage system (Figure 10). Sinks shall not drain onto the milk house floor. Where required, install non-corrodible, impervious racking for draining and storing milking equipment and utensils.
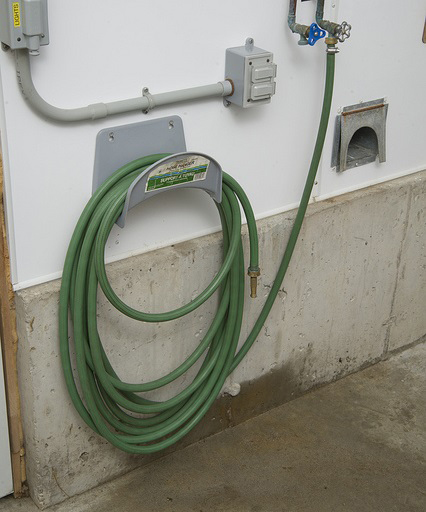
A hose and attached nozzle are required for rinsing the bulk tank and cleaning the milk house. Hose length should not be any longer than what is required to perform these functions. A dedicated faucet is required for the hose connection, as well as a hose rack for proper storage of the hose off the floor when not in use (Figure 11).
Water heater selection
Work closely with your dairy equipment specialist when choosing the size and type of hot water heater. Factors such as size and configuration of equipment, pipeline length, the use of meters and/or plate coolers will determine the volume of hot water required for cleaning cycles.
Your hot water heater must be able to produce water with a minimum temperature of 77°C (170°F). It is sometimes difficult to get sufficient volume of hot water for equipment cleaning purposes when using a household water heater with factory-installed thermostats. Installing 82°C (180°F) thermostats is recommended as it provides the option of setting the temperature higher than the minimum required if necessary. Alternatively, you could install a commercial water heater, with factory-installed high temperature thermostats, to obtain the necessary hot water temperature.
Depending on your water hardness, a water softener may help to reduce the amount of cleaning agents required in the cleaning operation. Milking equipment is likely to be much cleaner and free of water stains if a softener is used. If you have hard water, a water softener will also increase the lifespan of your hot water heater.
Walls and ceilings
Make sure that all construction complies with the Ontario Building Code. To ensure proper construction, consult with your building contractor to make appropriate decisions for your situation.
Walls and ceilings must be constructed with appropriate insulation and vapour barrier to minimize heat transfer and prevent condensation in the milk house. Wall and ceiling surfaces must be made of materials that are smooth, washable and moisture-proof. Light-coloured sheet metal, vinyl siding, tile or other impervious surfaces (such as painted wood, block, brick, concrete) may be used. Ceilings must be high enough to allow the complete opening of the manhole cover of the bulk tank for visual inspection of the milk and interior of the bulk tank. Ceilings must also be high enough to allow collecting a representative sample and complete removal of the dipstick for reading, manual cleaning and inspection.
Roof
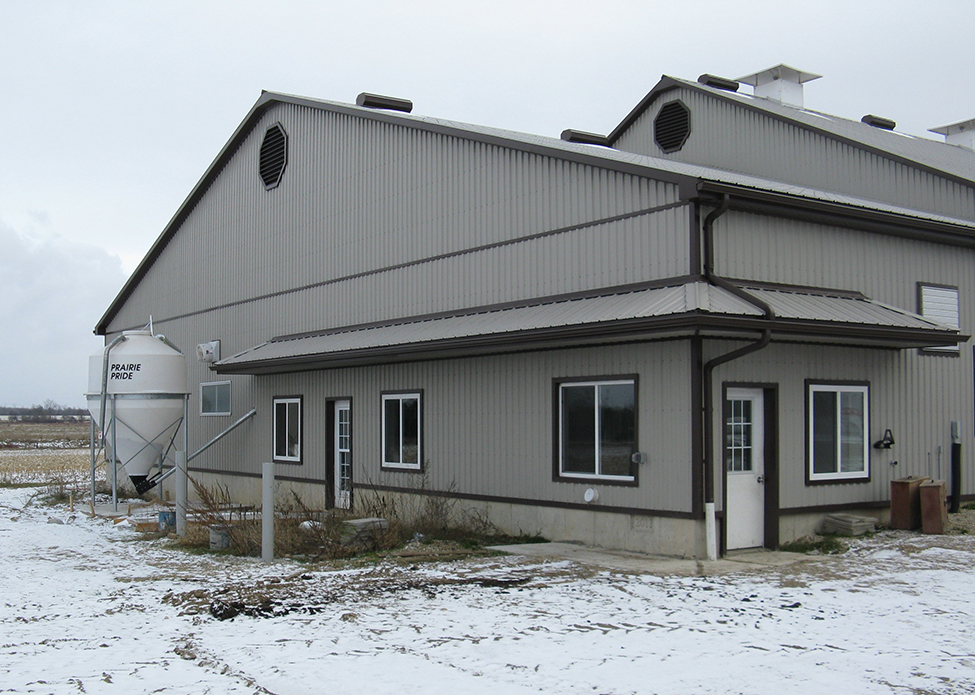
The roof of your new milk house may be any type and will depend on the roofline of other buildings on the farmstead and your own preference. The gable roof is least expensive and is most likely to match other new buildings using clear-span trusses (Figure 12).
Where the milk house roof is attached or adjacent to the hayloft wall of a two-storey barn, reinforce this wall with extra lumber to prevent hay or other stored materials from pushing out the milk house roof and outer walls. Also, install a galvanized, sheet-steel rodent-stop between the two buildings to keep rats and mice out of the milk house attic. Use wall and roof flashing to keep rainwater out. Make sure that the milk house roof is built to withstand the extra loads of snow and ice that may drift or slide off the main barn roof.
The attic space must be vented to minimize the risk of moisture and mould build-up. A continuous screened opening under the eaves and either a gable end louver or a ridge ventilator provide good attic ventilation. Cover all vents with bird screening.
Doors and windows
Work closely with your contractor and dairy equipment specialist to ensure proper installation and placement of all windows and doors.
Consider providing a wall opening big enough for a bulk tank. One way to do this is by installing a removable insulated panel beside the outside entrance door. Ensure that the panel and main door open up to give adequate space to allow removal or installation of a bulk tank, with consideration that a new bulk tank may be larger than your current one.
Where the ground elevation outside the milk house is somewhat higher than the floor, you can use a large window opening for changing the bulk tank. The opening may be partly window area and partly a removable insulated frame panel. Another way is to construct part of one wall as a removable insulated panel large enough to fit a bulk tank. This can be securely held in place with bolts, screws or turn-buttons, and made weather-tight by caulking or special tape.
There must be a separate door entrance from the outside into the milk house. Any doors leading from the milk house out to the milking area or animal housing, must be solid. All doors in the milk house must be tight-fitting and self-closing. There must be a window that permits the BTMG to observe the tank-truck (also called the milk truck) from the milk house. Any window between the milk house and the milking area must be a fixed pane (does not open). For the best summer ventilation, locate two windows on opposite exterior walls of the milk house. Screen windows and other ventilation openings to keep out insects.
All doors, windows and panels must be insulated in order to remain free of frost and moisture and to operate freely in all weather.
Ventilation
Milk houses must be properly ventilated to prevent odours from affecting the milk and to prevent condensation on surfaces.
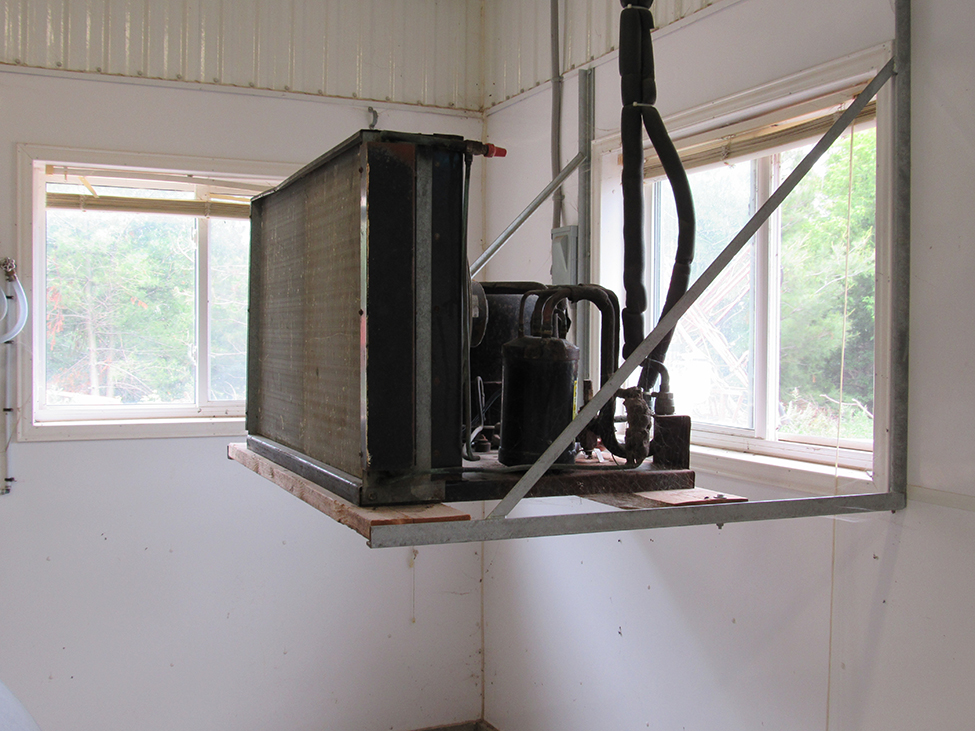
An important consideration when designing the ventilation system of the milk house is the placement of the radiator of the milk cooling system. The compressor and radiator are usually combined into 1 unit that is placed in either the milk house or a utility room. When in a milk house, these units are often installed such that the fans draw outside air (through a screened opening) through the radiator, removing the heat from the compressed gases and transferring it to the air in the milk house (Figure 13).
In the summer, the milk house can be ventilated by opening screened windows or insulated panels to exhaust hot air. However, in cold weather forced ventilation may be necessary. The milk house ventilation system must not draw air from the milking or livestock housing area of the barn to prevent transferring odours to the milk in the bulk tank. It is very important to work with your dairy equipment specialist to consider all options of radiator placement and orientation, as well as the size of any openings for the supply of fresh air for all ventilation needs.
Heating
Much of the heat required in a milk house can be provided by the bulk tank refrigerating unit, provided the condenser is located in the milk room. Heating requirements depend on the size of the milk house, the insulation in the foundation, walls and ceiling, and the outside temperatures. Discuss heating requirements with your building contractor.
Outside walkway
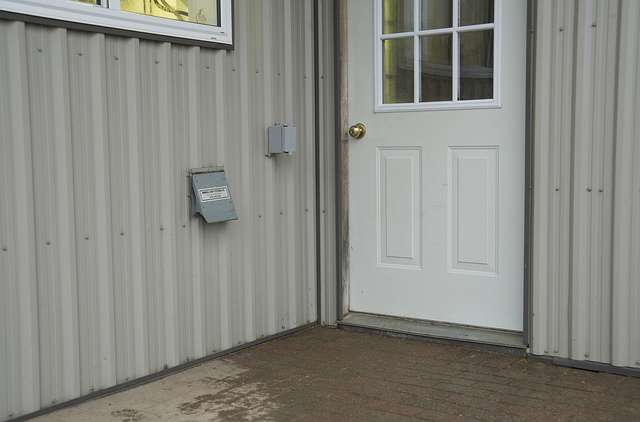
Provide a concrete or other solid surface outside the milk house and directly below the milk hose transfer-port, that is connected to the main entrance of the milk house (Figure 14). This keeps the milk transfer hose clean when it is hauled from the tank-truck and reduces the possibility of dirt and mud being tracked into the milk house.
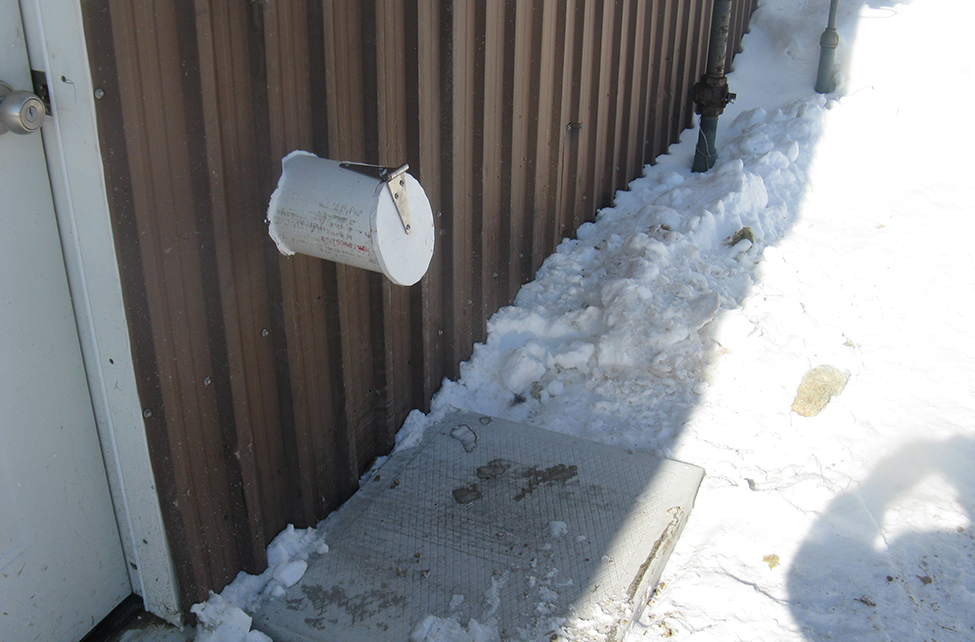
Milk hose transfer-port
Every milk house must have a self-closing hose transfer-port for connecting the milk hose from the tank-truck to the bulk tank (Figures 14 and 15). The best place for the port is 40–60 cm (16–24 in.) above the floor on the wall near the bulk tank outlet and next to the truck parking area. If the inside floor and outside grade are at very different levels, put the hose port at least 15 cm (6 in.) above the inside floor or the outside paved walkway, whichever is higher.
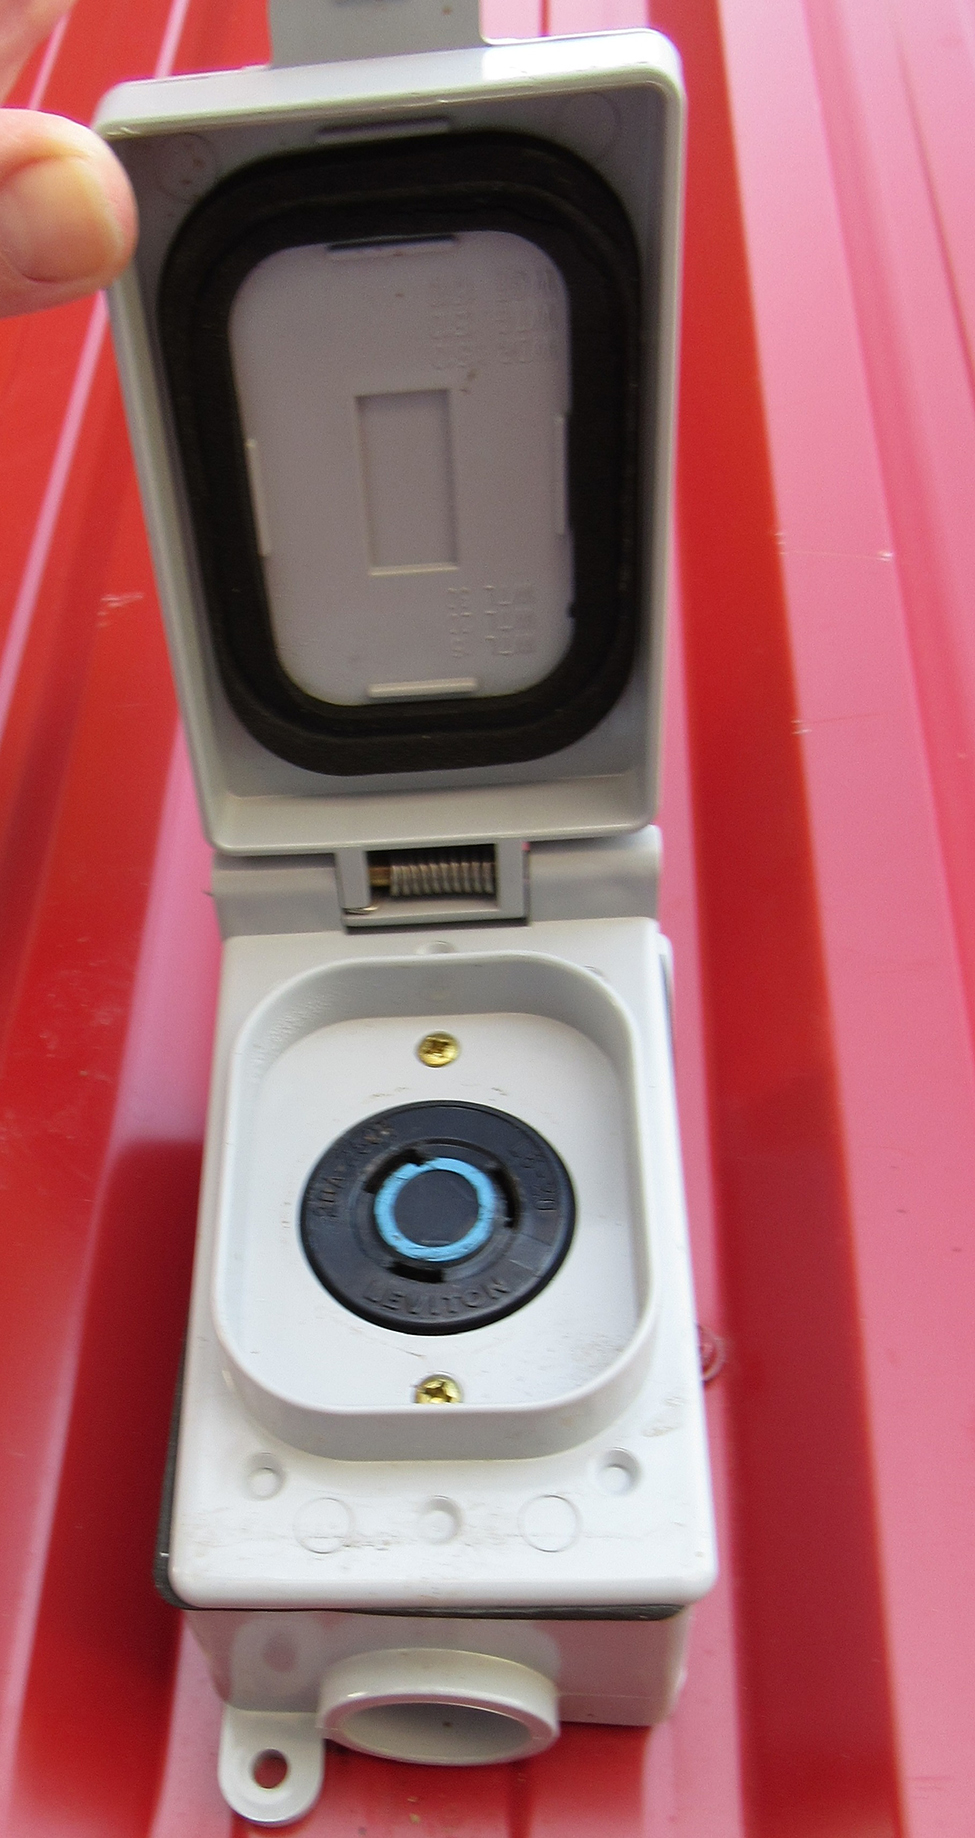
Electrical outlet for tank-truck
All milk houses must be equipped with a standard electrical outlet (receptacle) to receive the tank-truck pump plug (Figure 16). The weatherproof receptacle must be located on the outside of the milk house wall, near the hose port as shown in Figure 14. The receptacle (configuration L6-20-R) is rated at 250 volts, 20 amperes, 2-pole and 3 wire (twist-lock type grounding). For safety, when not in use, the circuit feeding the receptacle must be equipped with a double-pole switch rated for 20 amperes, located inside the milk house.
Lighting and electrical
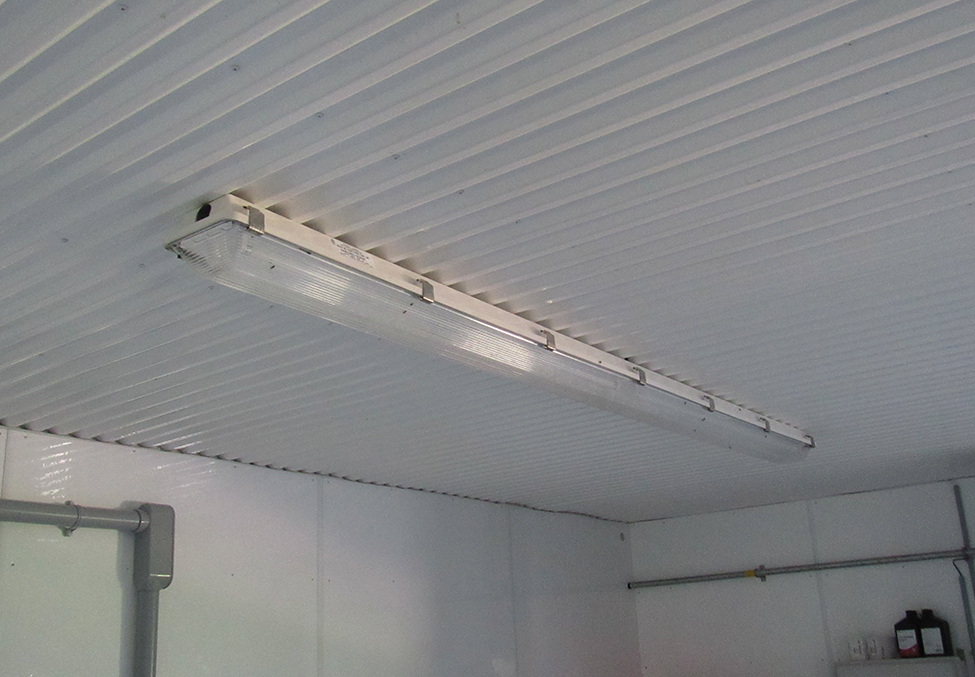
Adequate lighting is required to permit inspection and cleaning of the milk house and equipment. Shatterproof covers or coatings on light fixtures prevent broken glass from falling on equipment or contaminating milk (Figure 17). Consider placing lights such that, when the manhole cover of the bulk tank is open and the dipstick removed, lights will not be damaged. Also consider placement of lights to prevent shadows from being cast when taking a sample or cleaning the bulk tank. Do not put them directly over the bulk tank where there is a risk of breakage. Make sure there is adequate lighting over the wash sink to allow proper cleaning of utensils.
For more information on lighting, refer to the Lighting options for free stall housing fact sheet.
For other electrical requirements for your milk house and parlour, consult with your building contractor, dairy equipment specialist and the Electrical Safety Authority to obtain permits and meet electrical safety standards.
Washrooms
If there are plans to incorporate washrooms, they should be located and maintained so as not to constitute a source of contamination to the milk or equipment. The toilet must be connected to an approved sewage disposal system. The liquid effluent containing human waste from the washrooms must not be directed to a permanent liquid nutrient storage facility. All doors must be solid, tight-fitting and self-closing. All other openings in the washroom should be screened to keep pests out. The washroom should be adequately ventilated and contain hand washing and drying facilities.
For further information on washroom design, construction and installation requirements, refer to O. Reg. 332/12 (Building Code) made under the Building Code Act, 1992.
Planning your parlour
Work with OMAFRA’s raw milk quality program coordinator or a food safety inspector and your dairy equipment specialist when planning your parlour. Design and layout will impact animal flow through the parlour, speed of milking and labour requirements.
You must ensure that you have at least 1 floor drain that is accessible for cleaning and maintenance, and that the floors are sloped towards the drains for easy cleaning.
Ventilation must be adequate to prevent condensation, remove heat during warmer weather and remove strong odours that may otherwise affect the smell and taste of the milk.
The lighting in the parlour must be adequate to allow for proper udder preparation prior to milking as well as proper operation and cleaning of the milking equipment. Good lighting will also create favourable conditions for inspection of animals, milking equipment and the milk during harvest.
Depending on parlour and barn design, all walls and ceilings that are a part of, or directly adjacent to, the milking operation must be covered with a material that will permit cleaning and maintenance of a sanitary environment. Its light colour will allow for increased lighting and show that surfaces are clean when dirt is removed. Surfaces that consist of bare wood, flaking paint or are in disrepair are not permitted.
Barns that have a parlour design consisting of a closed-in, separate room for milking, should have all openings leading to the outside designed to minimize the entry of insects, birds, rodents and other pests. Entry of these pests in a parlour puts them in close proximity to the milking equipment and ultimately the milk. To minimize the entry of insects, doors and windows can be kept closed and other openings such as fans and chimneys can be screened. A properly designed ventilation system will also decrease the entry of insects, odours and dust particles.
Any floors, ramps, platforms and alleys associated with the milking parlour must be constructed of concrete or other durable, waterproof material. This material makes cleaning easier and will allow for adequate drainage when constructed properly. Drains should be covered to prevent splashing and be equipped with traps to prevent odours and gases from entering the parlour. Drains must empty into an approved wastewater drainage system.
Summary and contacts
A carefully planned milk house will serve most dairy goat farms adequately into the future.
Before starting construction, contact the OMAFRA raw milk quality program coordinator or a food safety inspector by emailing dairyfoodsafety@ontario.ca to discuss your plans.
As part of providing accessible service, you can also contact the Agricultural Information Contact Centre by phone
This fact sheet was written by the Inspection Programs Unit, Food Safety Inspection Delivery Branch, with input from Environmental Management Branch.