Maintenance of a subsurface drainage system
Learn how to complete the initial and ongoing inspection and maintenance of a subsurface drainage system. This technical information is for Ontario producers and rural landowners.
ISSN 1198-712X, Published December 2024
Introduction
A subsurface drainage system is a significant financial investment. There is no better way to protect that investment than with regular and proper inspection and maintenance of the system. Even a well-designed and constructed system, built to last a lifetime, must be carefully maintained.
This fact sheet provides information to complete the initial and ongoing inspection and maintenance of a subsurface drainage system.
The 5 pillars of an effective subsurface drainage system are:
- quality material — including pipe, envelope/filter (if necessary), fittings, risers
- proper design — completed by a licensed drainage contractor or a professional engineer
- proper installation — completed by a licensed drainage contractor
- compatible land management practices
- regular inspection and maintenance
Properly designed and constructed drainage systems require minimal maintenance and repair for the first few years following installation. However, it is important that a new subsurface drainage system is carefully inspected and maintained for the first 2 or 3 years. Any weak spots that have developed in the lateral and main drains and any backfilled areas that have settled can be remedied and filled in. There is some ongoing maintenance to complete every year, but this should be minimal for most systems.
The importance of the drainage plan
A drainage plan indicates the location and layout of lateral and main drains, outfalls, surface water inlets and other structures in the field. It is a very important document to use for future maintenance. Keep this document with the property deed, so that if the property ownership changes, the drainage information is kept with the farm. Some municipalities require or allow for storage of the drainage plan at their office. This creates a permanent record, which helps locate the drains for future subsurface drainage repair or improvements.
A good drainage plan includes the following:
- date of construction
- name of installer (contractor or landowner)
- identification of any changes made during installation from the original plan
- lateral spacing, size, depth, grade, footage and material
- main location, material, size, depth, grade and capacity
- details of any construction problems encountered during the installation
- location of all outfalls, surface water inlets and other structures
- location of utilities, sand pockets and springs that may affect future maintenance
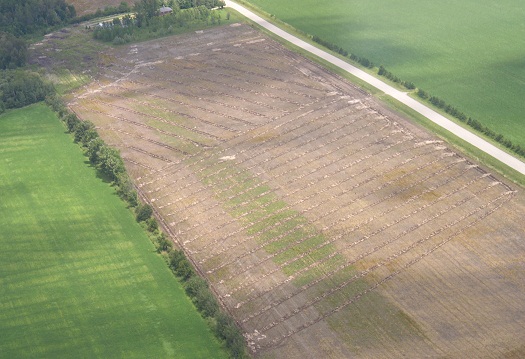
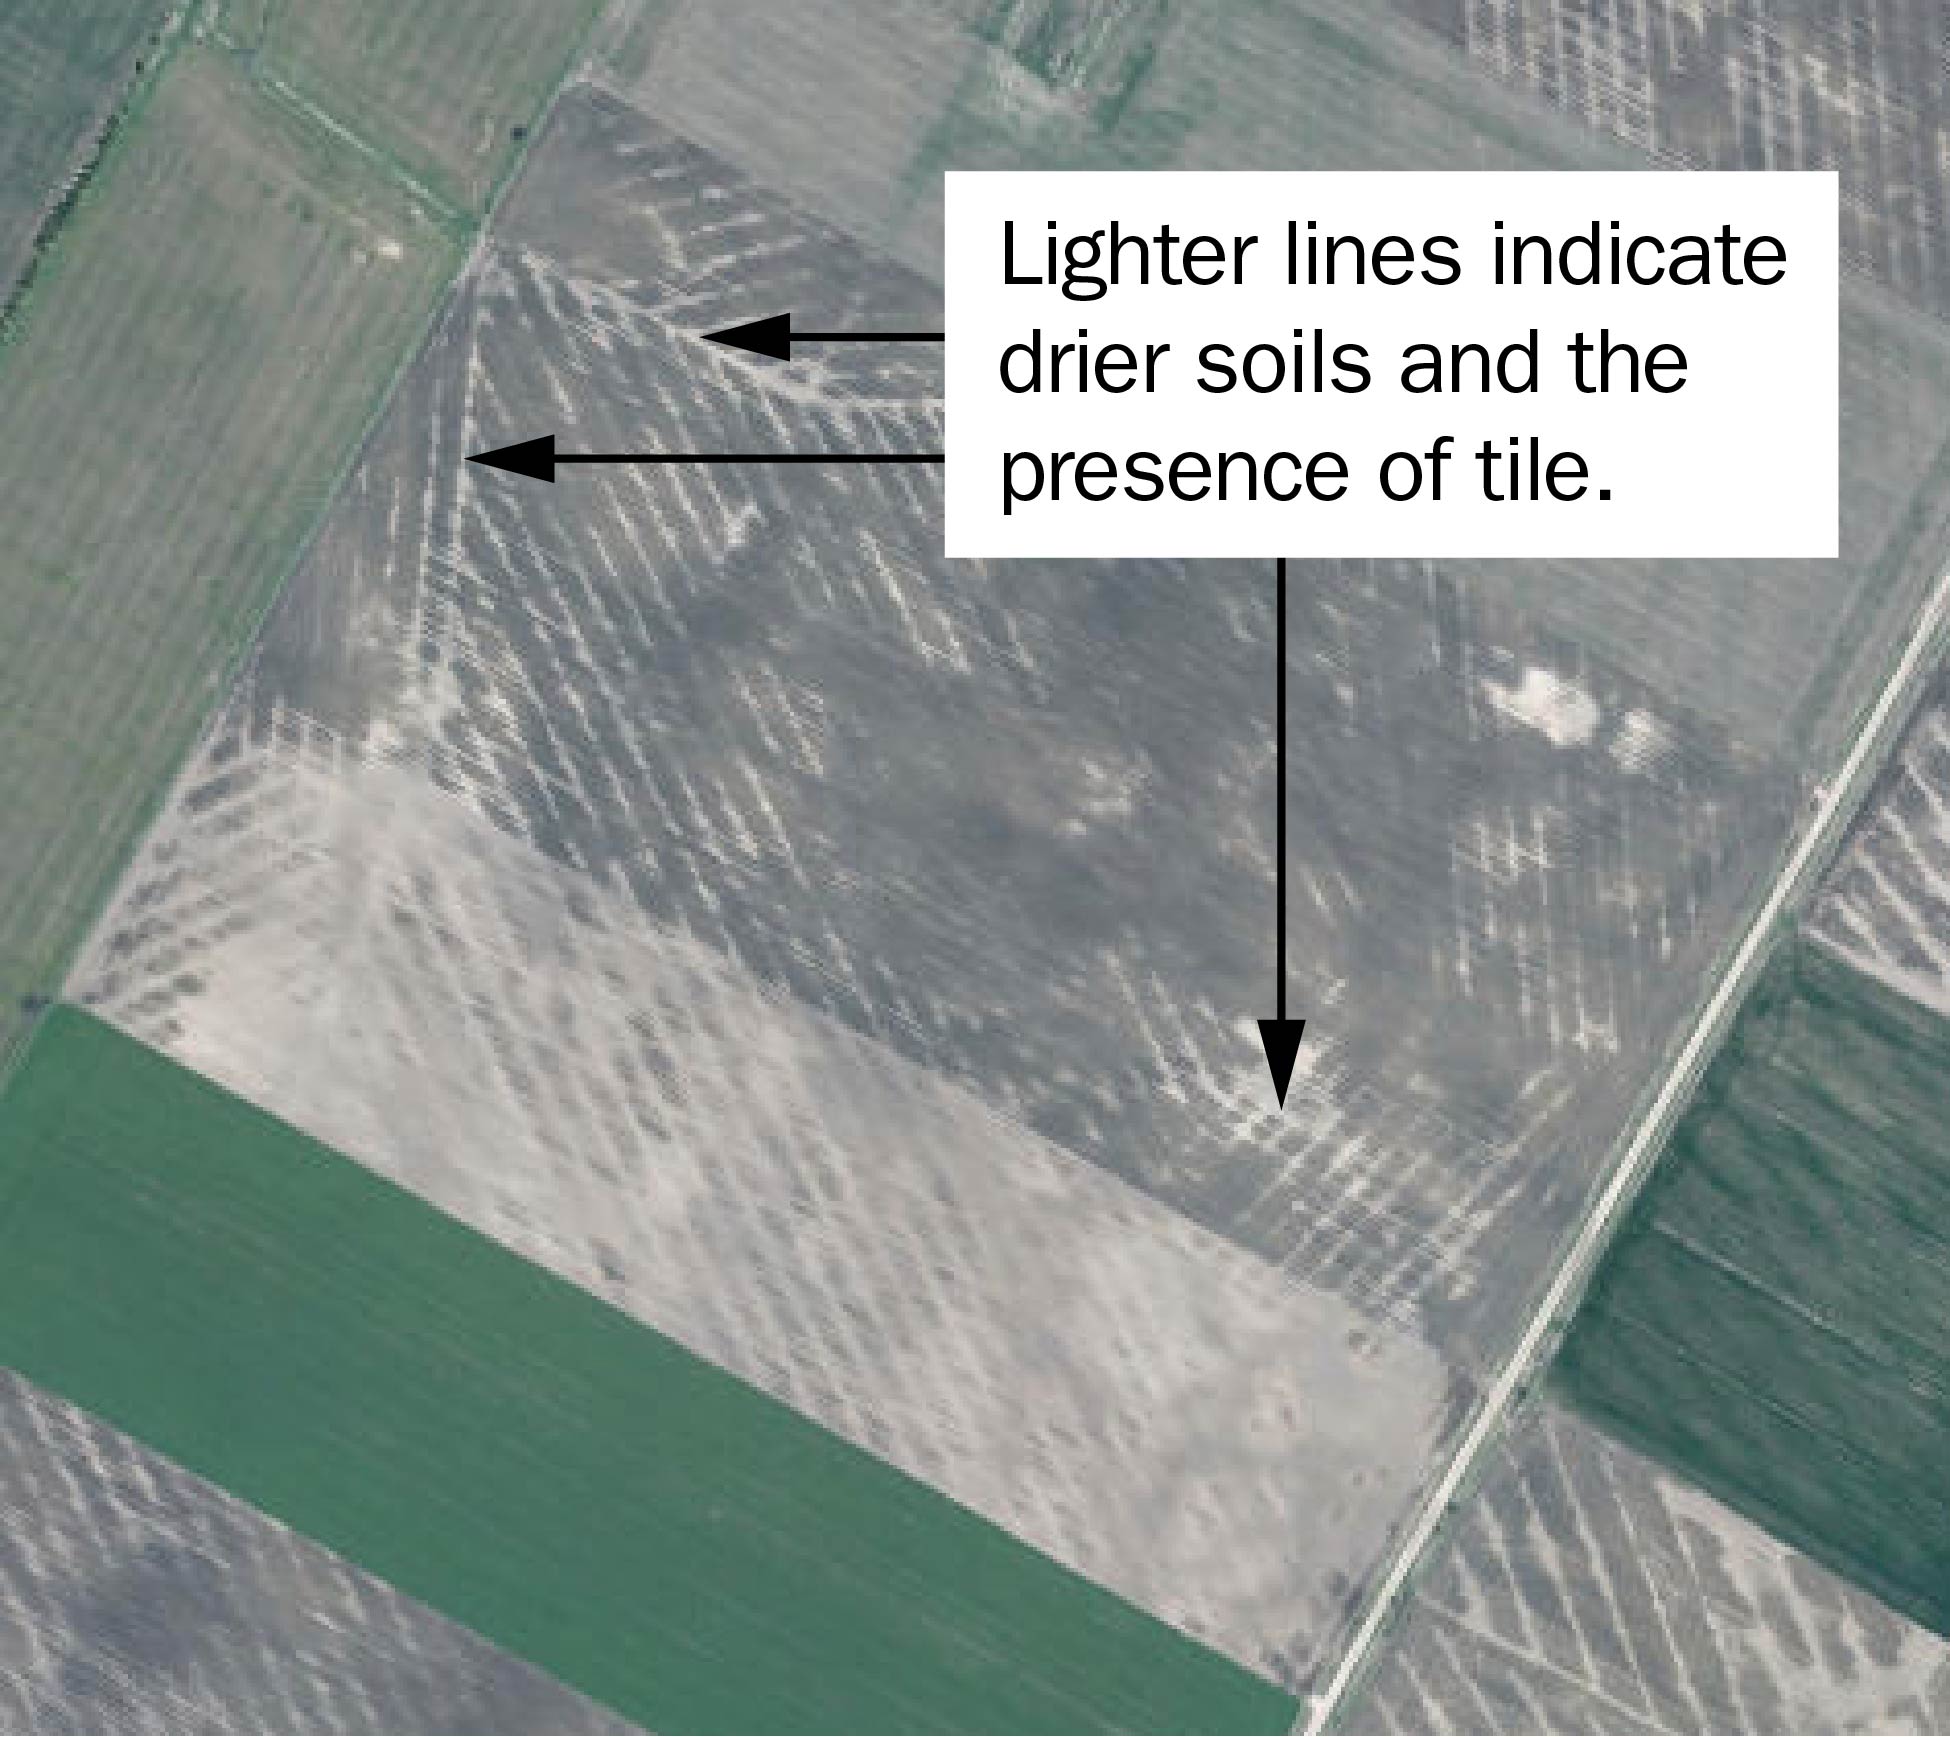
The contractor should provide a copy of the plan of the drainage system to the landowner following the completion of the job. If a formal plan has not been provided by the contractor or if the landowner does the installation, use an aerial photograph or satellite image (such as Google Earth) to identify and show the drainage system similar to that shown in Figure 1.
Ways to identify tile locations:
- On some satellite images, the tile drains are visible if the image is captured at just the right time in the spring drainage cycle. If possible, refer to historic imagery as well. The darker sections are often wet areas between the tiles and the lighter lines are dryer soil areas directly above the tile (Figure 2).
- In some cases, locate one lateral drain and use it to estimate the spacing to find another lateral drain and so on. This process is easier with a very uniform field/installation pattern or if the layout is known in the aerial photo.
- Landowners or contractors can rent devices that use ground-penetrating radar to locate the plastic tiles. This process doesn’t always work, depending on whether or not the existing tiles are full of sediment.
Accessible description for Figure 2
Global positioning systems (GPS) are increasingly being used for surveying and installation of drainage systems by contractors in Ontario. A GPS system generates a detailed drainage map showing the exact location of the drainage system as well as existing field conditions such as field boundaries and contours. The contractor can provide a printed and/or digital version of the plan to the landowner following installation. If your contractor does not use GPS to install the system, you can use a handheld GPS to record the coordinates of all outfalls, surface water inlets and other structures.
It is important to keep the drainage plan up to date by revising it whenever changes or repairs are made to the system.
Initial inspection after installation
What happens during the initial period following the installation of the new subsurface drainage system is critical to ensuring it functions properly for years to come. The soil around and above the drains will still be loose and should be left alone to settle naturally with time and rain. Do not use equipment to pack down the soil over the drains, as any heavy pressure on the loose soil could damage or collapse the pipes. Minimize traffic on the field for as long as possible and straddle the laterals and mains with equipment or work across (not parallel to) the drains when working the field in the first year after installation.
Using the drainage plan as a guide, locate, inspect and mark all outfalls and surface water inlets for reference when spreading nutrients on the property and for future maintenance. Use a durable, permanent marker that is highly visible above crops and tall grass. Ensure the workmanship of the system is good, as there will be limited time to access the warranty period provided by the contractor.
Confirm that all surface water inlets are fitted with a proper guard or grate to keep debris and trash out of the subsurface drainage system.
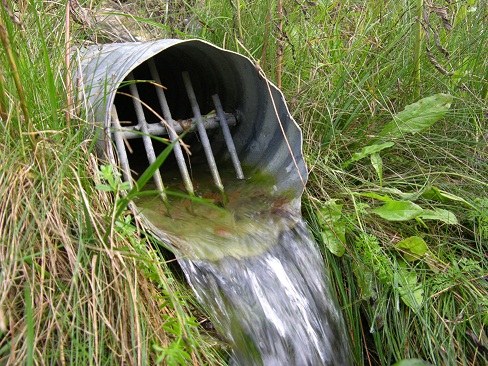
Ensure a grate or rodent guard is installed on all outfall pipes to prevent unwanted entry by burrowing animals such as rodents, muskrats, rabbits and foxes (Figure 3). Check for burrowing animal activity around the outfalls. If any signs exist, arrange to have the animals legally removed.
To minimize ice damage and sedimentation, locate the bottom of the outfall pipe(s) at least 300 mm (12 in.) above the normal water level in the receiving drainage channel or natural watercourse. Otherwise, the outfall(s) may require additional ongoing maintenance. During the first year, sediment may appear in the outfall due to the soil settling. Under normal conditions, the outfall should flow free and clear from any sediment or debris.
Confirm the contractor has installed a rigid, non‑perforated end pipe. Standard corrugated plastic tubing is not satisfactory as it can be damaged. The pipe should be sufficiently durable to resist weather, animal damage, crushing and ice or fire damage. It should extend into the ditch far enough that the flow will not erode the ditch bank. Review the Ministry of Agriculture, Food and Agribusiness (OMAFA) fact sheet, Subsurface drainage system outfalls, for additional details on the construction requirements for an outfall.
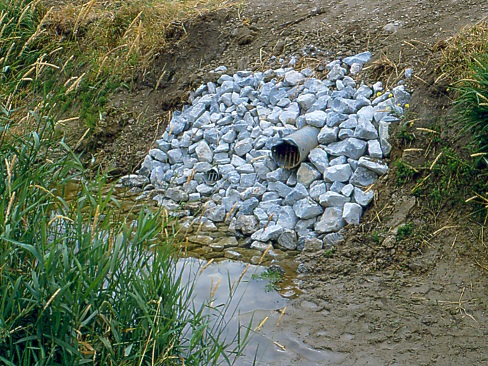
The water that discharges from the outfall can cause erosion in the receiving drainage channel or natural watercourse. Check to see if the contractor has installed sufficient erosion protection to prevent this from happening (Figure 4).
Compatible land management practices
The installation of a tile drainage system is a best management practice that has many positive results for crop production and the environment. Perform other land management practices in a compatible manner to ensure long-term function of the drainage system and protection of the environment. For example:
- Work the land during dry soil conditions, as working in wet soil conditions can cause soil compaction that reduces drainage.
- Handle milk house effluent, septic system waste, silo and farmstead runoff in an environmentally responsible manner. Do not discharge these substances into tile drainage systems. If not disposed of properly, these organic wastes can be harmful to the environment and plug the tiles.
- Plant trees and shrubs far enough away from the drainage system so that roots cannot enter and block the drainage system.
- Protect the outfall from erosion by preventing surface water from flowing over it.
- Fence water courses to keep livestock from having direct access to them. Livestock with direct access to a water course may damage the banks of the water course, including possibly damaging or crushing any tile outlet pipes that drain into the water course.
- Avoid burning grass or other vegetation on the ditch bank around the outfall pipe, which may damage the pipe.
The installation of a subsurface tile drainage system may result in increased “soil macropores” (small pores through the soil that lead directly to the tile). Unless properly managed, applied nutrients can travel easily through these pores, through the tile and into the receiving waterbody, resulting in environmental harm. Only apply nutrients to the land in accordance with the Nutrient Management Act, 2002, and regulations:
- Maintain the appropriate minimum separation distance from surface inlets when applying nutrients.
- Apply nutrients at the recommended rates, using proper methods and at the correct time of year.
- Avoid applying nutrients when the soil is saturated or the tiles are discharging water.
- Periodically check the outfalls for signs of nutrient discharge after nutrient application.
- Avoid repeated travel in one location when hauling manure to prevent soil compaction in your fields.
- Do not apply nutrients in a wide area around surface inlets. If nutrients do enter the inlet, take appropriate measures to stop the flow (such as using shut-off valves).
Ongoing inspection and maintenance
It is important to regularly inspect and maintain the drainage system over its life span. The ideal time to inspect the system is in the spring, late fall and after a significant rainfall event — when the soil is wet and the drains are running. Prompt repair of any noted issues will ensure the system is always in good working order and will prevent a more serious issue from developing.
Remember to keep records of any maintenance/repairs and changes to the system on the drainage plan. This ensures there is always an accurate plan of the system for future inspection and maintenance.
In the field
Check for any signs of erosion of the drain pipe trench following rain events, especially in the first few years. Inspect the mains and laterals a couple of days after a heavy rainfall to look for any signs of ponding or excessive wet spots in your field. This may indicate that a blocked drain exists and will have to be repaired.
Uniformity of crop growth is another good indicator of a properly functioning drainage system. Ideally, the field should dry evenly and produce similar yields. Watch for changes in crop yield in different areas of the field annually to see if there is a slower developing problem in the drainage system that may need repair. Take periodic aerial photographs of the farm to get an overview of the drainage system and to identify potential drainage problems.
Water ponding on the surface of a field or sections of a field remaining wet are signs of drainage problems. Soil structure problems are often the result of compaction or a lack of organic material and macropores in the soil. If water cannot move through the soil to the tile, the effectiveness of the tile system is reduced, and wet spots appear in the field. Practise the activities described in the section on Compatible land management practices to prevent soil compaction or plant a deep-rooted crop to improve soil porosity.
A collapsed or crushed tile is often the result of high traffic over the tile in certain portions of the field. Consider using stronger pipe in high-traffic areas. Old tiles that have been cut during the installation of a new tile system may cause wet spots in the field. Sometimes during the installation of buried utilities such as water lines, pipelines or electrical conduits on the farm, tile pipes are cut, resulting in drainage problems. Contact a licensed tile drainage contractor to investigate the issue and complete the necessary repair.
When drains get plugged, water rises to the surface at the point of the water stoppage. Dig up the drain at the wet spot and repair it. Mark any locations of concern and contact a licensed contractor to complete the repair as soon as reasonably possible. If the fields are wet, it may be better to wait for drier conditions to make the repairs to avoid damaging the soil structure.
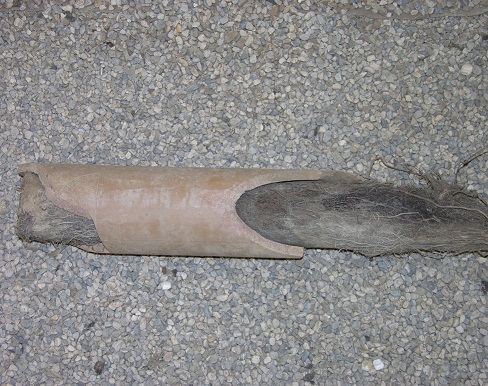
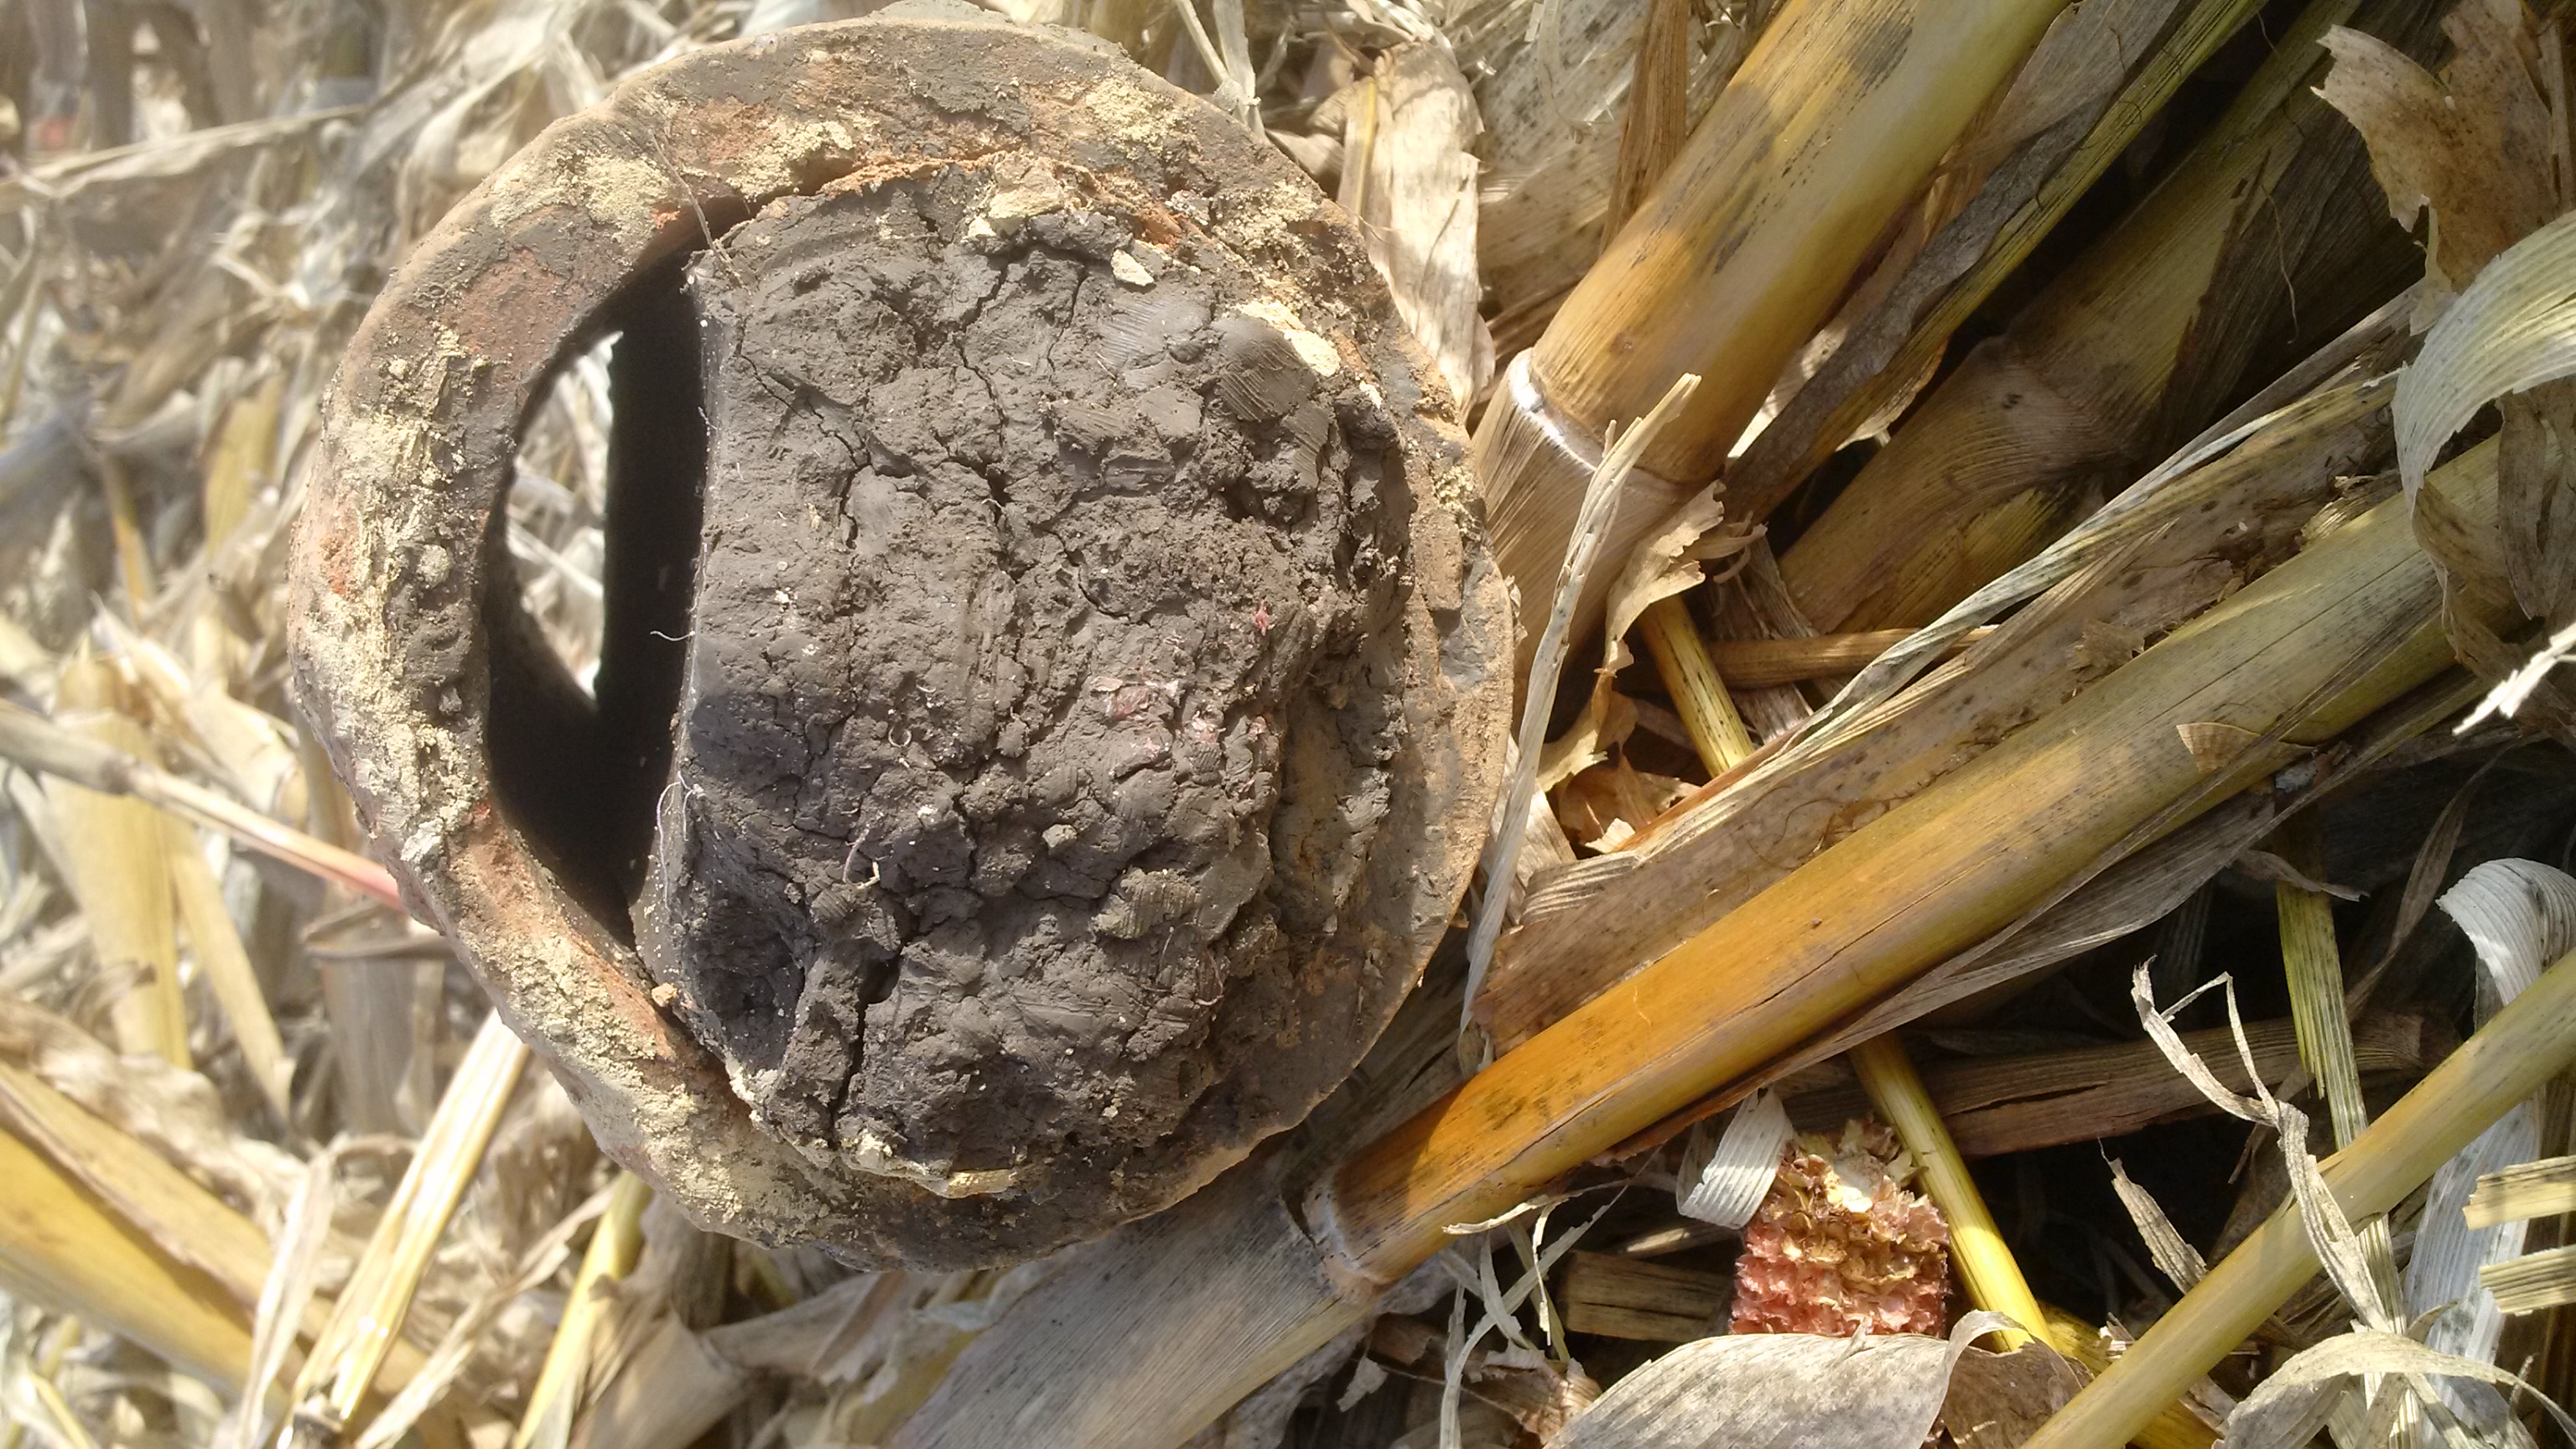
If drains carry water for a prolonged period during the growing season, they can become plugged by tree roots (Figure 5). A good design will route the drains (both laterals and mains) at least 30 m (100 ft) from water-loving trees such as willow, soft maple, elm and poplar and at least 15 m (50 ft) from all other types of trees.
If the drainage system becomes blocked with tree roots:
- reroute the drainage pipe away from the tree(s)
- remove and replace the section of blocked drains and remove the tree(s) causing the problem
- replace the drain using continuous non-perforated pipe for a distance of 15 m (50 ft) on either side of the tree
Some commercial crops have roots that grow into drain lines and clog them. Roots from annual crops such as alfalfa, brome grass, rye grass, canola and sugar beets will usually clear themselves when the crop is harvested. If a problem is encountered:
- avoid growing the problem crops again
- flush the roots from the drain pipe using low‑pressure jet cleaning
- remove and replace the blocked section with a larger diameter drain pipe
- refer to the OMAFA fact sheet, Farm drainage systems and tree roots for more information
Silt boxes and catch basins are often installed at critical points in the system. Inspect and clean them out annually. Ensure their covers fit tightly and are free from structural damage. These structures should always remain locked to prevent unwanted access and tampering.
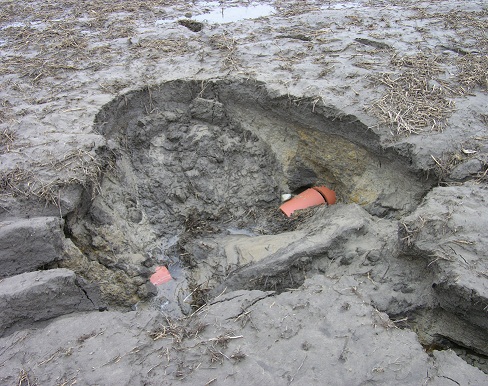
Check for any signs of wash-ins and blowouts, which can indicate that there is a broken drain pipe, and surface water has entered the drain (Figure 6). At the first sign of the smallest surface hole, repair the damage before too much sediment enters the subsurface drainage system and reduces its hydraulic capacity (Figure 7).
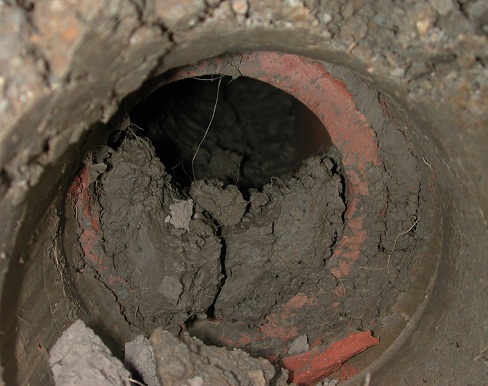
Even if there are no signs of wash-ins or blowouts, older clay tile drainage systems may become filled with sediment and have significantly reduced capacity (Figure 8).
If the drainage system is filled with sediment and is not functioning properly:
- Renovate subsurface drains that have become filled or partly filled with sediment. This should only be completed when the cost of renovation does not exceed 70% of the cost of a new drain.
- Dig up, clean and re-lay existing clay or concrete drain pipes. While it is too costly to dig up and salvage drain pipe 150 mm (6 in.) or less in diameter, it is cheaper to salvage larger sizes, if they are still structurally sound. Consider digging and re-laying only where the drainage pipe is not damaged, carelessly laid with joints having wide gaps or not protected with a cover material to exclude sediment.
- Clean lateral drains through the use of sewer-cleaning rods or flushing if the deposit is only for a short stretch of pipe. Thick deposits over the length of the pipe are difficult to remove.
Cleaning subsurface drains is done the same way as cleaning sanitary sewers. Holes are dug down to the drain at intervals of 10–25 m (33–82 ft), depending upon the size of the drain and the amount of sediment to be removed. A short section of the drain is removed to allow a fabricated steel rod with a hook or corkscrew end, or short-jointed sewer rods, to be inserted into the drain. It may be convenient to dig the hole below the level of the drain as a temporary sediment basin. The steel rod with the corkscrew end is inserted from the lower end of the drain until resistance is encountered. The rod is screwed into the sediment and removed several times. After the rod has been pulled through the drain several times, clean the drain further with a ball of barbed wire or a chain.
Flushing the drain is also recommended. To flush and clean a drain, a reasonable supply of water must be available. Special drain-flushing equipment is available, and the success of the procedure depends on the nature of the deposit in the drain.
Use a large volume of water for flushing rather than high pressure. Low pressure (480 kPa) jet-cleaning of 100 mm (4 in.) drain pipe up to 175 m (574 ft) in length is successful when the deposits are mainly iron ochre and iron sulfide (FeS). In sandy areas, jet-clean the drain soon after the deposition occurs. The flow rate required is approximately 75 L/min (20 US gal/min).
High-pressure jet-cleaning will not clean a significant distance down the drain. However, high-pressure pumps (8,300 kPa) are successful in removing some sands from drains. In most cases, high-pressure jet-cleaning usually only spreads out and levels the deposit.
A water supply is needed to flush the drainage system. Consider using an irrigation system if one is available on the farm. If the water supply is limited, a catch basin or hole at the upper end of the plugged section will serve as a water reservoir. Block off the upper end of the drain and fill the catch basin or hole with water, then remove the block and allow the water to flush suddenly through the drain. This simple procedure of flushing may solve the problem.
There may be regulatory concerns with flushing any sediment into the receiving water body. Contact the local conservation authority or a Ministry of Natural Resources (MNR) office prior to starting any flushing activities.
Surface water inlets
Inspect all surface water inlets (Figure 9) twice a year (spring and fall) and ensure all of the markers are still in place and clearly visible. Re-mark if necessary.
Remove any trash, debris or plant material that has accumulated around the inlet to make sure that it functions properly.
Check the structural integrity of the riser inlets and repair or replace, if necessary.
Outfalls
Conduct thorough inspections of all outfalls in the spring, fall and after severe storm events when the soil is wet and the subsurface drains are running. Make sure all the markers are still in place and clearly visible. Re-mark any if necessary.
Examine end pipes and any erosion controls such as riprap aprons for scour and undermining and to confirm that water is not draining from under and/or around the end pipe.
Check the end pipe for damage caused by ice.
Remove any trash, debris or plant material that has accumulated around the end pipe to ensure that it continues to function properly.
Make any repairs or replace the grate or rodent guard if necessary to prevent unwanted entry by burrowing animals. Rodents will enter a tile and be unable to turn around and exit. The carcass will bloat and completely block the tile, resulting in wet spots in the field. Check for any new animal activity around your outfalls. If signs exist, arrange to have the animals legally removed.
Look for any signs of reddish-orange slime coming from the outfall. This may indicate the presence of iron ochre, which can plug the drainage system. Iron ochre is a stringy red or orange organic material that can block the openings in the tile. Although organic soils may be the source of ochre, it is difficult to predict the problem in advance. If ochre is present in the soil, the drainage system will have a shorter life expectancy than normal.
Look for signs of sediment in drain discharge and in the receiving ditch. Sediment at the drain outfall indicates that there is soil entering the drainage system from bad joints, crushed pipe or the need for a drain envelope. Quite a bit of sediment may come out of the system in its first year, but this should not persist. Locate the area where the sediment is entering the drainage system and repair the drain or remove the sediment using one of the methods described earlier in this fact sheet.
Have the receiving drain cleaned if it has accumulated sediment and is negatively affecting the outfall. Contact the local municipality if the outfall discharges to a municipal drain — never complete any work on a municipal drain. Contact the local conservation authority or MNR office if the outfall discharges to a natural watercourse. In all cases, obtain all necessary approvals prior to starting any work.
Resources
For more technical information on planning, design, construction and maintaining a drainage system, refer to OMAFA Publication 29: Drainage Guide for Ontario.
Land Improvement Contractors of Ontario (LICO) is an association of professional contractors, suppliers and associated industries principally concerned with agriculture and the land drainage industry of Ontario.
For more information on best management practices, refer to Cropland Drainage.
Author credits
This factsheet was written by Tim Brook, P. Eng., drainage program coordinator, OMAFA, and updated by Dan Ward, P. Eng., poultry and other livestock housing and equipment, OMAFA.
Accessible image descriptions
Figure 2. Satellite image showing the presence of tile drains.
An aerial view of several agricultural fields taken in the spring. The fields are bare soil with dark wet areas of undrained soil and lighter lines of drier soil directly over the tile drains. The tile systems that are buried under the soil can be seen by the drier lines directly over that tiles that drain faster than the area in between the tiles that take a longer time to drain.