Ontario Ministry Of The Environment Wastewater System (MEWS) Industrial User Guide
This document provides guidance for Industrial facilities which are required to report their effluent discharges as per the nine Effluent Monitoring and Effluent Limits Regulations through the Ministry of the Environment Wastewater System (MEWS) website.
MEWS Version 3.5.1
April 2017
We welcome your feedback
We have used our best efforts to produce a guide that will help you become familiar and comfortable with the MEWS application. Changes will be made periodically to the information contained in this guide and will be incorporated in later editions. In case of discrepancies between the MEWS guide and other guides and checklists, the official documents such as acts and regulations will prevail.
We welcome your comments about this guide, its organization or subject matter. Please send your comments directly to:
Water Wells and MISA (Municipal/Industrial Strategy for Abatement) Reporting Unit
Ministry of the Environment, Conservation and Parks
Environmental Monitoring and Reporting Branch
125 Resources Road
Toronto, Ontario M9P 3V6
Or:
Email: WastewaterReporting@ontario.ca
For user account issues and system access issues, please contact the MEWS Program Officer at WastewaterReporting@ontario.ca.
Please direct any other correspondence regarding reporting of data to the District Office of the Ministry of the Environment, Conservation and Parks, Senior Environmental Officer. A listing of ministry District Offices is viewable from the ministry website.
MEWS Industrial User Guide
© Queen’s Printer for Ontario, 2017
1. Introduction
The Ontario Ministry of the Environment Wastewater System (MEWS) is a web-based application designed for the monitoring and reporting of wastewater from companies discharging into Ontario waterways.
The Ontario Ministry of the Environment and Climate Change’s Effluent Monitoring and Effluent Limits Regulations—and other legal instruments such as Certificates of Approval and Environmental Compliance Approvals—under the Environmental Protection Act of Ontario (the EPA) and the Ontario Water Resources Act (the OWRA), require designated dischargers of wastewater who discharge directly to water bodies in Ontario to sample their wastewater discharge, analyze the wastewater discharge samples, and report data to the ministry based on the results of the analysis of the samples, as well as to ensure that the quality and quantity of wastewater discharge comply with the regulated limit.
Pre-approved users are permitted entry to the secure MEWS website and can gain access to their discharge data. Users interact with the MEWS website using Internet browsers and the World Wide Web.
The MEWS website supports the following primary business functions:
- Capturing and storing industrial wastewater discharge information for at least 4 years.
- Maintaining company and ministry contact information.
- Maintaining individual user passwords on the website.
- Calculating Industrial Summary Data.
- Generating online discharges reports.
- Submitting discharge data to the ministry at the end of a reporting period in an electronic format as required by the regulations.
This guide is prepared to help you use the MEWS website and to explain how the above functions work.
2. Before you get started
Before you can start using MEWS, you need specific hardware and software, as well as basic computer skills.
a. Computer requirements
The following are the minimum recommended software and hardware computer requirements to connect to the MEWS application:
- Internet Explorer 6.0, Firefox 2.0, or Safari 3.0 (recommended browser versions are very important as you will likely experience problems with earlier versions).
- VGA monitor with resolution set to 600 × 800 (1024 × 768 recommended) and Font Size set to Normal (96 DPI).
- Network connection to the Internet (recommended high speed internet connection; dial-up connection not recommended, but if used, recommend using only during periods when MEWS usage is likely to be low, such as early morning, weekends, and up to 15 days prior to the next quarterly submission deadline).
- Adobe Acrobat Reader (minimum version 5.0).
Hint: Allow pop-ups on your browser for MEWS. This option is found in the Tools menu of your web browser.
b. User prerequisites
To navigate effectively through the MEWS website, users should have a basic understanding of:
- Operating systems such as Microsoft Windows (NT/2000/XP/Vista/2007) or Apple Macintosh (Mac OS 10.0 or later).
- Computer and mouse operations.
- Internet browser operations (clicking on links, viewing content).
Note: Internal company policy may place constraints on your web browser. If you have difficulties accessing the MEWS website, contact your IT department.
3. Logging in to MEWS
This section explains how to locate MEWS on the Internet, obtain a MEWS account, log in to the system, and handle some common access problems.
a. Obtaining a MEWS user account
Contact the MEWS Program Officer to obtain a user account for the MEWS application. MEWS user accounts are provided to employees of industrial wastewater dischargers who are legally required to monitor and report on their discharges. MEWS accounts are not provided to third-party consultants for liability reasons. A discharger must have at least one Industrial Officer account, and may have more than one of each type of account—the account-holder is responsible for the proper use of the account, as detailed in the Disclaimer (see Appendix A).
b. MEWS user roles
The MEWS application is designed for two user roles: Industrial Officer and Industrial Staff. Each system user is designated as one of these user roles and is thereby limited to viewing items or performing functions associated with that specific user role. The following tables identify the MEWS views and functions accessible by each user role.
| MEWS View / Function Accessible | Industrial Officer | Industrial Staff |
|---|---|---|
| View and Delete Notification Messages | ✔ | ✔ |
| MEWS View / Function Accessible | Industrial Officer | Industrial Staff |
|---|---|---|
| Industrial Data Entry | ✔ | ✔ |
| Industrial Data Upload (XML) | ✔ | ✔ |
| Submit Industrial Data | ✔ | ✖ |
| Inactive Control Point | ✔ | ✔ |
| MEWS View / Function Accessible | Industrial Officer | Industrial Staff |
|---|---|---|
| Summary Discharges | ✔ | ✔ |
| Detail Discharges | ✔ | ✔ |
| Daily Plant Loading | ✔ | ✔ |
| Daily Pipe Loading | ✔ | ✔ |
| Limit Check | ✔ | ✔ |
| Company Profile | ✔ | ✔ |
| Outlier Statistics | ✔ | ✔ |
| Value Review | ✔ | ✔ |
| MEWS View / Function Accessible | Industrial Officer | Industrial Staff |
|---|---|---|
| Change My Password | ✔ | ✔ |
| Maintain Contact | ✔ | ✔ |
c. Connecting to MEWS
To access the MEWS application, you will need an Internet connection and familiarity with a browser application such as Internet Explorer. The following steps describe the process of connecting to MEWS.
From your Desktop:
- Start your web browser of choice.
- In the “Location/Address” box of the web browser, type the following: http://www.mewsontario.ca
- Press the Enter key.
The MEWS “Log-on” page will appear as illustrated below (see Figure 1). Type in your user name and password, and then click the “Logon” button to access the system.
Figure 1

Note: To maintain the security of the account, the username and password, ensure the browser settings, such as “remember password” or “auto complete” type features, are turned off.
d. What to do if you cannot access the MEWS site
Your workstation must be properly configured to access the Internet before attempting to gain access to the MEWS website.
If you type http://www.mewsontario.ca you may receive any of the following error messages:
Cannot open the Internet site www.mewsontario.ca or A connection with the server could not be established or Unable to locate the server www.mewsontario.ca
If so, please perform one of the following actions:
- Make sure that you are connected to the Internet. Check that your internet connection is established, and you can access other websites.
- Re-type http://www.mewsontario.ca and try accessing the site again.
If you still cannot access the MEWS website after a reasonable time, contact the MEWS Program Officer.
Note: Internal company policy may place constraints on your web browser. Confirm with your IT department that access to the MEWS website is not restricted.
4. Getting started
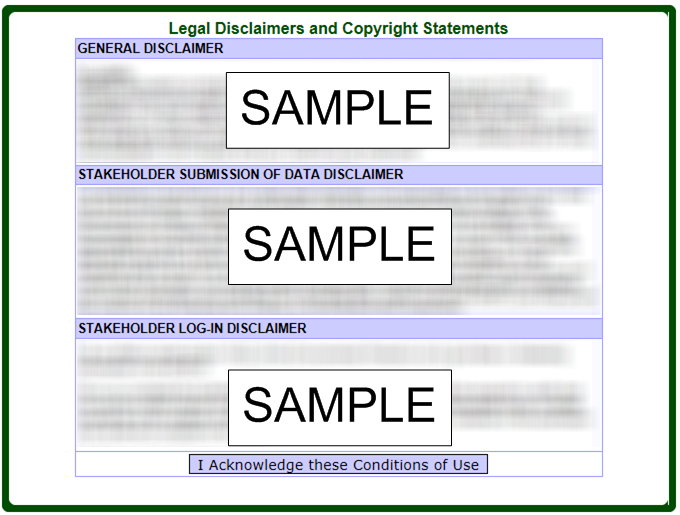
a. Accept the legal disclaimer
A legal disclaimer will be displayed the first time you log in to the MEWS system (see Figure 2 and Appendix A). It explains that MEWS is a public service provided by the Ministry of the Environment and Climate Change. The Government of Ontario assumes no responsibility and you should verify the information from other sources prior to making decisions or acting upon it. This notification is displayed once. To proceed, read the content and click the “I Acknowledge these Conditions of Use” button.
Figure 2
b. Check your company profile
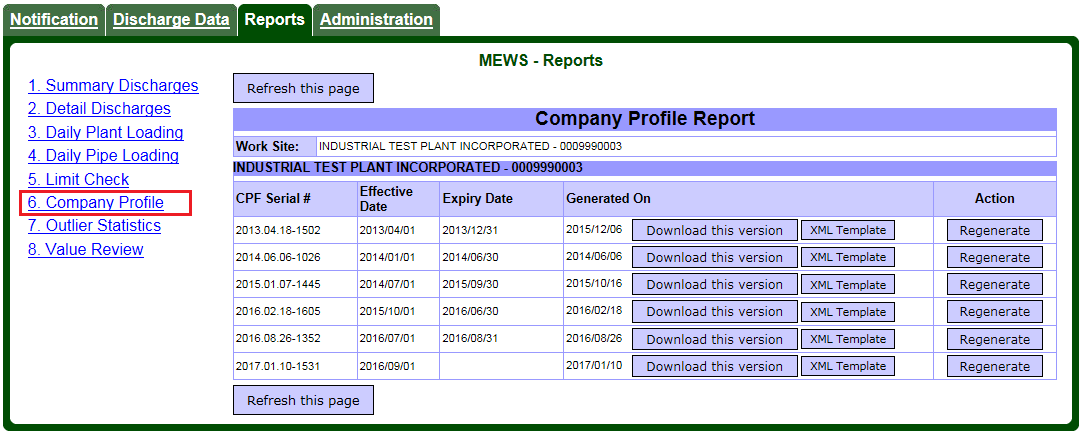
The MEWS home page contains four tabs—“Notification”, “Discharge Data”, “Reports” and “Administration”—and normally defaults to the “Notification” tab. However, when you first log in, MEWS defaults to the “Reports” tab and the Company Profile Report page; this page is also the default display following any recustomization of your Company Profile File (CPF) (see Figure 3). Review your company profile before starting (see Figure 74 for an example of a CPF), and report any errors in your CPF to your ministry District Office.
Figure 3
Note: The parameter codes and descriptions (e.g. PPUT - Phosphorus, Unfiltered Total) relate to specific parameter testing methods and analysis. Verify with your laboratory to ensure the correct testing method and analysis is being performed for each parameter.
The MEWS discharge data entry application requires that reporting parameters such as flow and chemical substances are customized in a CPF. This Company Profile is “active” for a defined period of time. The Industrial Data Entry screen is driven by the customization in the CPF. The ministry customizes the Company Profile based on the regulatory requirements (such as reporting parameters and schedules). The shortest CPF period is one calendar month and it must start on the beginning of the month. A maximum of three CPFs may be active within a given quarterly reporting period. When you enter a particular sample date, the system will search and select the appropriate CPF.
Before you begin entry of data resulting from the analysis of wastewater discharge samples, please verify that the ministry has created a valid active Company Profile for the quarterly sampling period in question. To do this, download the Company Profile Report to assist in the verification (details in Section 9g).
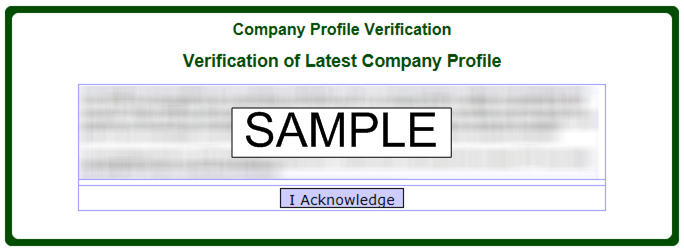
Note: When the ministry uploads a new CPF to MEWS, a notification is presented when you log in (see Figure 4). This notification is displayed once. To proceed, read the content and click the “I Acknowledge” button.
Figure 4
c. Choose your task
The MEWS home page contains four tabs—“Notification”, “Discharge Data”, “Reports” and “Administration”—and defaults to the “Notification” tab. You may choose any of these four tabs. Each one is explained briefly below. You can find more details of all four tabs and their modules in other sections of this guide.
Note: The MEWS system “times out” after 20 minutes of inactivity. Your session will be disconnected and the system will ask you to log in again. Any changes that were not saved prior to the time-out disconnection will be lost.
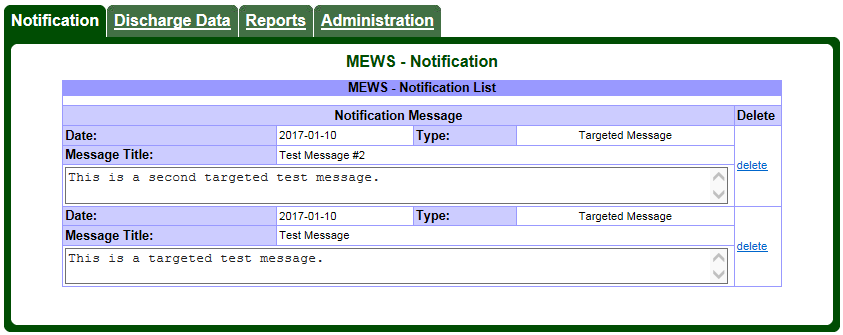
d. Notification tab
The “Notification” tab provides a listing of notices posted by the MOECC (see Figure 5). These notices are displayed in reverse chronology (latest at the top), grouped by notification message type (targeted and broadcast). The discharger should consult the notices for important information on the use of MEWS, or for reporting issues specific to your work site.
Figure 5
The following function is available:
| Function | Description |
|---|---|
| Delete | Click on “delete” beside a notice to delete the Notice after you have read it and / or saved it (see below). |
The discharger may wish to save notices for future reference. This may be accomplished by selecting the notice (use your mouse to highlight the notice) and using the browser’s Copy feature (under the Edit tab), then Paste the notice text into a separate word processing document.
A notice that is posted by the MOECC while a user is displaying the “Notification” page will not appear to this user; however, it will appear once the user has either refreshed the page (using the browser’s Refresh button) or has returned to the “Notification” page from another tab.
The “Notification” tab screen will show only the page title when a user has no messages.
e. Use discharge data tab for day-to-day operations
The “Discharge Data” tab provides four modules where day-to-day operations will be performed (see Figure 6). To activate a module, simply click on the module title.
Figure 6
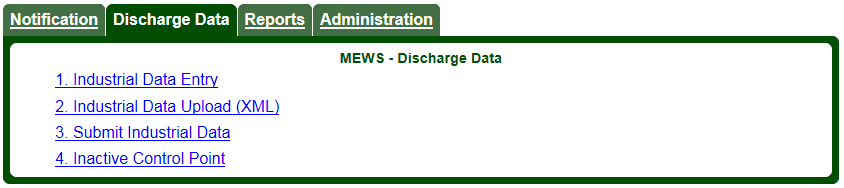
| Number | Module | Function |
|---|---|---|
| 1 | Industrial Data Entry | To perform entry and editing of sample comments, result values, value remark codes and result comments. Find details in Section 7 of this Guide. |
| 2 | Industrial Data Upload (XML) | To upload data results through the use of the XML file format (an alternative to Industrial Data Entry). Find details in Section 8 of this Guide, as well as the current “XML Format Electronic File Transfer for industrial officers and staff” guide. |
| 3 | Inactive Control Point | To specify a period of inactivity for one or more control points. If a specific control point has a period of inactivity, this information may be entered into MEWS in this module. Find details in Section 6 of this Guide. |
| 4 | Submit Industrial Data | To submit industrial data to the ministry. After uploading and / or data entry of regulatory discharge data and verification is complete, this data is required to be submitted to the ministry. Find details in Section 10 of this Guide.
Note: The Submit Industrial Data module is only available to Industrial Officers. |
f. Use reports tab to generate reports
The “Reports” tab (see Figure 7) provides eight online discharges reports:
Figure 7
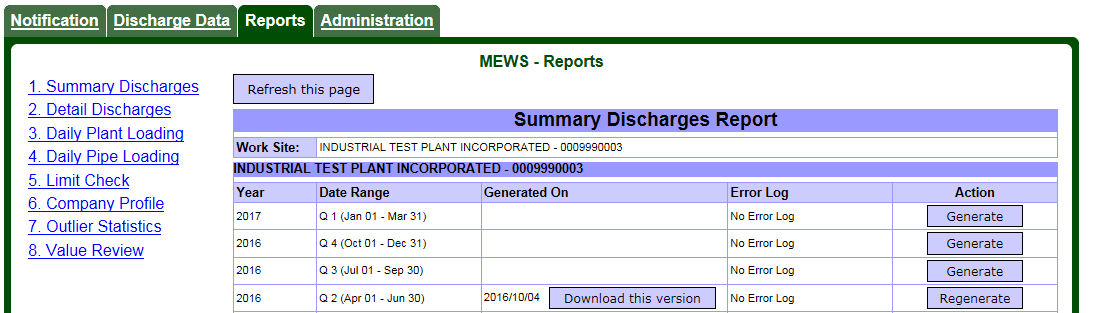
| Number | Report | Function |
|---|---|---|
| 1 | Summary Discharges | Lists all summary values calculated by MEWS, based on the sample result values you entered. |
| 2 | Detail Discharges | Lists all values you entered and all values calculated by MEWS. |
| 3 | Daily Plant Loading | Lists all loading values calculated by MEWS for the plant. |
| 4 | Daily Pipe Loading | Lists all loading values calculated by MEWS for each sample location (pipe). |
| 5 | Limit Check | Also called the “Summary of Non-Compliance Report”, lists values in non-compliance with ministry requirements. Limit exceedances must be reported as soon as reasonably possible to your local ministry District Office. |
| 6 | Company Profile | Provides details of the work site sample locations and monitoring and reporting requirements. |
| 7 | Outlier Statistics | Also called the “Value Outliers Report for Concentration and Loading”, lists sample result values that fall outside the normal expected results—for data quality review only. |
| 8 | Value Review | Also called the “Incomplete Data Entry Report”, lists all parameters not reported for each day that a sample is required—for data quality review only. |
To select a report, simply click on the report name. Details of these reports are in Section 9 of this guide.
g. Use administration tab for contact information
The “Administration” tab (see Figure 8) has two modules that allow you to change your password and manage contact information. To activate a module, simply click on the title.
Figure 8

| Number | Module | Function |
|---|---|---|
| 1 | Change My Password | Allows you to change your MEWS website log-in password as required. |
| 2 | Maintain Contact | Work Site and Ministry contact information is maintained here. The work site contact entered here will be used as defaults for the quarterly industrial data submission to the ministry. |
For details on the “Administration” tab, see Section 5 of this guide.
5. Managing your account
Before getting started with MEWS business, you need to change your password and check your contact information with the ministry. You do this through the “Administration” tab, which has two modules: Change My Password and Maintain Contact (see Figure 9)
Figure 9
a. Changing your password
You will be provided with an initial user name and password by the ministry. It is highly recommended that you change your password the first time you log on. After you click on the Change My Password module from the MEWS “Administration” tab, the Password Maintenance page appears (see Figure 10).
Figure 10
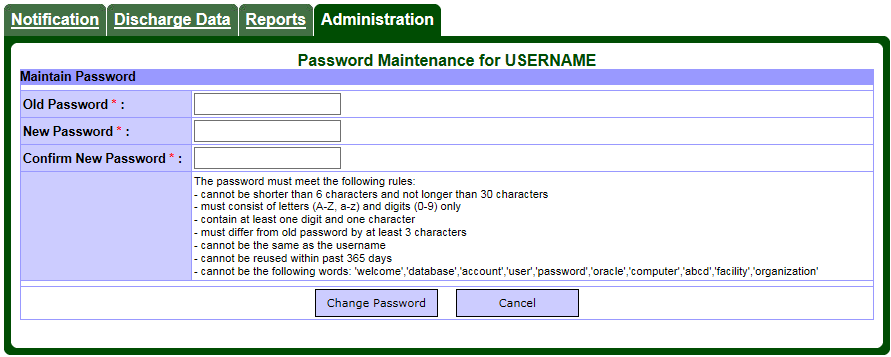
Entering old and new passwords
To change your password:
- Enter your current (“old”) password in the first field.
- Enter a “new” password in the second field.
- Confirm the new password by entering it again in the third field.
The data entry section contains the following fields:
| Field | Description | Editable? |
|---|---|---|
| Old Password | Enter your old password for security check. | Yes |
| New Password | Enter your new password. | Yes |
| Confirm New Password | Re-enter your new password for confirmation | Yes |
All fields are mandatory. The new password must meet the following rules:
- Cannot be shorter than 6 characters and not longer than 30 characters.
- Must consist of letters (A to Z, a to z) and digits (0 to 9) only.
- Contain at least one digit and one character.
- Must differ from old password by at least 3 characters.
- Cannot be the same as the username.
- Cannot be reused within past 365 days.
- Cannot be the following words: ‘welcome’, ‘database’, ‘account’, ‘user’, ‘password’, ‘oracle’, ‘computer’, ‘abcd’, ‘facility’, ‘organization’.
The following buttons are available:
| Button | Description |
|---|---|
| Change Password | Saves the new password. |
| Cancel | Exits the current page without saving any changes, and returns to Administration tab page. |
Saving a new password
Click the ‘Change Password’ button to save the new password. The following validation message may appear:
| Validation message | Meaning |
|---|---|
| “Old Password is incorrect.” | Re-enter old password in the Old Password field. |
| “Invalid New Password.” | Make sure the new password adheres to the rules as listed on the change password page. |
| “New Password and Confirm Password do not match.” | Make sure that the New Password field and the Confirm Password field contain the same password. |
After the password has been successfully changed a message will be displayed: “Success! Password has been changed.”
You may continue working in MEWS but the next time you log in, use your new password.
Note: If you have forgotten your password and need to have the password reset, please contact the MEWS Program Officer. A new temporary password will be provided. It is highly recommended that you change the temporary password immediately.
b. Maintaining contact information for the ministry
You can manage the contact information that the ministry needs for your data submissions in the Maintain Contact module. When you select this module in the “Administration” tab, the Work Site Contact page appears (see Figure 11).
Figure 11
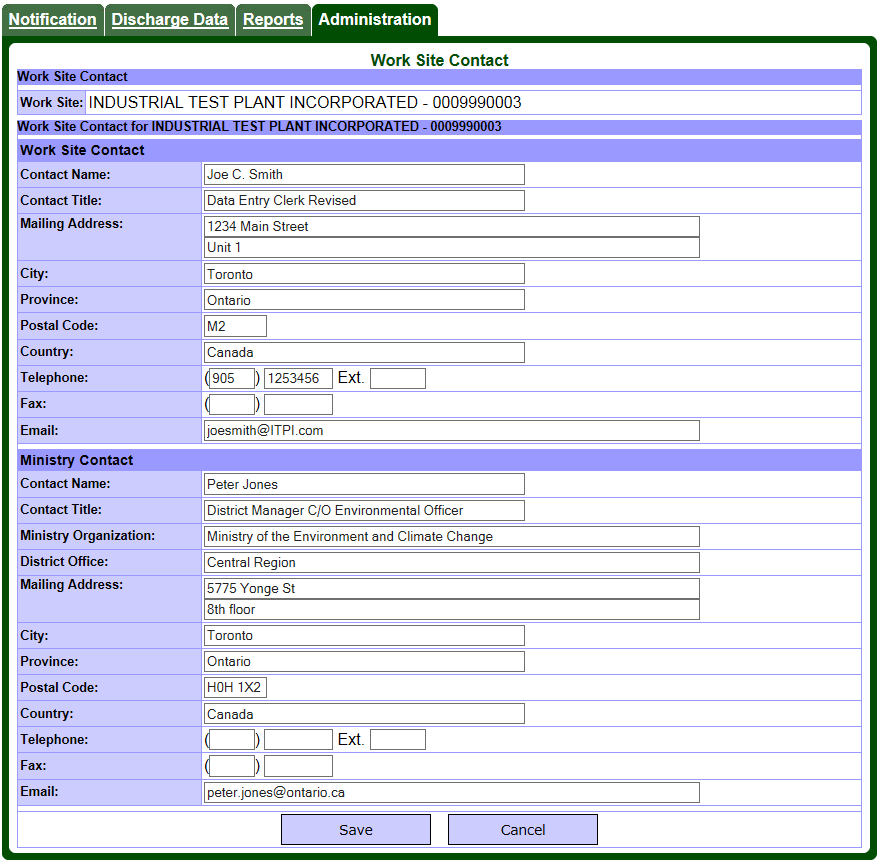
There are 2 types of contact information required for the work site:
| Number | Contact Type | Where contact information is used |
|---|---|---|
| 1. | Work Site Contact | The work site contact information is used to automatically populate the appropriate submission information fields on the “Data Submission” page (explained in Section 10) on which you enter information when performing data submissions. |
| 2. | Ministry Contact | The ministry contact information will provide you with details to allow you to directly contact your District Officer. This information also appears on the Transmittal Sheet. |
Important Note: The data submission Transmittal Sheet will not include all the required components unless the work site contact (including the ministry contact) data are completed.
The work site contact should be an employee of the discharger, who has been assigned a MEWS user account, preferably with the role of Industrial Officer. The work site contact details must relate to the same discharger for whom the user is logged in; the company name of the discharger is automatically populated in the Work Site field. The regulatory requirement is for the Transmittal Sheet to be signed by the discharger, who is defined as being “the owner or person in occupation or having the charge, management or control of a plant”. While the Transmittal Sheet is populated with the work site contact details (Figure 81), since the person signing may not necessarily be the same person listed as being the Work Site Contact person, the Transmittal Sheet must be completed/revised manually in the format provided.
For the Ministry Contact information, the Contact Name field should be the District Manager care of (“C/O”) your Environmental Officer, and the Contact Title field should be “District Manager”. The Transmittal Sheet is populated with this information (Figure 81); the regulatory requirement is for the discharger to make their data submissions to the “Director”, who is defined as the District Manager. The remainder of the Ministry Contact information should relate to the Environmental Officer.
You may perform any of the following tasks on the Work Site Contact page:
- retrieve the contact information
- edit the contact information
- save contact information modifications
- cancel contact information modifications
Retrieving the contact information
MEWS will automatically retrieve existing contact information. You may proceed with editing. Note that upon entering the Work Site Contact page for the first time, the data entry fields will be blank.
Editing the contact information
The retrieved contact information is displayed in the data entry section. You can edit the contact information on this page. To modify contact information, move the cursor to the desired contact field and enter the new information. The data entry section contains the following fields:
| Field | Description | Editable? |
|---|---|---|
| Work Site | Defaults to your work site. | No |
| Work Site Contact | ||
| Contact Name | Name of the work site contact person. | Yes |
| Contact Title | Title of the work site contact person. | Yes |
| Mailing Address | Mailing address of the work site contact; can include street number and name, postal box number, suite number, rural route number, etc. | Yes |
| City | City of the mailing address. | Yes |
| Province | Province of the mailing address. | Yes |
| Postal Code | Postal Code of the mailing address. | Yes |
| Country | Country of the mailing address. | Yes |
| Telephone | Area Code (3-digit), telephone number (7-digit) and extension (4-characters, if applicable) of the work site contact. | Yes |
| Fax | Area Code (3-digit) and fax number (7-digit) of the work site contact. | Yes |
| Email address of the work site contact. | Yes | |
| Ministry Contact | ||
| Contact Name | Name of the ministry contact person—enter the name of the District Manager, care of (“C/O”), and the name of your Environmental Officer. The regulatory requirement is for the discharger to make their data submissions to the “Director”, who is defined as the District Manager. | Yes |
| Contact Title | Title of the ministry contact person—should be “District Manager”. The remainder of the Ministry Contact information should relate to the Environmental Officer identified in the Contact Name field. | Yes |
| Ministry Organization | Defaulted to “Ministry of the Environment and Climate Change”. | Yes |
| District Office | Name of the ministry District Office. | Yes |
| Mailing Address | Mailing address of the ministry contact; can include street number and name, postal box number, suite number, etc. | Yes |
| City | City of the mailing address. | Yes |
| Province | Province of the mailing address. | Yes |
| Postal Code | Postal Code of the mailing address. | Yes |
| Country | Country of the mailing address. | Yes |
| Telephone | Area Code (3-digit), telephone number (7-digit) and extension (4-characters, if applicable) of the ministry contact. | Yes |
| Fax | Area Code (3-digit) and fax number (7-digit) of the ministry contact. | Yes |
| Email address of the ministry contact, which is typically firstname.lastname@ontario.ca. | Yes |
Note: MEWS does not validate the contact information entered. However, the telephone numbers, fax numbers and email addresses must be in the appropriate formats.
The following buttons are available:
| Button | Description |
|---|---|
| Save | Saves all modifications and returns to previous screen. |
| Cancel | Exits the current page without saving any changes, and returns to previous page. |
Saving contact information modifications
To save changes you have made to the contact information during your editing, click on the ‘Save’ button at the bottom of the page.
Note: When the ‘Save’ button is clicked, the data will be saved and the system will return to the “Administration” tab page.
Canceling modifications to contact information
If you want to cancel your changes, simply click on the ‘Cancel’ button.
Note: When the ‘Cancel’ button is clicked, the system will return to the “Administration” tab page, without saving any of the changes that you have made.
c. Removing a work site from MEWS
A work site can be removed from the MEWS system. The discharger must contact the MEWS Program Officer to confirm why the work site should be removed from the MEWS system and the final day of discharge from work site. The work site will then be end-dated in the MEWS system and related MEWS accounts will be removed.
Alternately, an MOECC Environmental Officer may notify the MEWS Program Officer of a work site status (e.g. company out of business), and the MOECC will proceed with end-dating the work site and removing all related MEWS accounts from the system.
Note: A work site should be removed from MEWS when there is no longer any discharge of wastewater effluent directly to Ontario waterways from any control point, and when there is no expectation of any such discharge in the future. Examples include: permanent site closure, diversion of all discharge to sanitary sewer, and wholesale change of operations. This is not the same as designating control points as being Inactive—see Section 6.
6. Specifying an inactive control point
There will be occasions when a work site has no discharge from one or more control points for a significant (week or more) amount of time. In these cases, it is important that you let the ministry know that there was no discharge from the control point(s).
This can be easily accomplished by designating a control point as inactive. Below are the steps one should take in ensuring that there are no errors and the information is accurately submitted to the ministry.
a. Specifying an inactive control point
This section features a function that allows you to enter a start and end date where no effluent has passed the sample location over an extended time period. Examples of no discharge over an extended time period include:
- The sample location is shut down for maintenance.
- The discharge is rerouted from one control point to another for a defined period of time (overflow effluent discharge).
- The discharge facility is temporarily shut down (e.g., seasonal, work stoppage)—see Section 6d, Submitting quarterly data with all control points inactive.
The remark code “!NM” will automatically be added for each entire month for which no discharge is entered using the Inactive Control Point module. You should enter the reason for no discharge in the Comments field provided in the “Data Submission Form” (see Section 10, Submitting industrial data) prior to submitting the quarterly Industrial Data.
“Inactive” is defined as a period of time during which no effluent was discharged for listed control point(s).
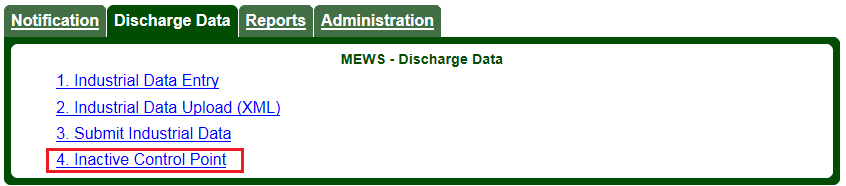
Select module #4 from the “Discharge Data” tab (see Figure 12).
Figure 12
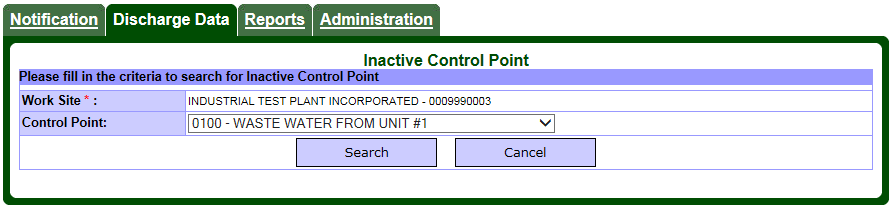
You must first identify the control point that is inactive. To do this, select the control point from the pick list (see Figure 13).
Figure 13
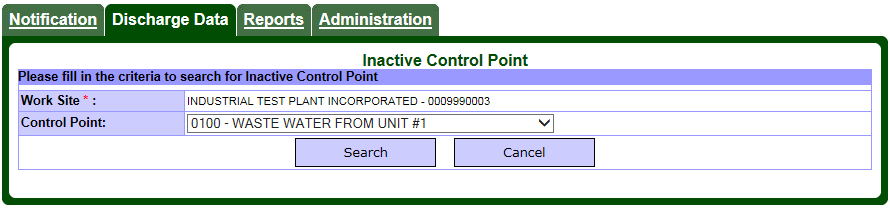
The following table identifies the criteria:
| Field | Description | What to do |
|---|---|---|
| Work Site | Name and number of the work site. | This field is pre-populated. |
| Control Point | Name and number of the control point within the work site. | Select a control point from the pick list. |
Hint: If a control point is no longer being used, you must inform the ministry to change your Company Profile File (CPF).
The following buttons are available:
| Button | Description |
|---|---|
| Search | Retrieves the period of inactivity for a control point. Also, refreshes the screen and removes any incorrectly entered dates / record. |
| Cancel | Exits the current page and returns to the Discharge Data tab. |
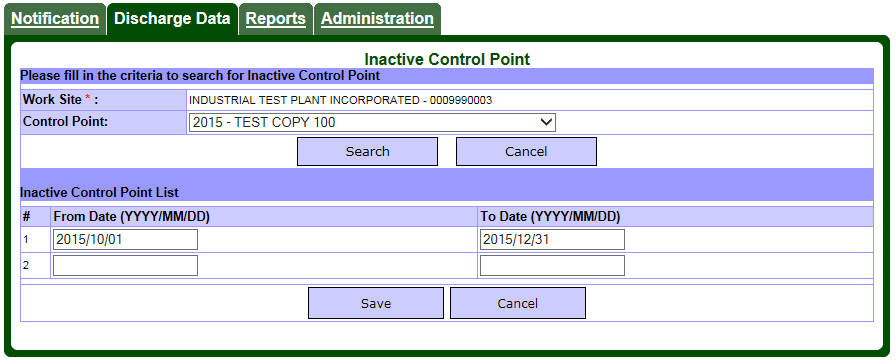
Once you click Search, the application will search for dates already entered for the selected control point. If no data is found, a blank record will appear for entry of dates by the user (see Figure 14). If data is found, the dates for which the control point is inactive will be listed.
Figure 14
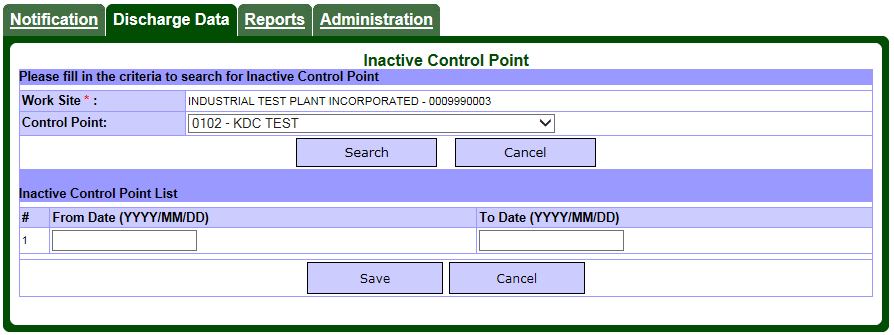
Enter the “From Date” and the “To Date” (in yyyy/mm/dd format) for the period of time during which there is no discharge for this control point. The start and end dates of periods of control point inactivity must be within the reporting period, and are inclusive. The following table identifies the data entry fields:
| Field | Description | What to do |
|---|---|---|
| From Date | The beginning of the period of time during which there is no discharge for this control point. | Enter the beginning date of the inactive control point in yyyy/mm/dd format (must be within the reporting period). |
| To Date | The end of the period of time during which there is no discharge for this control point. | Enter the end date of the inactive control point in yyyy/mm/dd format (must be within the same reporting period as the From Date). |
The following buttons are available:
| Button | Description |
|---|---|
| Save | Saves the control point inactive information to the database and adds a second line with blank date range fields for the same control point. |
| Cancel | Exits the current page (without saving any changes), and returns to the Discharge Data tab page. |
The following validation message may appear:
| Validation message | Meaning/button |
|---|---|
| Input value must be in (YYYY/MM/DD) format. | The dates entered in the “From Date” or “To Date” field are invalid. This error message will supersede the “To Date and From Date cannot span more than a quarter” error message if both errors are present. |
| To Date and From Date cannot span more than a quarter. | The period identified by a From Date and To Date is more than a calendar quarter (i.e., one of the 4 three-month periods within each calendar year). Old entries may be validated as new ones are entered; check all inactive date entries for the control point and revise. |
| Data exists for Inactive control point period specified. Please delete data from YYYY/MM/DD to YYYY/MM/DD. | Data cannot be entered or exist for an inactive control point period. The data should be removed or the inactive control point information revised. |
If you change the Control Point, click the “Search” button again.
Once you have saved one set of dates, a second line will appear with blank fields for entry of another date range for the same control point, if required (see Figure 15).
Figure 15
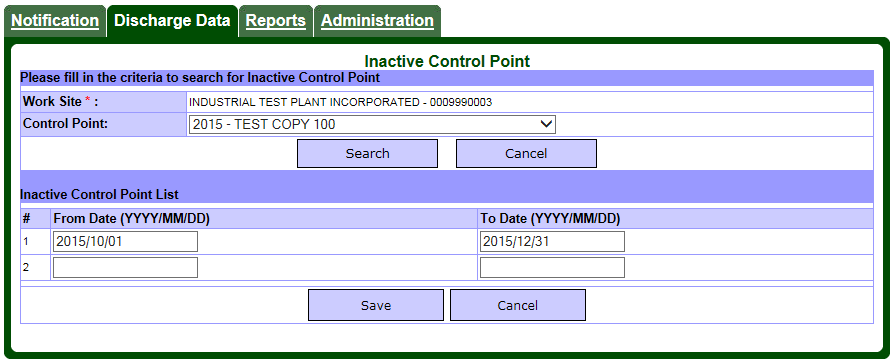
Enter the next set of dates and click “Save.” If there are no other periods to be entered for this control point, click “Cancel” to return to the “Discharge Data” tab page. Or select another control point from the control point pick list and click the “Search” button. Repeat the above steps to enter the inactive period information for the control point.
Hint: You may provide additional information regarding the inactive control point. Enter this information in the Comments field provided in the “Data Submission Form” (see Section 10, Submitting industrial data) prior to submitting the quarterly Industrial Data.
Note: Inactive control point periods, “From” and “To” dates, can only be entered through this website module. Inactive “From” and “To” dates cannot be entered via XML file uploads.
b. Editing an inactive control point time period
Select module #4 from the “Discharge Data” tab (see Figure 12).
You must first identify the control point that requires the inactive period to be edited. To do this, select the control point from the pick list in the criteria section of the page (see Figure 16).
Figure 16
The following table identifies the criteria:
| Field | Description | What to do |
|---|---|---|
| Work Site | Name and umber of the work site. | This field is pre-populated. |
| Control Point | Name and number of the control point within the work site. | Select a control point from the pick list. |
The following buttons are available:
| Button | Description |
|---|---|
| Search | Retrieves the period of inactivity for a control point. |
| Cancel | Exits the current page (not saving any changes), and returns to MEWS Discharge Data tab page. |
Once you click Search, the application will search for the selected control point. If no data is found, a blank record will appear for entry of dates by the user. If data is found, the dates for which the control point is inactive will be listed (see Figure 17).
Figure 17
To edit an existing from/to date period, place the cursor in the appropriate field and change the date. Click the ‘Save’ button.
c. Deleting an inactive control point time period
Select module #4 from the “Discharge Data” tab (see Figure 12). You must first identify the control point that has an inactive period to be deleted. To do this, select the control point from the pick list (see Figure 18).
Figure 18
The following table identifies the criteria:
| Field | Description | What to do |
|---|---|---|
| Work Site | Name and number of the work site. | This field is pre-populated. |
| Control Point | Name and number of the control point within the work site. | Select a control point from the pick list. |
The following buttons are available:
| Button | Description |
|---|---|
| Search | Retrieves the period of inactivity for a control point. |
| Cancel | Exits the current page (not saving any changes), and returns to the MEWS Discharge Data tab page. |
Once you click Search, the application will search for the selected control point. If no data is found, a blank record will appear for entry of dates by the user. If data is found, the dates for which the control point is inactive will be listed (see Figure 19).
Figure 19

To delete an inactive date period record, highlight the date and delete the values in each of the “From Date” and “To Date” fields. Click the ‘Save’ button.
Important Note: If all sample dates for a quarter are deleted, as described in Section 7d, the inactive control point periods must also be deleted to clear all information for the quarter.
d. Submitting quarterly data with inactive control points
The discharger is reminded that even if all control points are indicated as being inactive for an entire reporting period (i.e. the full quarter), the discharger is obligated to submit a Detail Discharges Report to the MOECC for this quarter.
The discharger is further reminded that the start date and end date of periods of control point inactivity must be within the reporting period.
Important Note: The discharger should complete a Detail Submission (see Section 10) and submit a Detail Discharges Report (section 9c) if any or all control points are inactive for any period greater than a month.
7. Discharge data: Entering sample results
The second tab is the “Discharge Data” tab (see Figure 20). Four modules appear in this tab:
- Industrial Data Entry
- Industrial Data Upload (XML)
- Submit Industrial Data
- Inactive Control Point
Figure 20
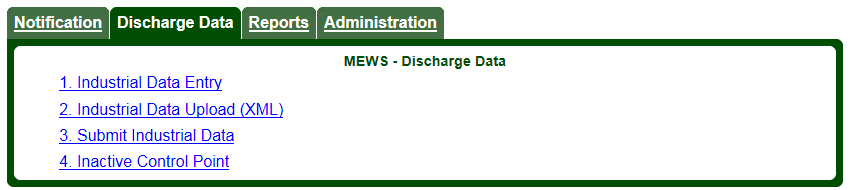
“Discharge Data” entry is the primary front-end tool for wastewater discharge reporting. It provides an easy-to-use interface for entering and editing sample results for industrial wastewater discharge. You can create a new discharge sample and save it, you can edit existing discharge data, or you can delete an entire sample.
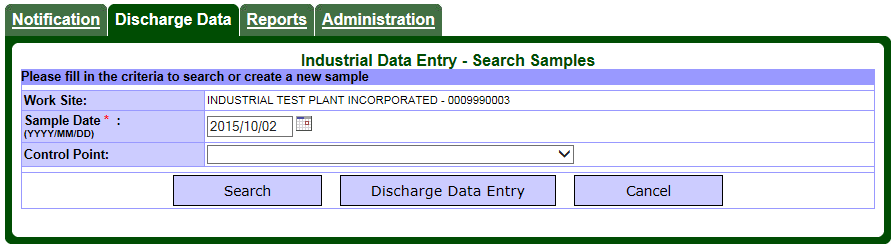
On the “Discharge Data” tab, click on module #1, Industrial Data Entry. The Industrial Data Entry - Search Samples page appears (see Figure 21). Use this page to enter or edit discharge data.
Figure 21
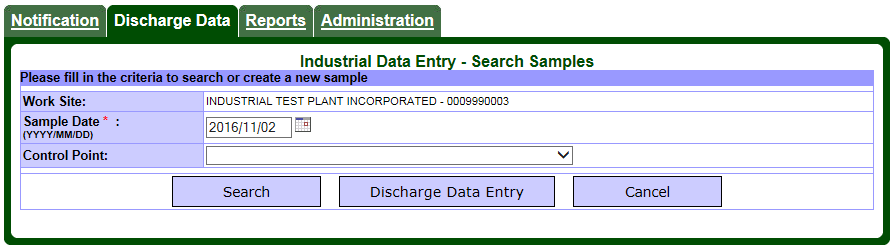
The following table describes the fields and buttons found in the Industrial Data Entry module:
| Field / Button | Description | What to do |
|---|---|---|
| Work Site | Your company name will appear in this field. | This field is pre-populated; however, if the company name has changed, the discharger must advise the MOECC and the Company Profile File must be updated. The company name must include the legal name of the company, followed by the work site company name if it is different than the legal name. |
| Sample Date | Date the discharge sample is taken. Defaults to today’s date. | Enter a valid date to identify when the sample was taken. The default format is yyyy/mm/dd, such as 2017/01/19.
Type the date or click on the calendar icon to select the sample date by calendar. When you select a date in the calendar, it will appear in the sample date field, as in Figure 22 below. |
| Control Point | Provides a drop down pick list of pipe-level control points that are active at the above work site and sampling date. This pick list is dynamically populated based on the company profile and the above specified work site and sampling date. | Select the pipe-level control point of interest. |
| Search | Provides a list of existing sample results based on criteria such as sample date and control point. | Use only if discharge data is already entered and you want to review or edit the information. |
| Discharge Data Entry | Opens the Industrial Data Entry Discharge Data Sample Results page. | Click when you have entered the sample date and control point and you are ready to enter new discharge data. |
| Cancel | Exits the current page without saving any changes, and returns to Discharge Data tab page. | Click to cancel anything you have entered and return to the “Discharge Data” tab page. |
First, enter the date (see Figure 22).
Figure 22
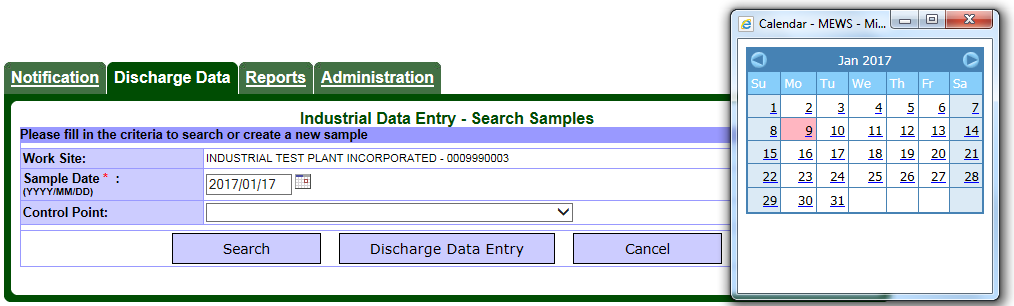
Hint: Certain dates on the calendar appear in red. At least one sample has been created on those dates, for at least one control point.
Important Note: After the sample date is entered, MEWS searches the appropriate company profile for the sample date. The system will pop up a “Please Wait” window. Allow the system to refresh the screen before continuing.
Note: The calendar pop-up window may continue to appear on the screen or be active after the search is completed; in this case, click on the X to close the calendar window.
Next, select a control point from the drop-down list (see Figure 23 and Figure 24).
Figure 23
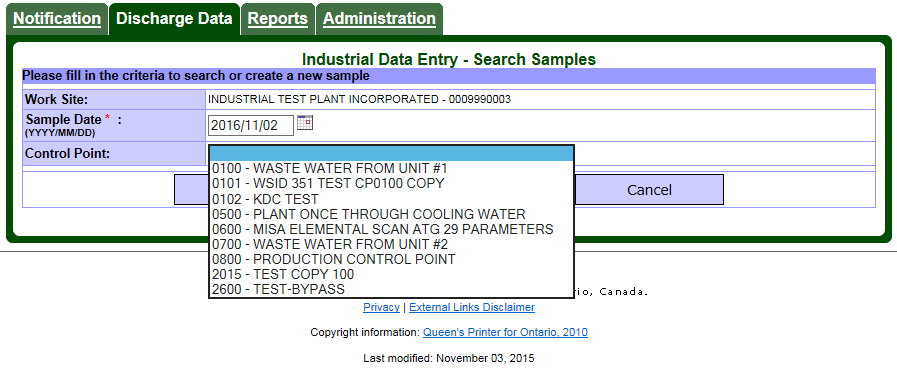
Figure 24
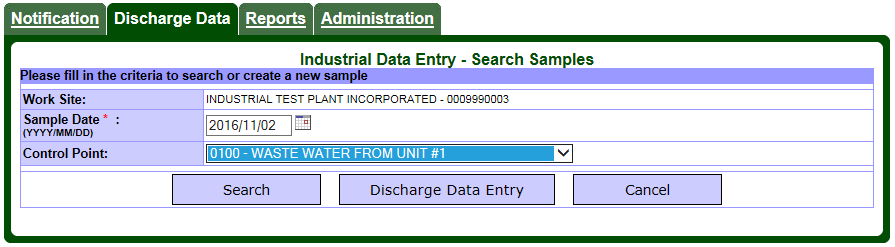
Now you are ready to enter the discharge sample result values. Click the Discharge Data Entry button at the bottom of the page.
The page similar to the example below will appear (see Figure 25). The number and type of parameters will reflect your work site specific CPF.
Figure 25
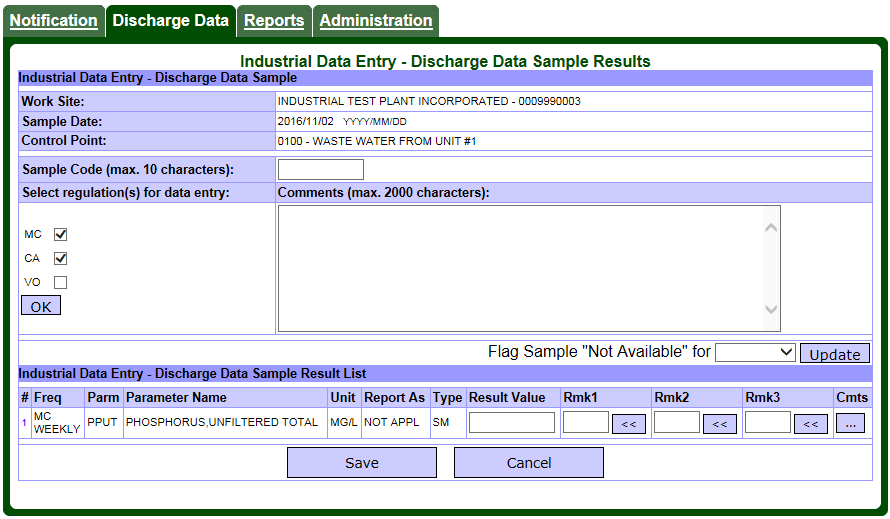
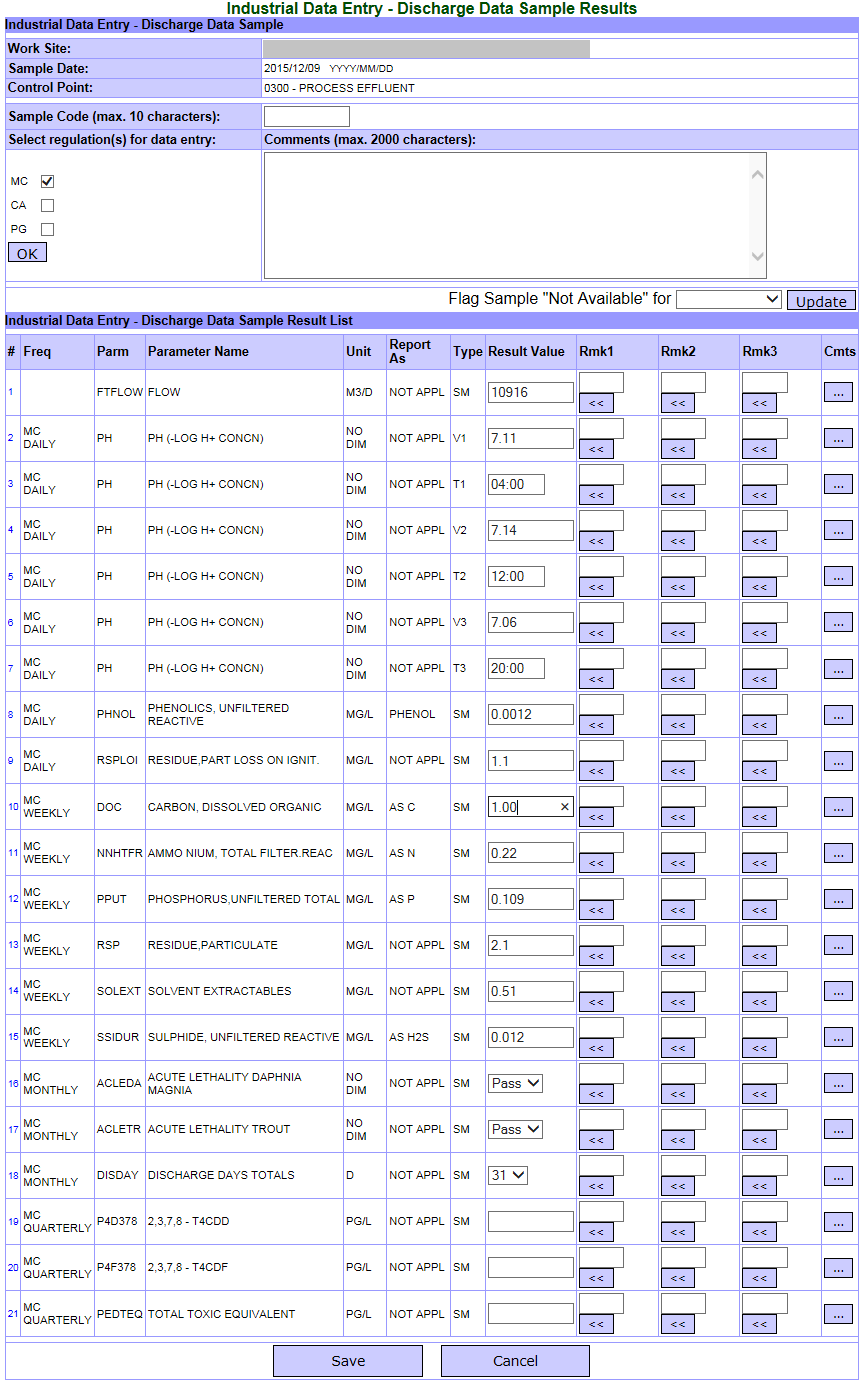
a. Understanding the discharge data sample results page
Before you enter new information about discharge samples, make sure you understand everything on this page. It provides access to pipe-level “detailed data” (such as flows and concentration values). Other categories of data, such as statistical (monthly plant-level maximum, minimum and averages) and derived data (such as daily loading), are generated by the Summary Calculation function (discussed in Section 9a, “Tips for retrieving reports”).
The Discharge Data Sample Results page contains the following fields:
| Field | Description | Editable? |
|---|---|---|
| Work Site | The company name and unique IMIS number of the discharger’s work site. | No |
| Sample Date | The chosen date of the discharge sample for data entering and/or editing. | No |
| Control Point | The chosen control point of the discharge sample for data entering and/or editing. Control points are typically located at the end of a discharge pipe, and are prescribed by a legal instrument. | No |
| Sample Code | An identifier to be associated with the discharge sample as a whole. This field is optional, free-text, and can include up to 10 alphanumeric characters. Dischargers may use this field to document their own sample numbering system. However, it does not appear on any reports. | Yes |
| Select Regulation | Available modules for the different ministry regulations. Refer to section 7b, “Entering new discharge data,” for more details. See full name descriptions in your CPF. | Yes |
| Comment | A comment to be associated with the discharge sample as a whole. This field is optional, free-text, and can include up to 2000 alphanumeric characters. This comment will appear on the Detail Discharges Report. This comment will appear on the Summary Discharges Report, provided at least one result value or remark has been entered for the sample. | Yes |
| Flag Sample “Not Available” for | Refer to section 7b, “Entering new discharge data,” for more details. | Yes |
The discharge sample parameters are displayed in tabular format. Each row represents a reporting-for-time (frequency) and parameter that have been customized in the “active” company profile. The following field items are presented in a tabular fashion:
| Field | Description | Editable? |
|---|---|---|
| # | A unique row number for each reporting parameter in the current data entry screen. | No |
| Freq | The reporting frequency of the parameter, also known as “Reporting-For-Time”. | No |
| Parm | The code of the parameter being reported. | No |
| Parameter Name | The name of the parameter being reported. | No |
| Unit | The abbreviation of the unit of measure of the parameter. | No |
| Report As | An abbreviation of an alternative way that the parameter will be reported. For example, the parameter BOD5 is reported as oxygen (“as O”). | No |
| Type | The type of the component of the result structure that applies to the parameter. For example, “SM” means “single measurement”, whereas “T3” means “time 3”. | No |
| Result Value | The value of the result of the analysis of the sample for the given control point, date, parameter, and unit of measure. Typically the result value is a number representing a concentration, but it could also refer to a value for time, acidity, conductivity, the number of days, or a toxicity exceedance, among others. Some parameters require the value to be chosen from a pick list. The result value must be left blank if none is required on the given sample date (see Note below). | Yes |
| Rmk 1, Rmk 2, Rmk 3, | A remark represented by a code, to be associated with the result value. All remark codes must be chosen from a pick list. | Yes |
| Cmt | A comment to be associated with the result value. This field is optional, free-text, and can include up to 2000 alphanumeric characters. This comment will appear on the Detail Discharges Report only. | Yes |
Hint: All fields bolded in the chart above are generated from your Company Profile File (CPF).
The reporting parameters are listed, with flow parameter appearing at the top of the list. The rest of the reporting parameters follow Flow, and are listed alphabetically by:
- frequency of reporting
- parameter code
- unit abbreviation
- type of result structure component
Note: During data entry, you don’t need to enter result values for all parameters. For a given sample, only parameters required for that day need to be entered.
For example, if the discharge control point is customized for daily, weekly and monthly reporting of various parameters, result values (or remarks) for daily parameters must be reported every day, for weekly parameters must be reported once per week, and for monthly parameters must be reported once per month.
Consult the regulatory requirements that apply to your work site. For each sample location and parameter, the monitoring and reporting periods are also listed in your Company Profile File (CPF).
Note: If no result value is available on a required sample date, a Remark Code (and optionally a Comment) should be entered to explain why a result value has not been entered (see Section 7b, “Entering new discharge data”).
Hint: You can use the short-cut Ctrl+F to search for alphanumeric characters to find a word or value on the page.
b. Entering new discharge data
Notice that there are four different buttons on this page. Use these buttons to enter new information about your discharge data.
| Button | Description |
|---|---|
| ok | To confirm the selected regulation. All of the applicable regulations must be selected (checked) for the specified sample date before entering any data; otherwise some data may be lost. Click the ok button prior to entering any data. |
| Update | To populate the “!NM” remark code in the remark field for parameter records of a frequency selected in the drop down ‘Flag Sample “Not Available” for’ field. The Update button applying the Flag must be clicked prior to entering data for all parameters with the selected frequency, otherwise the result values and / or remarks entered for all such parameters will be deleted and replaced by the remark code “!NM” (“no effluent - no sample available”). |
| Save | Saves all modifications since the last cancel or save. The system will return to the “Industrial Data Entry - Search Samples” page. |
| Cancel | Exits the current page without saving any changes, and returns to “Industrial Data Entry - Search Samples” page. |
Note: Please ensure that your CPF contains your monitoring and reporting requirements. See Section 4b for details.
Note: Individual reporting parameters cannot be inserted during discharge sample editing. If there are missing reporting parameters for the control point selected, you must notify the ministry to modify your Company Profile File.
Note: In the Industrial Data Entry module, don’t use the back button in the Browser toolbar. Use the “Save” and “Cancel” buttons on the MEWS page.
Selecting available regulation
You can select one regulation or a combination of several regulations. The example below (see Figure 26) shows two possible selections: MC (MISA Compliance) and CA (Certificate of Approval/Environmental Compliance Approval).
Figure 26

The default selection is “MC” if MC is in the Company Profile—all customization of the parameters required under MISA/EMEL Compliance will automatically appear. If other parameters are required for the same sample date under different regulations, you will need to also select the regulation that applies for that sample date, and then press the ‘ok’ button. The page will refresh with the appropriate parameters to be reported for the selected regulations and sample date.
Important Note: All of the applicable regulations must be selected (checked) prior to entering any data. Click the ‘ok’ button. Once the ‘ok’ button is clicked, this page will refresh with the parameters customized for the selected regulation(s). When you come back for further editing for the specified sample date, you must select the same regulation(s) entered in the previous session for the same sample date. If not, data will be lost.
For example, you select regulations MC and CA for a specified sample date, complete data entry and save the data. You then return to the same specified sample date and select only regulation CA to edit result values. You then save the data: MEWS saves only the CA data for that day, and will delete data previously entered for MC, as it will assume that the user intended that only the CA regulation requirements applied for that date. You must always select the same regulations for the specified sample date.
Conversely, only those regulations that are applicable must be selected (checked) prior to clicking the ‘ok’ button and entering any data. The discharger must not select a regulation for which data is not required for the specified date. Doing so may result in Error Logs and report generation failure.
If you de-select the default regulation or fail to select any regulation and then select the ‘ok’ button, no parameters are shown and an error message “Please select at least one regulation” will appear.
Note: If data entry has been completed and the ‘Save’ button is not clicked, data will not be saved.
Following is the default display order of the commonly used regulations:
| Regulations | Abbreviations |
|---|---|
| MISA/EMEL Compliance | MC |
| C. OF A. - Certificate Of Approval / ECA – Environmental Compliance Approval | CA |
| Control Order | CO |
| Provincial Guidelines | PG |
| Provincial Regulations | PR |
| Federal Requirements | FR |
Entering the sample code
The sample code field is optional. This field may be comprised of up to 10 alphanumeric characters. This code is used for your internal reference and sample identification purposes only. This code does not appear on any report.
Entering the sample comments
The sample comment field is optional. This field may be comprised of up to 2000 alphanumeric characters. This comment will appear on the Detail Discharges Report. This comment will appear on the Summary Discharges Report, provided at least one result value or remark has been entered for the sample.
Entering result values
To enter a result value, move the cursor to the desired result value field and enter the new result value. For some parameters, a value and/or result (such as pass/fail) must be selected from the drop-down pick list.
The result value can be blank—simply skip over a result value that is intentionally left blank; do not enter a “null” value such as a space, and do not enter a zero. The result value of all parameters for which the frequency does not apply for the date selected must be blank.
Results that are less than one and greater than zero must be entered with a leading zero (“0.002”, not “.002”), otherwise the value is not recognized as a number.
Scientific E notation (e.g. 3.2 million = 3,200,000 = 3.2 × 106 = 3.2E6) may not be used in data entry or XML file uploads.
Leading blank spaces do not affect the recognition by MEWS of the actual result value—no Error Log will be generated due to leading blanks in a result value.
Trailing blank spaces do not affect the recognition by MEWS of the actual result value—no Error Log will be generated due to trailing blanks in a result value.
Significant digits
The following guidelines should be used to determine the appropriate number of significant digits to report in the result value:
- There are a minimum number of two significant digits when determining compliance.
- Legislated limits containing more than the minimum number of two significant digits are assumed to have an appropriate number of significant digits.
- Reported result values should contain as many significant digits as the method detection limit allows for the type of analytical equipment used.
- All digits in excess of the appropriate number of (or default two) significant digits will be ignored when determining compliance—i.e., no rounding occurs; however, MEWS calculations will use all significant digits as input by the user, when determining a derived value.
- Significant digits start with the first non-zero from the left; however, three significant digits are preferable if the first digit on the left is a "1".
- The Result Value field in MEWS has a restriction of 20 digits, including the decimal point (if any); therefore, the number of significant digits cannot be over 20, and will be less if the numerical result value includes a decimal.
Note: You are required to enter data only for the sample date, regulation and frequencies that apply. Result values may not need to be entered for all parameters.
For a given sample day only parameters required for that day need to be entered. For example, if the discharge control point is customized for daily, weekly and monthly reporting of various parameters, result values (or remarks) for daily parameters must be reported every day, for weekly parameters need only be entered once per week, and for monthly parameters need only be entered once per month.
If the “Flag Sample ‘Not Available’” button is selected for the day, then of course no result value or remark need be entered for all parameters—see the section “Flagging all parameters when no effluent is discharged”.
Note: The parameter value measured using a given method must be recorded as measured and that value must be used to determine compliance with the regulated limits
Note: The purpose of regulating accuracies of monitoring equipment is to ensure that sufficiently accurate equipment is used and to allow enforcement of the use of such equipment. It is not meant to provide variance to compliance with regulated effluent discharge limits.
See Figure 27 for an example of properly entered data.
Figure 27
The reporting parameters are listed with flow parameter appearing at the top of the list. The rest of the reporting parameters follow, sorted by Frequency, Parameter test code, Unit Abbreviation, and Structure Component Type.
To easily navigate the Industrial Data Entry screen you may use one or a combination of the following methods:
- Click the scroll bar to move the page up and down.
- Place mouse pointer and click left mouse button to place cursor in the desired field.
- Tab key – to move the cursor to the next field.
- Shift + Tab key – to move the cursor to the previous field
Entering flow value
FTFLOW is customized in the Company Profile File (CPF) for every monitoring frequency that requires a loading calculation and/or a monthly summary calculation for flow, and / or for when flow data by itself is required.
The Flow parameter (FTFLOW) always appears at the top of the Results Table. There is no “Freq” (frequency, or reporting-for-time) displayed with the FTFLOW.
Refer to your regulatory requirements for your flow data entry. If there is no flow for that day:
- Flag “Sample not available for”.
- Click drop down list.
- Select the appropriate frequency as customized in the company profile.
- Click the “Update” button — see the section “Flagging all parameters when no effluent is discharged” for more details.
Entering values with multiple components (like pH)
A Result Structure with multiple components allows for data entry of more than one result value for the reporting parameter (as customized for the parameter) on a given day. The parameter “pH” usually has 6 components customized in its Result Structure. They are:
| Component | Type | Description |
|---|---|---|
| Value 1 | V1 | The numeric value of the first sample result. |
| Time 1 | T1 | The time when the first sample result value was obtained. Enter time as “HH:MM” in 24-hour clock. |
| Value 2 | V2 | The numeric value of the second sample result. |
| Time 2 | T2 | The time when the second sample result value was obtained. Enter time as “HH:MM” in 24-hour clock. |
| Value 3 | V3 | The numeric value of the third sample result. |
| Time 3 | T3 | The time when the third sample result value was obtained. Enter time as “HH:MM” in 24-hour clock. |
Hint: When entering a time value with no minutes, you may skip the minute portion (defaulted to “00”). For example, if the time value is “03:00,” you can simply enter “3” into the Result value. MEWS converts the time value to the HH:MM format, such as 03:00.
For any Value / Time combination, a remark may be entered for that time period only. For example, the on-line analyzer was off-line during only one of these three periods; enter the appropriate remark for that time period.
Other parameters may have a similar Result Structure, including Specific Conductance (Conductivity, or CNDVTY). Some parameters may be customized with a Result Structure requiring the entry of six result values and times on a given day.
Entering results over two days
Some parameters require samples to be taken several times a day with specified periods in between (4 hours, 8 hours, etc.), within the 24-hour period beginning at the first sample. Typically, this is for Daily sampling of the parameters pH, Conductivity, or Temperature. MEWS has no special provision for entering results over two days—the discharger should enter the result values on the day and time of the sampling as usual. For example, result values for the parameter pH customized for 3 result values within a 24-hour period beginning at 14:00 (2:00 PM) with an 8-hour separation, would consist of:
- For the first calendar day, a Remark Code (such as AR) entered instead of a value for V1 at T1 (06:00), a value entered for V2 at T2 (14:00), and a value entered for V3 at T3 (22:00).
- For all subsequent calendar days, a value entered for V1 at T1 (06:00), a value entered for V2 at T2 (14:00), and a value entered for V3 at T3 (22:00).
- For the last calendar day required to be reported, a value entered for V1 at T1 (06:00), a Remark Code (such as AR) entered instead of a value for V2 at T2 (14:00), and a Remark Code (such as AR) entered instead of a value for V3 at T3 (22:00).
The 24-hour period result values reviewed for compliance purposes would then be V2, V3 and V1 over two consecutive calendar days.
Entering pass or fail for acute lethality
You can report pass or fail for acute lethality (toxicity) parameters. You simply:
- Go to the acute lethality parameter at the specified frequency.
- Select either “Pass” or “Fail” or blank in the pick list. “Fail” indicates that toxicity test of the sample obtained from the effluent exceeded the regulatory requirements.
A Remark Code of NL (non-lethal, all organisms survived) is not required in addition to a Pass result value; the Pass result value is sufficient.
| Validation message | Meaning |
|---|---|
| “Invalid Pass/Fail Value. Verify that the value is either "Pass" or "Fail". | The value entered does not match one of the three appropriate entries. The result can only be “ ” (blank), “pass” or “fail” (all capitals letters). |
Note: Please leave the pick list blank if a result is not being reported. This may be the case if the frequency of reporting has been reduced from monthly to quarterly, and the company profile file has not been updated. Notification to the Director may be required for frequency changes; consult applicable regulations for details.
Note: The only parameters that you are required to enter a pass or fail of the regulatory limit exceedance are these toxicity parameters—MEWS calculates regulatory limit exceedances for all other parameters. While toxicity analysis results may be a reportable item, usually only the status of the results exceeding the allowable limit is reportable.
Entering DISDAY value
You can report the number of days in a calendar month that discharge flows past a control point by using the DISDAY parameter. For each month that discharge flows past a control point, on the last day of the month that discharge flowed past the control point, you simply:
- Go to the DISDAY parameter (they all should have a frequency of Monthly).
- Select a number from 1 to 31 in the pick list
The result value for the parameter DISDAY must be blank if:
- There was no discharge flowing past the control point for all days of the month, or
- It is not the last day of the month that discharge flowed past the control point.
For example, a discharger would enter “31” on July 31 for the month of July during which discharge flowed past the control point on all days in the month. A discharger would enter “22” on July 22 for the month of July during which discharge flowed past the control point on the first 22 days only in the month. A discharger would enter “22” on July 31 for the month of July during which discharge flowed past the control point on the last 22 days only in the month.
Note: Two sectors of the MISA/EMEL regulations, Petroleum Sector and Industrial Minerals Sector, are not explicitly required to report the parameter DISDAY at the pipe level. The system currently does not allow DISDAY to be customized at the plant level; therefore, any customization for reporting of DISDAY must be customized at the pipe level. This requires an interpretation of these two regulations to have the same meaning as the other regulations, which require reporting DISDAY at the pipe level.
If there is no flow for a full month, the DISDAY result value should remain blank (do not enter zero). In addition, a remark code is not required if the DISDAY result value is blank.
Low level data reporting
For low-level and “less than” data recording, refer to the ministry publication “Protocol for the Sampling and Analysis of Industrial/Municipal Wastewater,” as amended from time to time (available on the ministry website).
There is no minimum volume for reporting of Flow—i.e., all measured values of flow are to be reported. The discharger must determine if the level of flow is such that sampling cannot be conducted as per the MISA/EMEL Sampling Protocol, and indicate either a flow result value or an inactive control point.
The following table, based on the “Protocol for the Sampling and Analysis of Industrial/Municipal Wastewater,” lists the data entry of low level result values and codes:
| If the Measured Result Value is | Numeric value to be entered | Remark code to be entered |
|---|---|---|
| Equal to or greater than the RMDL | measured value | valid code if required |
| Less than the RMDL and equal to or greater than the LMDL | measured value | <T |
| Less than the LMDL and equal to or greater than the SRI | measured value | <DL |
| Less than the SRI, and the SRI is equal to or greater than the one-tenth the RMDL | measured valueIf a measured value is not available then the SRI value must be recorded. | <W |
| Less than one-tenth the RMDL | measured value | <W |
| Not available due to interference with the sampling | estimated value | > or < |
| Not available for reasons given in a separate report | Leave blank | ! |
Where:
SRI
Smallest Recording Increment
LMDL
Laboratory Method Detection Limit
RMDL
Regulation Method Detection Limit
Note: A discharger using a Laboratory for their sample analysis must obtain a result value from the Laboratory, and the value should be entered in MEWS along with an appropriate Remark Code.
Other direct wastewater: metal mining sector
Companies under the Metal Mining Sector may have overflow effluent sample locations. The Ministry Control Point Type is Type 44, “Other Direct Wastewater”. This CP Type has unique flow and loading calculation requirements. The reporting-for-time period is Event, and the discharger is required for the period of discharge to take a sample during each eight-hour period.
The discharger is also required to report on the volume of effluent that has passed the sample point during the eight-hour period. The flow is reported as the unit of measure cubic meters per eight-hours, or m3/8Hrs.
The discharger is also required to calculate overflow effluent stream loading for the same eight-hour period. The load is reported as the unit of measure kilograms per eight-hours, or kg/8Hrs.
For CP Type 44, the customization for data entry and reporting in MEWS is now as follows:
- Reporting-for-time is Event.
- Result Structure is P3 (three sample result values and times per day) for flow, concentration and loading.
Figure 28 shows the customized data entry page for this control point type.
Figure 28
Entering remarks for result value
In some cases, a remark may be entered instead of entering a result value. For instance, if there is no flow on the date a sample is required, a remark such as “!NM” should be entered and the result value field remains blank. If there is no flow for extended periods of time at a sample location, refer to Section 6 for inactive control points. In other cases, such as for low-level result values, both a remark and a result value must be entered. See Section 6 of the "Protocol for the Sampling and Analysis of Industrial/Municipal Wastewater".
Sample locations and/or parameters with the sampling frequency as “Event” are expected to have infrequent flows or sample under specific conditions set out in applicable regulations. A result is expected to be entered only when a flow event occurs or the conditions warrant sampling. The “!NM” remark code is not required to indicate no flow when the sampling frequency as “Event”.
Each result value can have up to 3 remarks. Simply enter a valid remark code in the ‘Rmk1’, ‘Rmk2’ and ‘Rmk3’ fields. Alternatively, click on the double arrow button to display the list of remark codes (see Figure 29)
Figure 29
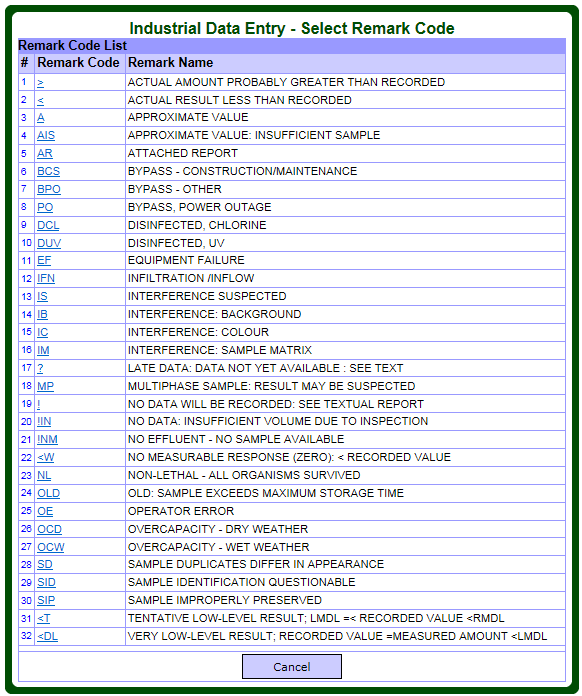
Select the desired remark by clicking on the “Remark Code” beside the “Remark Name” to associate a remark with the result value. Only one can be chosen at any one time. Once a Code has been selected, it will populate the Remark field for the parameter, and the Remark Code dialog box will close. The “Cancel” button will close the “List of Remark Codes” dialog box.
A Remark Code must be entered in the order of ‘Rmk1’ field, ‘Rmk2’ field (if a second Remark Code is required), and ‘Rmk3’ field (if a third Remark Code is required).
The following validation message will appear if a remark code not listed above is used and if “Rmk” fields are blank.
| Validation message | Meaning |
|---|---|
| “Invalid Remark Code “*” for Rmk* on row *.” | The value remark code is invalid. Verify that the value remark code is valid or select the remark code from the List of Codes. |
| “Remark code 1 (and/or 2) cannot be blank when remark code 2 (or 3) is specified on row *.” | The remark codes must be entered in the order of Rmk1, Rmk2 and Rmk3 fields. Add the first remark code to Rmk1, the second remark code to Rmk2 and the third remark code to Rmk3. |
Result Value Remark Codes will appear on the Detail Discharges Report; they will not appear on the Summary Discharges Report.
Entering a comment for a result
Each reporting parameter result value can have an associated comment. Simply click on the square in the “Cmts” column to display the Result Comment dialog box. Enter the result comment (maximum of 2000 alphanumeric characters) and press ‘Save’, or ‘Cancel’ to exit (see Figure 30).
Note that a comment for a result will only appear in the Detail Discharges Report.
Figure 30
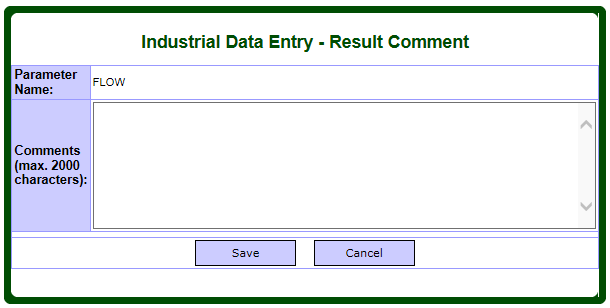
Note: The comment is associated with the result and not the individual result value of a multiple components reporting structure. (For example, the result comment of a pH reporting parameter is associated with all the result components V1, T1, V2, T2, V3 and T3.) A result or remark must be entered.
The following validation message may appear:
| Validation message | Meaning |
|---|---|
| “Error on row xx. Comment cannot be saved without a valid value or remark.” | You need to complete the result value field and/or choose a remark code. |
Hint: To close the Result Comment box, click on ‘Cancel’ or the X in the top right corner.
Tagging parameters as no data recorded
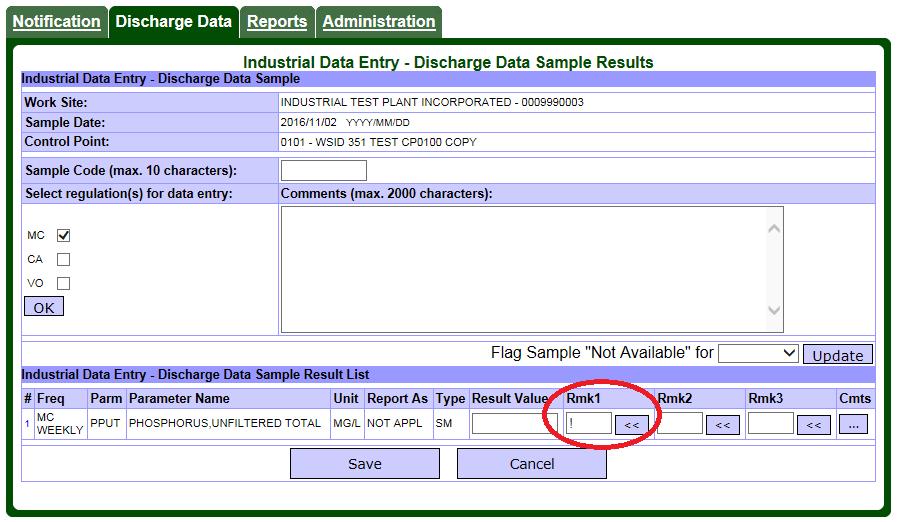
For situations where effluent is discharged but no data will be recorded for a parameter for a single day or for short periods, enter “!” in the valid remark code field of the parameter (see Figure 31). For situations where no effluent is discharged and therefore no data is collected, use the NM! remark code described below.
Figure 31
Flagging all parameters when no effluent is discharged
To identify that a sample is not available for a Reporting-for-Time (Frequency) code, you are required to identify each parameter result value in the specified Reporting-for-Time code as “no effluent - no sample available.”
There are two methods to flag these parameters if no effluent is discharged over a short time period: manually enter the remark code for each parameter, or use the ‘Flag Sample “Not Available” for’ function.
If no effluent is discharged over a longer period, use the Inactive Control Point module (refer to Section 6).
To manually enter the remark code, complete the following procedure to flag a parameter for a selected Reporting-for-Time code as “No Effluent – No Sample Available”:
- Go to the first parameter of the specific Reporting-for-Time.
- Enter “!NM” in the first remark code field. The “!NM” stands for “No effluent - no sample available.”
- Go to the next parameter of the specific Reporting-for-Time.
- Repeat steps 2 and 3.
Note: The result value, remark code 2 and remark code 3 fields should be blank for those parameters tagged no effluent “!NM”.
Alternatively, use the ‘Flag Sample “Not Available” for’ function to automatically populate the first remark code of each parameter in a specific reporting-for-time as “No Effluent - No Sample Available” (see Figure 32).
Figure 32
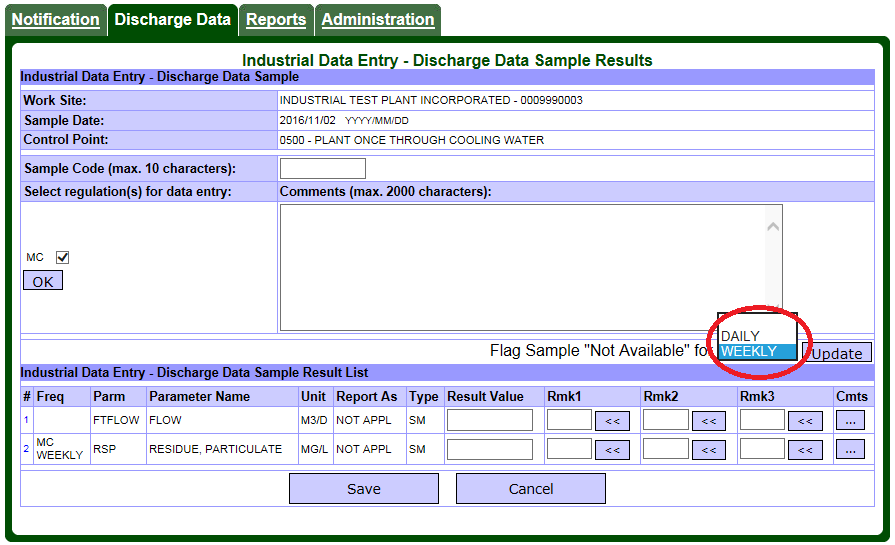
To use this function:
- Go to the ‘Flag Sample “Not Available” for’ pick list.
- Select the Reporting-for-Time in the pick list.
- Click the ‘Update’ button beside the pick list.
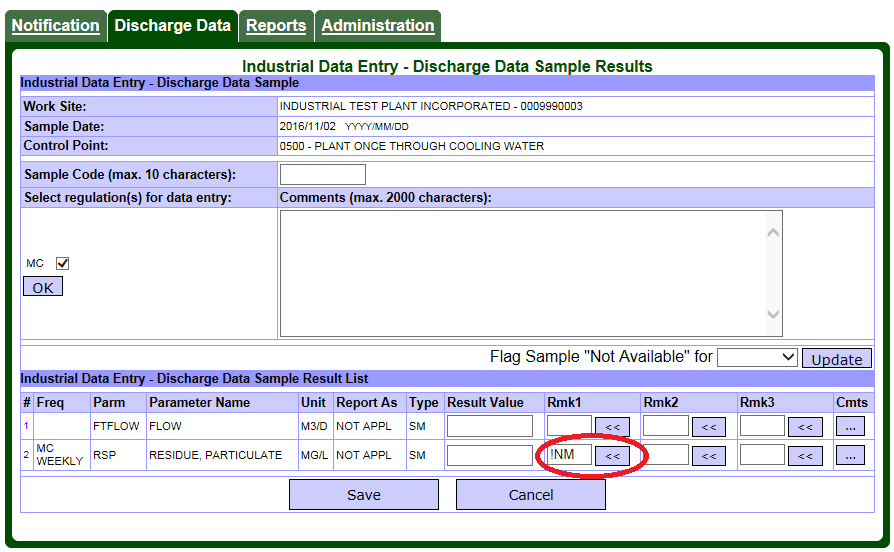
All reporting parameters in the chosen reporting-for-time (Frequency) will be assigned a blank Result Value and a “!NM” code in the first Remark Code field (see Figure 33).
Figure 33
Note: Do not use the “No Effluent - No Sample Available” remark to flag results that are not required for reporting. The “No Effluent - No Sample Available” remark only applies when there is no discharge passing by the sampling point.
Saving result values to the sample discharge record
Save data entries of result values to the sample discharge record once you have completed your data entry by clicking on the ‘Save’ button.
The following validation message may appear:
| Validation message | Meaning |
|---|---|
| “Invalid Result Value “*” on row *. Verify that the value is a number.” | Alpha numbering such as the letter “O” used instead of a zero (0) or the word “two” instead of “2” won’t work. In addition, if you enter a decimal you need to add the zero (enter “0.25” instead of “.25”). |
| “Invalid pH Value “*” on row *. Verify that the value is not outside 1 and 14.” | The result value is not a valid pH value. Verify that the value is between 1 and 14. |
| “Error: Invalid time. Time format is HH:MM.” | The result value is not a valid Time value. Verify that the value is between 00:00 and 23:59. Be aware that the time format used in MEWS is a 24-hour format, so “12:00” means 1200 hours, or noon, while “00:00” means 0000 hours or midnight. Values under 10:00 should have a leading zero—MEWS will add a leading zero if one is missing (“5:00” will appear as”05:00”). |
| “Report currently generating. This information cannot be edited/entered. Please wait for report generation to complete.” | If a report is in the process of generating, the corresponding data cannot be edited. Once the report generation is complete, the data can be edited. |
Note: Whenever the ‘Save’ button is clicked, the data will be saved and the system will return to the Data Entry Search page.
Hint: After entering or editing a sample record, the ‘Save’ button must be clicked. Using the ‘Back’ button on the tool bar of the Browser or clicking on the ‘Cancel’ button on the screen will not save data.
Canceling data entry
If you wish to cancel your data entry without saving, click on the ‘Cancel’ button.
Note: Whenever the ‘Cancel’ button is clicked, the system will return to the Industrial Data Entry - Search Samples page without saving any changes.
Deleting result values
A Reporting-for-Time (Frequency) and result value is considered as “not required for reporting” when it’s Result Value, Remark 1, Remark 2 and Remark 3 fields are all blank.
If a Result Value, Remark 1, Remark 2 and / or Remark 3 for a parameter was entered in error, use the following procedure to “delete” the result value and / or remark(s) for each parameter:
- Go to the first reported parameter of the specific Reporting-for-Time to be deleted.
- Clear the content in the Result Value and Remark(s) fields.
- Clear the content of the comment for the parameter (if any).
- Go to the next reported parameter of the specific Reporting-for-Time to be deleted.
- Repeat steps 2 and 3.
- Save the changes by clicking the “Save” button.
Note: This is not the same as “No Data Recorded” (“!”) which stands for “No data will be recorded: see textual report”.
Note: This feature is typically used for “deleting” individual result values. To delete an entire sample record for a specific day, refer to Section 7.d.
c. Editing sample results
Once the discharge sample record has been created, you may check it to edit or delete it. Back in the Industrial Data Entry - Search Samples page, you have the option of clicking the “Search” button to retrieve sample results you have already entered (see Figure 34).
Figure 34
When you have entered the date and (if you wish) a control point, click the “Search” button (see Figure 35).
Figure 35
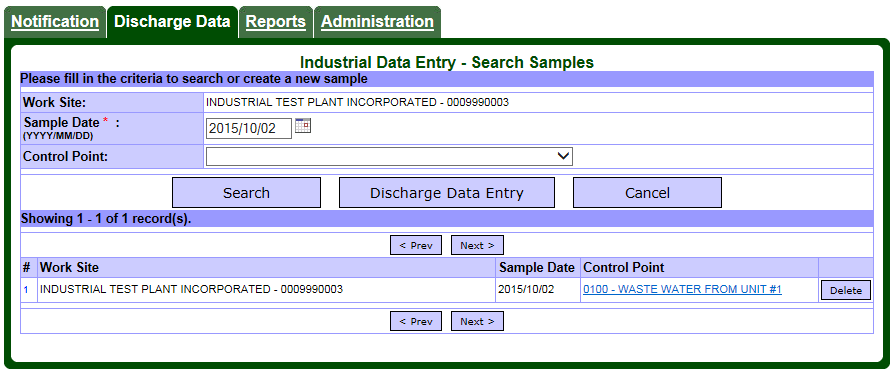
One of 3 scenarios may occur when you click on the “Search” button:
| Scenario | What will happen |
|---|---|
| No sample data exists for the specified criteria | No matching records are found. Try new search criteria. |
| Sample data exists for the specified criteria and has not been submitted | Data entry section appears with existing sample and result data. Data may be edited or deleted. |
| Sample data exists for the specified criteria and has been submitted | Data entry section appears with existing sample and result data. Submitted data cannot be edited. Message appears at the top. |
Note: The control point and sample date together is the unique key for a sample. There can only be one sample for a particular control point and sample date.
Click a control point link to open the sample for editing (see Figure 36).
Figure 36
Once the discharge sample has been retrieved, you may proceed with editing.
Note: Data that has already been submitted to the ministry is locked and cannot be edited here. See section 10d, “Requesting resubmission of data,” to unlock the data.
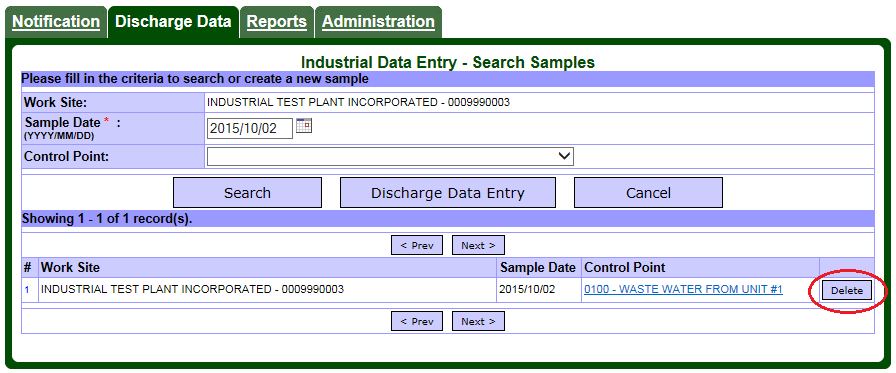
d. Deleting an existing sample discharge record
If you retrieve an existing discharge sample record and you want to delete it, simply click on the ‘Delete’ button beside the record (see Figure 37).
The delete function is used for permanent removal of a discharge sample from the database. You may want to use this function when you have accidentally created an incorrect discharge sample (the incorrect criteria such as date was used).
Figure 37
The application will prompt for confirmation. A dialog box will appear (see Figure 38).
Figure 38
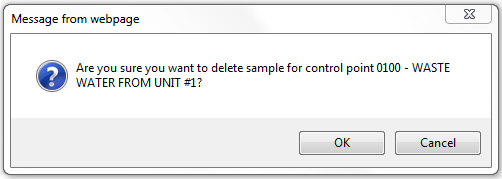
| Button | Description |
|---|---|
| ok | Permanently removes current discharge sample (all reporting-for-time and parameters). If you click ok the deletion of the sample will be complete. The screen will then return to the Industrial Data Entry – Search Samples page. |
| Cancel | Cancels action to delete selected discharges sample, closes dialogue box and returns to the Industrial Data Entry – Search Samples page. |
Note: Even after all the result values and all the remarks for all parameters in a sample that were previously entered have been cleared from the Data Entry page, a discharge sample record will still exist.
To ensure that a discharge sample record is properly deleted, use the method above.
8. Industrial Data Upload (XML)
Industrial Data Upload (XML) is an alternative method of sample data entry to MEWS instead of completing the manual data entry as detailed in Section 7. The XML file content is shown in Appendix B. The ministry has created a guidance document, “XML Format Electronic File Transfer for Industrial Officers and Staff” to assist you in creating the XML file.
Prior to uploading the XML files to MEWS, they must be compressed (zipped) file format. Multiple XML files can be included in the compressed file. Therefore, you can upload many XML files for different control points and sample dates in a single upload.
Q: What is an XML file?
A: XML stands for Extensible Markup Language. It is a format commonly used to exchange files over the internet with ease.
Note: An XML file should contain detailed data (such as concentration result values) and summary data that are not calculated by MEWS (such as monthly DISDAY result values). Once this data is uploaded to MEWS successfully, MEWS will calculate summary data when the reports are generated.
Note: A compressed/zipped file can only include XML files for the same work site.
a. Getting started
On the MEWS Discharge Data tab, click Industrial Data Upload (XML) module (see Figure 39).
Figure 39
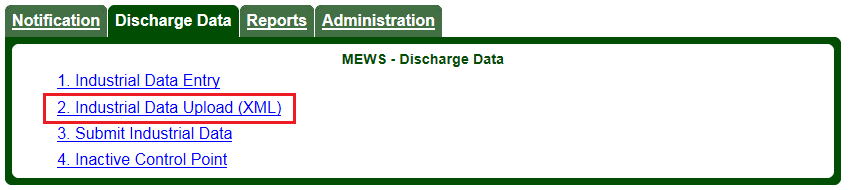
The Industrial Upload (XML) page is displayed (see Figure 40).
Figure 40
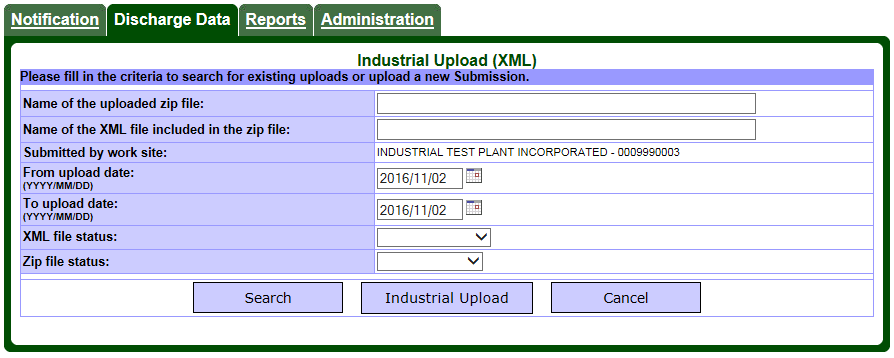
The following buttons are available:
| Button | Description |
|---|---|
| Search | Retrieve XML file previously uploaded based on search criteria. |
| Industrial Upload | Upload discharge data in an XML file to MEWS. |
| Cancel | Exits the current page and returns to Discharge Data tab page. |
b. Uploading XML discharge file
The intent of the Industrial Upload (XML) page is to upload files stored on your local workstation hard drive to MEWS. You must first select the discharge XML file you want to upload. To do so, click the ‘Industrial Upload’ button (see Figure 40). The “Industrial Data Entry –Upload XML Files” page appears (see Figure 41).
Figure 41
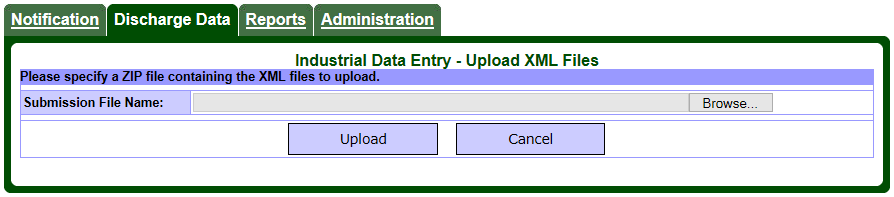
Hint: The XML file must be converted to a compressed/zipped format prior to uploading to MEWS. MEWS will not accept XML files that have not been compressed/zipped. Multiple XML files can be added to one ZIP file from the same work site.
ZIP programs are available for download from the internet. Other compression software besides ZIP may or may not work in MEWS
The following buttons are available:
| Button | Description |
|---|---|
| Browse | Open the computer’s operating system browse function (for example, with Microsoft Windows, the “Choose File” window will open) to search file on your local computer. |
| Upload | Upload the specified ZIP file to MEWS. |
| Cancel | Exits the current page and returns to Industrial Upload (XML) page without uploading data. |
Once the XML file(s) have been zipped, specify the location of the ZIP file by either typing in the location in the field or press the ‘Browse’ button to launch the computer’s operating system browse function (for example, with Microsoft Windows, the “Choose File” window will open) to retrieve the ZIP file.
To select a file for upload, click on the “Browse” button. A pop-up “Choose File” window will appear where you can specify the location of the data file in ZIP format (see Figure 42). Click on the file desired, and then click on Open.
Figure 42

The “Choose File” window will be closed. The path and filename of the selected ZIP file is added to the “Submission File Name” field (see Figure 43).
Figure 43
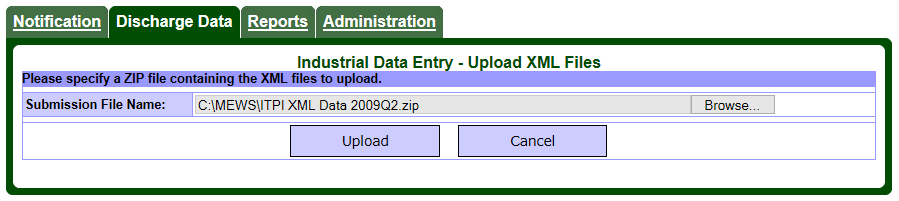
Click the Upload button to initiate the file upload. A message will be displayed indicating the file has been uploaded to MEWS successfully (see Figure 44).
Figure 44
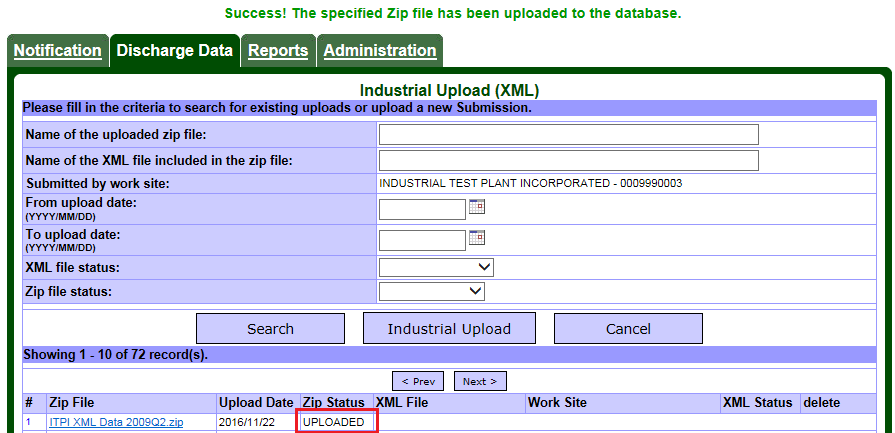
You can continue with uploading more data or you can click on the “Cancel” button to return to the Industrial Upload (XML) page.
| Validation message | Meaning |
|---|---|
| “Report currently generating. This information can not be uploaded. Please wait for report generation to complete.” | If a report is in the process of generating, XML files cannot be uploaded. Once the report generation is complete, proceed with XML upload. |
File processing – Extracting XML files from the ZIP file
The uploaded ZIP file will be processed by the MEWS background process. The result is indicated by the “Zip Status” (see Figure 45). There are various ZIP statuses as listed below:
| Status | Description |
|---|---|
| Uploaded | This status indicates the application has successfully received the ZIP file. At this point there is a process that will be run periodically to extract the XML files from the ZIP file. You should revisit to check on the status of this uploaded file. |
| Extracted | This status indicates the XML files have been successfully extracted from the ZIP file by MEWS. |
| Failed | This status indicates the application could not extract the XML files from the ZIP file. The user can click the Failed link to view the error (see Figure 45 and 46). |
Figure 45 and 46
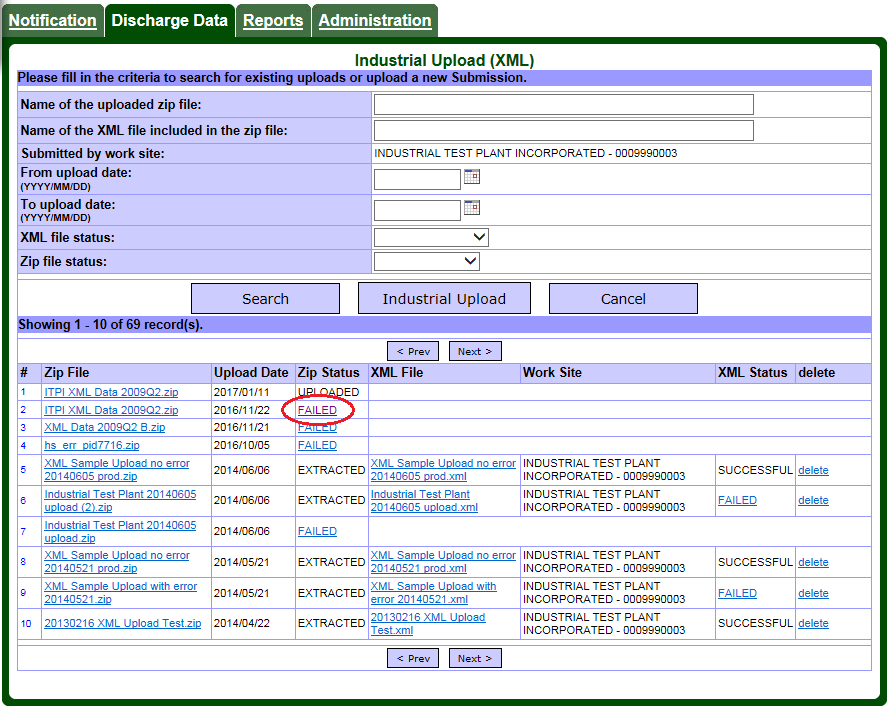
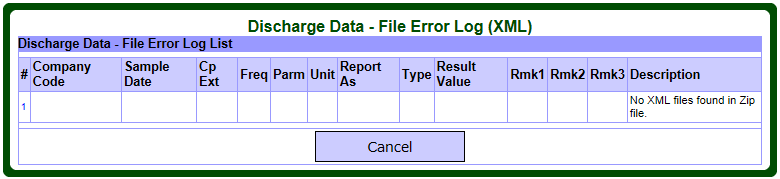
Important Note: The ZIP file must be within 1 MB in size for the upload function. The system will not accept a ZIP file larger than 1 MB.
Hint: The MEWS background process runs periodically to extract the XML files from the ZIP file. You should revisit the Industrial Upload (XML) page to check on the status of the uploaded file.
Hint: The ZIP filename is shown on the Industrial Upload (XML) page as a hyperlink. Clicking on this link will allow the user to retrieve the ZIP file in order to review its contents.
File processing – Extracting discharges data from the XML files
Once extracted from the ZIP file, the XML file name, Work Site and XML Status will be inserted into this page (see Figure 47). The samples and discharges data will be inserted into the database and may be viewed through the Industrial Data Entry module. The user may then generate discharge reports to view the data, as described in Section 9.
Figure 47
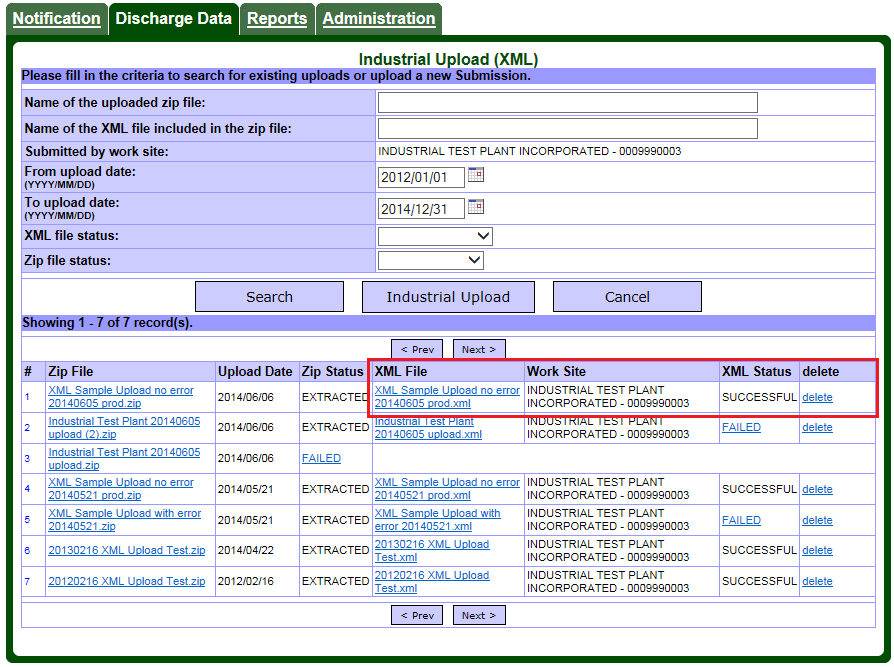
There are various messages for the XML status:
| Status | Description |
|---|---|
| Pending | The XML file is waiting to be validated. |
| Processing | The XML file is being validated. |
| Failed | Indicates the XML file failed one or more validation rules—the sample values that passed the validation rules up to the failure are stored in the MEWS database. You can click on the link of the ‘Failed’ status to review the error message (see Figure 48). |
| Successful | Indicates the XML file has passed all validation rules and the sample values are stored in the MEWS database. You can now visit the Industrial Data Entry page to review these sample discharge result values. |
Figure 48

Important Note: An XML file may contain more than one sample. In such cases, even if the XML file failed one or more validation rules, the samples that did pass the validation up to the failed sample are uploaded.
For example: In one XML file, there are entries for 4 samples. One on Jan 11, 2012, one on Jan 12, 2012, one on Jan 13, 2012, and one on Jan 14, 2012. When the XML file is uploaded, all the validation passed for Jan 11, 2012, Jan 12, 2012, and Jan 14, 2012 samples. There are some validations that failed for Jan 13, 2012 sample. In this case, the sample for Jan 11, 2012 and Jan 12, 2012 are saved in the MEWS database. The XML upload will have a status of failed and display the validations that failed for Jan 13, 2012 sample in the file error log. The sample data for Jan 14, 2012 are not saved in the MEWS database.
Important Note: Uploading an XML file is not considered a “submit” to the ministry. The submit function is done afterwards and is described in section 10.
Important Note: MEWS will not distinguish between filenames. MEWS does allow the user to add the same filename to the system multiple times. Please ensure that you manage your files to make them easily identifiable by your company.
The discharger must ensure that the data entered in the XML format is valid. However, MEWS may successfully upload XML files with data that is invalid, as it does not validate all fields.
The ministry periodically reviews codes used by the application, and in some cases these codes (for example, Remark Code ‘<RL’) may no longer be valid for use. Only valid Remark Codes, as provided in the MEWS drop-down list, must be used for data entry and XML upload.
c. Previously uploaded XML data file search
This section explains how to retrieve XML files that have been previously uploaded to MEWS (see Figure 49).
Figure 49

The discharge XML file can be identified by the following criteria:
| Field | Description | What to do |
|---|---|---|
| Name of the uploaded zip file | The name of the zip file you uploaded to MEWS. | Enter the name of the zip file. |
| Name of the XML file included in the zip file | The name of the XML file you previously uploaded to MEWS. This is part of the search function for previously loaded XML files as defined in the previous box. | Enter the name of the XML file. |
| Submitted by work site | Defaults to your work site. | Not editable. |
| From upload date | The beginning date range on which you want to search for uploaded files. Hint: Upload date is not the date of the actual samples. | Enter a valid date in the format of yyyy/mm/dd. |
| To upload date | The ending date range on which you want to search for uploaded files. Hint: Upload date is not the date of the actual samples. | Enter a valid date in the format of yyyy/mm/dd. |
| XML file status | You can filter the search by statuses: Extracted Failed and Uploaded. | Select upload status. |
| ZIP file status | You can filter the search by statuses: Extracted Failed and Uploaded. | Select upload status. |
Note: The calendar provided on this page allows the user to easily select a date range. The date selected in the calendar will automatically populate the date fields. The date highlighted in red in the calendar is the current date.
d. Discharge XML data file listing
Once the search of discharge XML data file(s) is completed, the listing of data files uploaded will be displayed according to the search criteria (see Figure 50). Here you can click on the XML file name to review the files. Also, you can check on the status of the uploaded file.
Figure 50
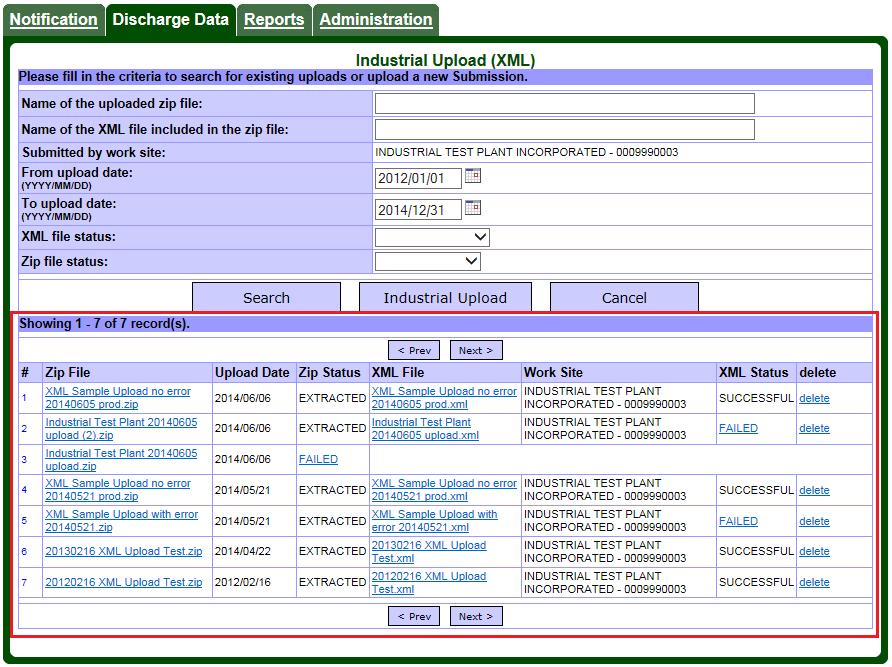
The following navigation buttons are available:
| Button | Description |
|---|---|
| < Prev | Returns to previous page of records. Records are displayed 10 per page. |
| Next > | Goes to the next page of records. Records are displayed 10 per page. |
e. Deleting a sample created by an XML upload
The corresponding sample and discharges data will be inserted into the MEWS database if the validation of the XML file has been completed and is successful. To delete a sample created by an XML upload, you need to go to the Industrial Data Entry module to search for the data that you uploaded by XML (refer to section 7).
Note: To remove a sample record from an XML file that has been uploaded to the MEWS database with the status of ‘successful’, you must go to Section 7d, “Deleting an existing sample discharge record.” Follow the steps outlined in this section for deleting an existing sample discharge record.
f. Deleting an XML file
The XML files can be deleted by both the Industrial Staff and Industrial Officer users. On the Industrial Upload (XML) page, list the uploaded XML files (successful and failed) as per Section 8.d. To delete an XML file, click on “delete” beside the XML file (see Figure 51)
Figure 51
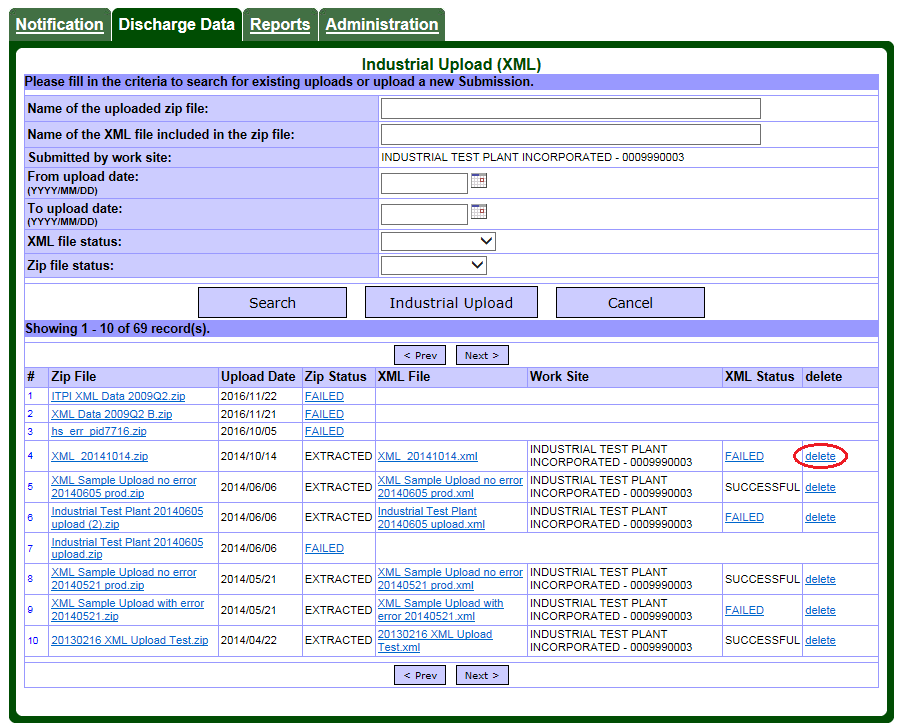
A verification window will appear (see Figure 52).
Figure 52
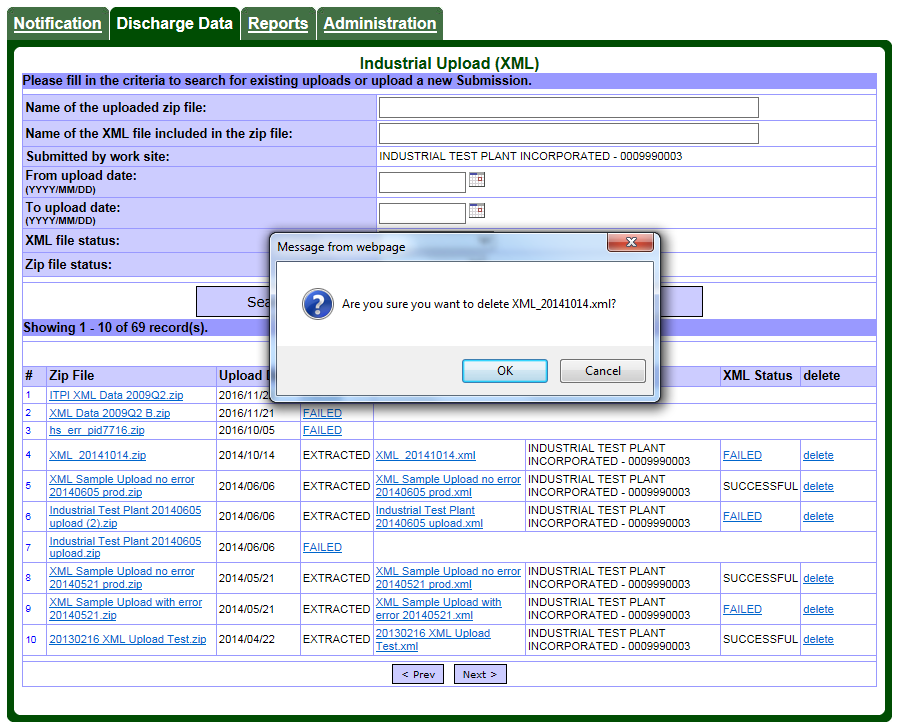
Confirm the appropriate XML file has been selected and click ‘ok’. If the record was successfully deleted, a message will appear at the top of the page (see Figure 53).
Figure 53
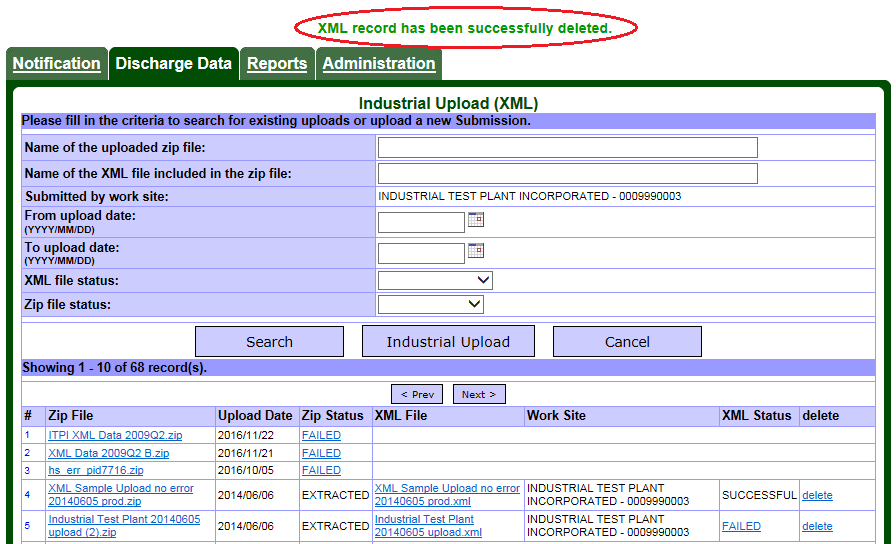
Note: To delete a zip file, all the XML files it is associated with must be deleted. The zip will remain until all of its XML files are deleted.
Deleting the XML file will not remove successfully uploaded data. Proceed to the following section for re-uploading instructions.
g. Re-uploading an XML file
Re-uploading an XML file could be required due to an error in the initial load of the XML (failed the original validation, you have corrected the error and are now ready to reload the XML to MEWS) or the original XML was loaded successfully but a result value needs to be changed.
To edit a result value that has been uploaded by an XML file, one of two methods can be used. It is suggested to use Method 1 if you are using XML data file upload as your primary data entry method for reporting sample results.
- Method 1: Edit the result value in the XML file on your computer; compress the XML file into ZIP format and upload the entire XML file.
- Method 2: Go to section 7c entitled Editing Sample Results, and follow the steps in the section.
Important Note: The sample date and control point together is the unique key of the discharges data. When you re-upload an XML file, it overwrites the previous discharges data for each corresponding sample date and control point. All other entered data remain in the MEWS database. To delete all data for a sample date, follow the procedure outlined in Section 7d.
If the XML file upload fails, data from previously successful XML file uploads remain in the MEWS database (see Note after figure 45 for exceptions).
Re-uploading an XML file can be performed as long as the data within the XML file have not been submitted as the quarterly data submission to the MOECC (please refer to Section 10 for more details).
h. Using an XML template from your CPF
The Company Profile Report page displays a button called “XML Template” beside each Company Profile File (CPF) version—see Figure 54. Click on the XML Template button to obtain an XML file template for the version of CPF desired.
Figure 54
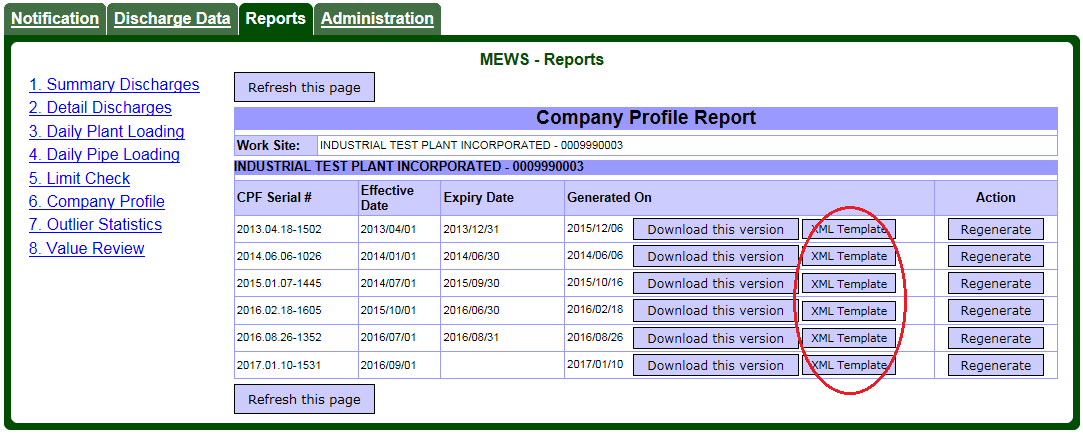
The XML file template generated from your CPF Report reflects many of the requirements contained in your CPF. This XML file can be used as a basis for creating a complete XML file, for data upload.
Note: The XML file template does not reflect all of the requirements contained in a Company Profile File. The XML template can only be used as a basis for creating a complete XML file for data upload, and in itself is not a complete XML file ready for data input. The discharger must modify their XML Template to reflect all of the requirements contained in a Company Profile File, including proper reporting-for-time values and regulation values.
Following are some of the features and limitations of the XML file template:
- Includes all parameters for all regulations, as if all regulations have been checked off and ok’d on the Data Entry screen.
- Excludes the regulation code result value, since various regulations may be required for a single Control Point.
- Includes the result structures of SI, which is the most common for detailed data entry.
- May include the result structure of P2, P3 and P6, which are also common for detailed data entry.
- Includes only one Flow parameter per Control Point, and this Flow excludes the reporting-for-time result value, since various Flow reporting- for-time result values may be required for a single Control Point.
9. Displaying and printing discharges reports
The Reports tab enables you to generate reports based on predefined criteria (see Figure 55).
Figure 55
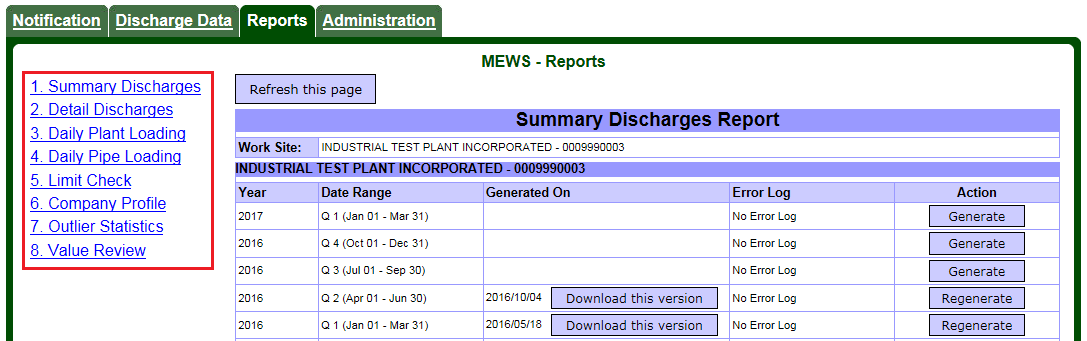
There are 8 online discharges reports:
| Number | Report | Function |
|---|---|---|
| 1 | Summary Discharges | Lists all summary values calculated by MEWS, based on the sample result values you entered and all pipe-level summary result values entered. Required by MOECC regulation and for submission to the ministry. |
| 2 | Detail Discharges | Lists all values entered by user and calculated by MEWS. |
| 3 | Daily Plant Loading | Lists all daily loading values calculated by MEWS for the plant. |
| 4 | Daily Pipe Loading | Lists all daily loading values calculated by MEWS for each sample location (pipe). |
| 5 | Limit Check | Lists values that are in non-compliance with ministry requirements. |
| 6 | Company Profile | Provides details of the work site sample locations and monitoring and reporting requirements. |
| 7 | Outlier Statistics | Lists sample result values that fall outside the normal expected results—for data quality review only. |
| 8 | Value Review | Lists all parameters not reported for each day that a sample is required—for data quality review only. |
a. Tips for retrieving reports
After you click on the Reports tab from the MEWS home page, by default the Summary Discharges Report page appears (see Figure 56).
Figure 56
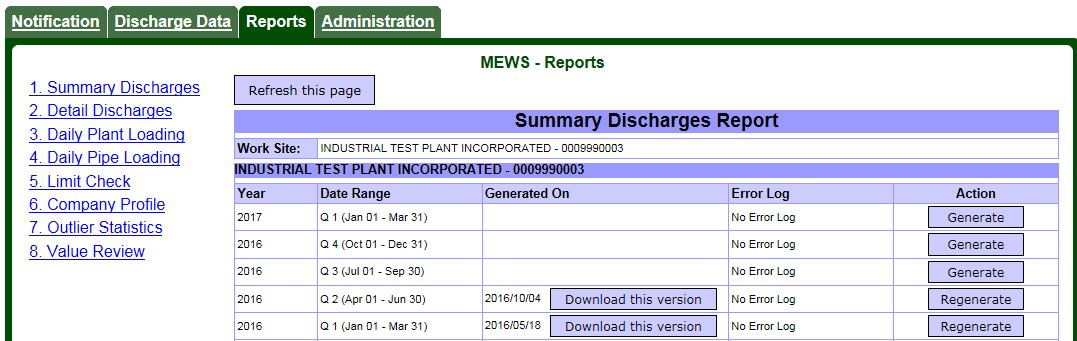
The table on the right changes to reflect the information for the report, as selected from list on the left side of the screen. The report name on the top of the table indicates which report is selected. The report generation is initiated by the user clicking on the “Generate” button (under the Action column). Once selected, the Generate button will become “Pending Generation” (see Figure 57).
Figure 57
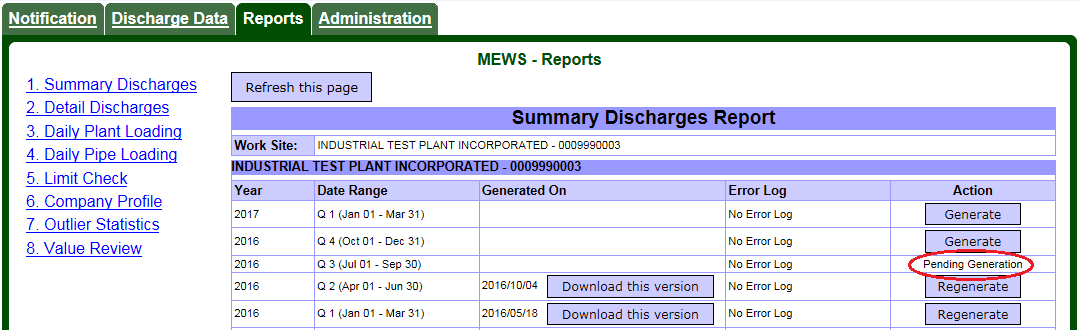
Report generation requests are queued up in the MEWS system. A background process is started periodically (approximately every 5 minutes) to process the requests. When a generation request is being processed the Action becomes “Processing” (see Figure 58).
Figure 58
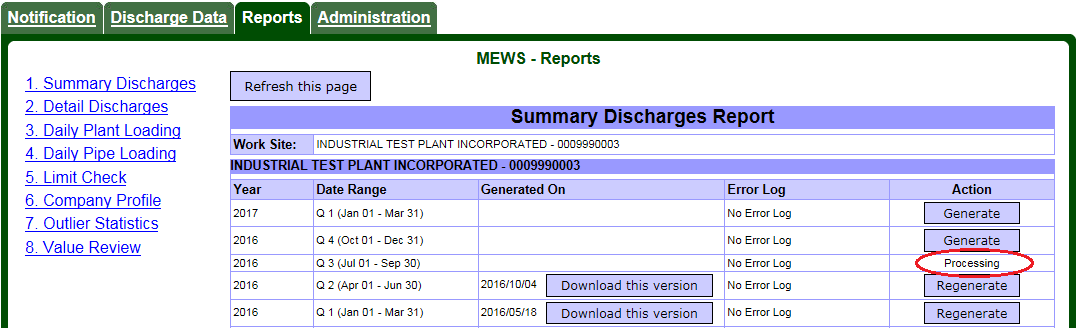
Once the report is generated it is available for download (see Figure 59).
Figure 59
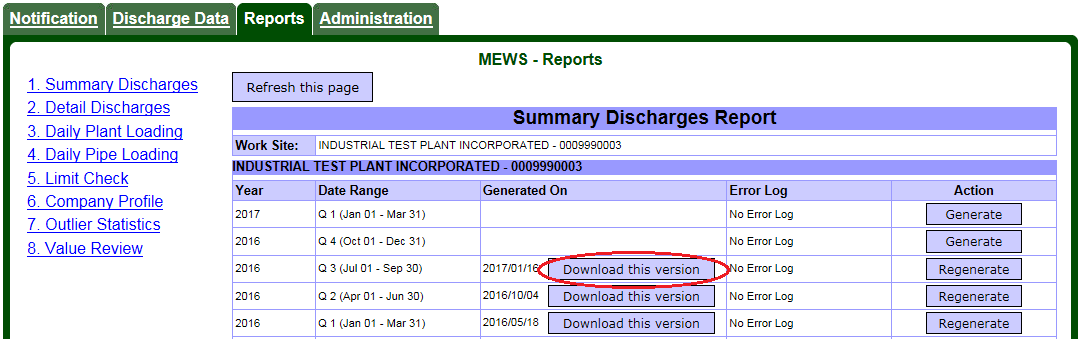
Hint: The date beside the “Download this version” button indicates when the report is generated. If the report is outdated (i.e., data has been revised since then), you can click the “Regenerate” button to create a newer version of the report.
Hint: The “Refresh this page” button is available at the top or bottom of the page. Click this button to refresh the page while generating or regenerating a report in order to update the status of the report generation.
Note: To protect data integrity, adding, altering or removing data on the data entry page or uploading data by XML file format will not be permitted while reports are being generated.
Reviewing and saving the report
Select the “Download this version” button to download the report in PDF format. You need Adobe Acrobat Reader (version 5.0 or newer) installed on your workstation. Report output can be displayed, printed out or saved (depending on your browser and Acrobat version) (see Figure 60).
Figure 60

MEWS currently creates default filenames for all reports, such as “Summary Discharges Report 2007Q2.pdf”. The filename may contain a version number (such as “[1]”) when the report is opened immediately after it is downloaded. The discharger can edit and remove these extra characters from the filename when saving the file to a local drive.
Note: If the report is saved immediately after it is downloaded prior to opening it, the filename will not contain a version number (such as “[1]”).
Printing the report
You can use the web browser or PDF reader print function to generate a hard copy of the report (see Figure 61).
Figure 61
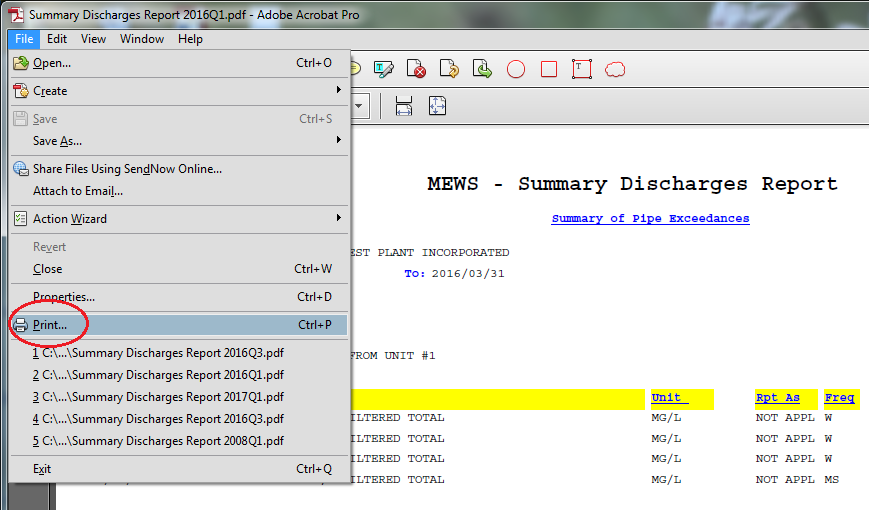
Reviewing the calculation error log
If a discharge data error is detected during the generation of any report, an error log will be generated and will appear for all reports (see Figure 62).
Figure 62
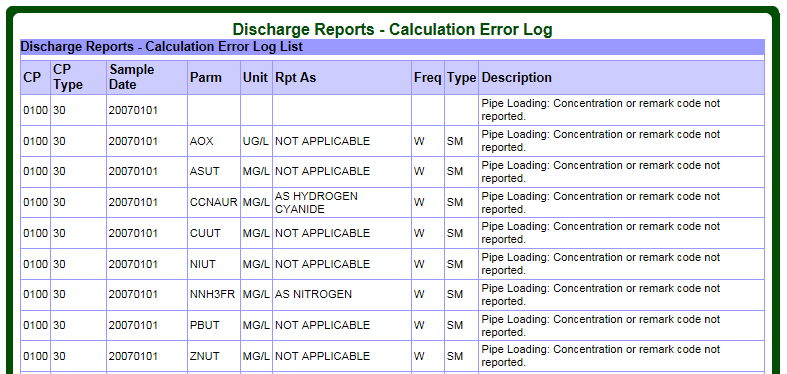
You can click the “View Error Log” button to determine the source of the error (see Figure 63).
Figure 63
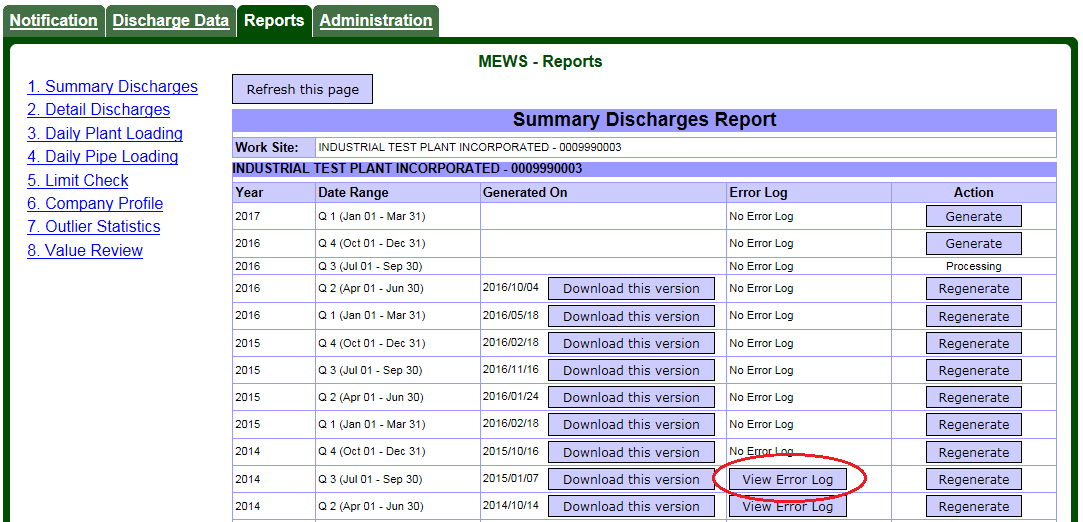
The error log is for information purposes and it will not affect your ability to submit the quarterly Industrial Discharges data to the ministry. However, it is recommended that you review the error log and correct the data error prior to submitting the quarterly Industrial discharges data to the ministry.
Currently, the Calculation Error Log does not distinguish between the frequencies of monitoring for parameters. For instance, if Daily and Weekly parameters are both customized, error logs will appear for the Weekly parameters—they can be ignored.
Summary calculations (which may or may not produce the error log) are calculated first before the reports are created. Therefore, when a user clicks on the Generate/Regenerate button to generate a report, MEWS may display the error log first (if there is an error log), then create the report and display the report that is available for download. Some reports, depending on what information is displayed in the report, may take time to get created. Therefore, the error log can appear before the report is created.
The following are common error types:
| Warning | Meaning |
|---|---|
| Concentration data missing | Concentration data is not available for loading calculation (null). |
| Flow data missing | Flow data is not available for loading calculation (null and not “!NM”). |
| Incorrect flow value | Flow value is 0 or negative. |
Printing the calculation error log
You can use the web browser print function to generate a hard copy of the error log (see Figure 64).
Figure 64
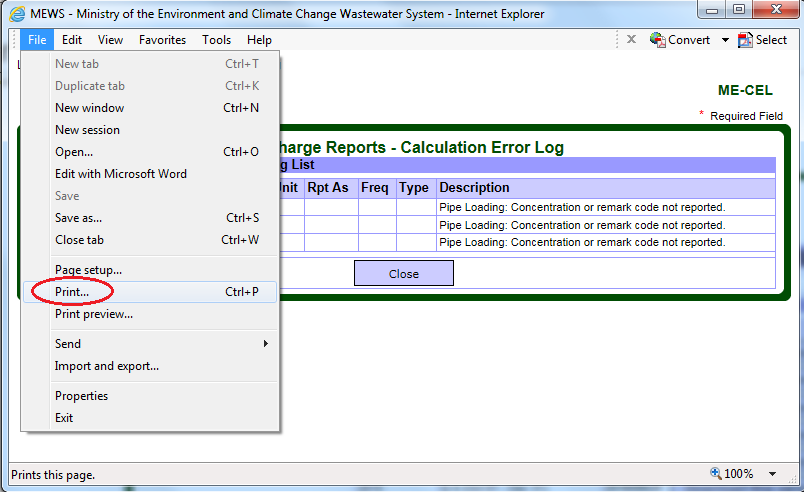
Automatic data calculation
The Summary Calculation is done automatically when you generate the following reports:
- Summary Discharges
- Detail Discharges
- Daily Plant Loading
- Daily Pipe Loading
- Limit Check
MEWS calculates the following summary data:
| Summarized/derived data | Pipe/plant-level |
|---|---|
| Daily pipe-level loading – Loading cannot be calculated unless an FTFLOW value is reported | Pipe |
| Monthly Summary reporting data | Pipe and plant |
| Weekly, monthly, etc. statistics (e.g. maximums, minimums and averages) | Pipe and plant |
| Regulatory limit exceedance | Pipe and plant |
Upon adding or editing data, reports must be generated or regenerated to update loadings calculations, summary calculations and compliance checks. As a minimum you need to generate reports # 1 to 5 for quarterly Industrial Data submission.
On the following sections we explain how to generate each report.
b. Generating the summary discharges report
The Summary Discharges Report is a document required by MISA/EMEL regulations to be submitted to the ministry. This report provides plant and pipe level summary data (such as loadings) for a quarterly submission. Regulation violations are also reported. The plant level component of this report shows the plant monthly averages, minimum and maximum loads. The pipe level summary reports the toxicity, pH, number of discharge days in a month, and where required averages, minimum and maximum concentrations.
The Summary Discharges Report contains the following:
- transmittal sheet (when the quarterly industrial data is submitted, see section 10)
- submission comment
- summary of plant exceedances
- summary of pipe exceedances
- summary of plant level data
- summary of pipe level data
- sample comment
- inactive control points
Values in reports are based on codes contained in the CPF. Figure 65 is an example of a generated Summary Discharges Report.
Figure 65
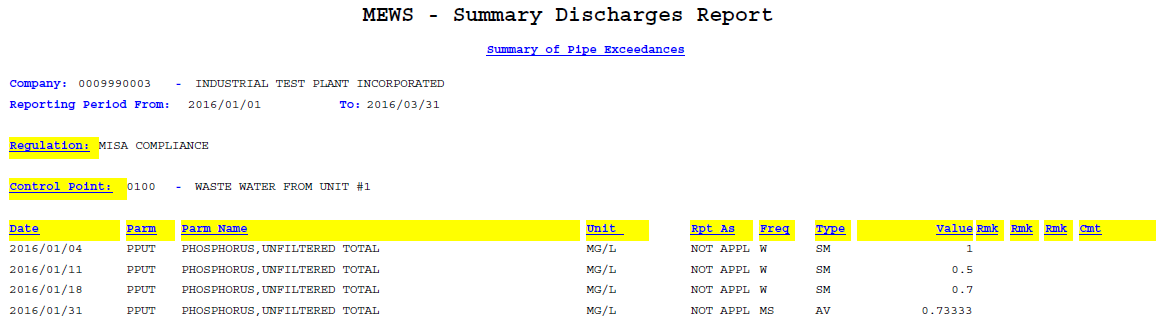
c. Generating the detail discharges report
The submission of the Detail Discharges Report to the ministry may be required by the MISA/EMEL regulations, other regulations or if requested by an Environmental Officer. The Detail Discharges Report provides all non-summary data (such as concentrations, or Production Data) and summary data (values calculated by MEWS). The Detail Discharges Report should also be submitted to the ministry if the discharger is reporting no discharge for all control points for the reporting period (see Section 6d). This report can be generated before and after data is submitted.
The Detail Discharges Report contains the following:
- transmittal sheet (when the quarterly industrial data is submitted, see section 10)
- submission comment
- detail data including flagging of exceedances
- summary of plant level data
- summary of pipe level data
- sample comment
- result comment
- inactive control points
Values in reports are based on codes contained in the CPF. Note that the Report shows the same Flow result value for identical frequencies for different regulations as separate records; even though only one result value has been entered (see Figure 66). The Report will show only one record for the same regulation with different frequencies (e.g., MC regulation with Weekly and Thrice-Weekly flow frequencies).
Figure 66
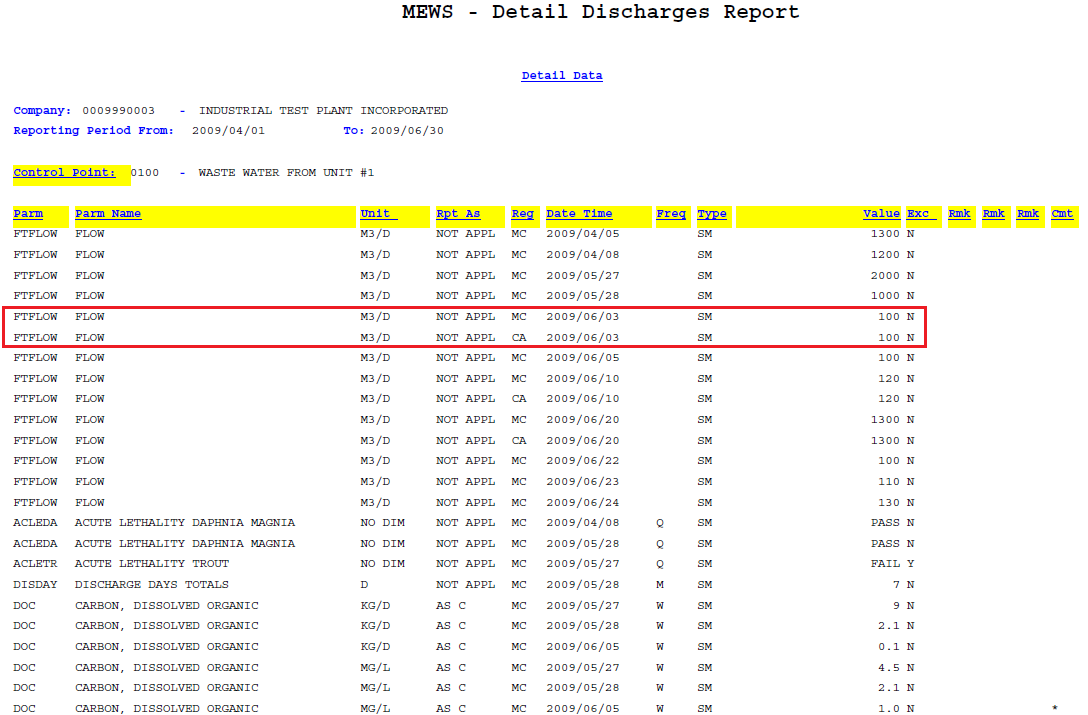
Also note that if a concentration result value is less than 10 percent of the parameter Regulation Method Detection Limit( RMDL), MEWS does the following:
- Displays the actual concentration result value on the report (see Figure 67, section A).
- Converts the concentration result value to zero for calculation purposes, so that the pipe-level Control Point (CP) loading that it calculates will be zero (see Figure 67, section B).
- Adds the Remark Code “<DL” to this pipe-level loading record (see Figure 67, section B).
- If the loadings for all CPs of the same type are zero, the Detail Discharges Report shows the calculated plant-level loading as zero (see Figure 68).
Figure 67 is an example of a generated Detail Discharges Report.
Figure 67
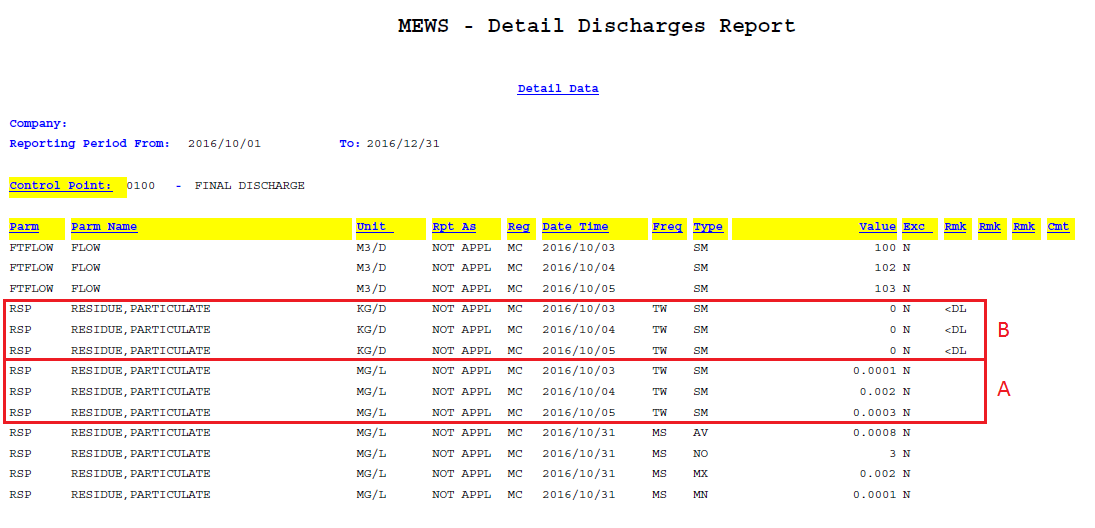
Figure 68 is an example of a generated Detail Discharge Report for the Plant Level.
Figure 68
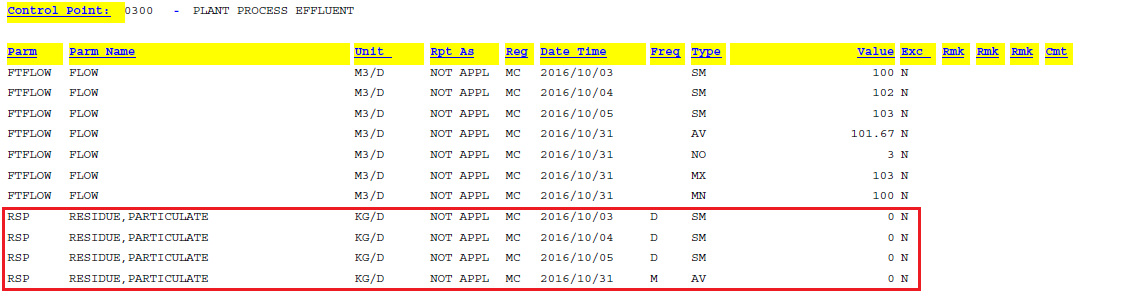
If a pipe level concentration result value is left blank with a remark code added, the pipe level loading calculation will be automatically populated with the remark code, and the loading value will remain blank. Figure 69 is an example of this situation.
Figure 69

d. Generating the daily plant loading report
The Daily Plant Loading Report lists plant loading data as calculated by MEWS. This report is typically not required to be submitted to the MOECC, and can be used for data entry QA purposes. Values in reports are based on codes contained in the CPF. Figure 70 is an example of a generated Daily Plant Loading Report.
Figure 70
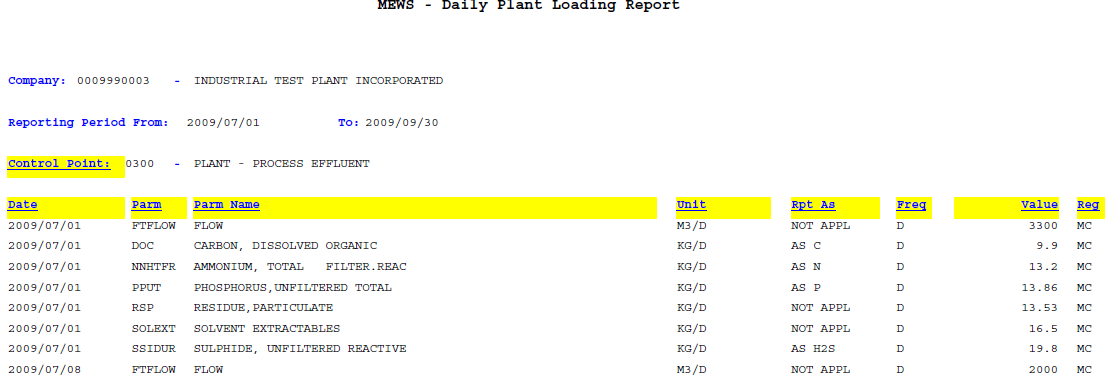
e. Generating the daily pipe loading report
The Daily Pipe Loading Report lists loading values calculated by MEWS for each sample location (pipe). This report is typically not required to be submitted to the MOECC, and can be used for data entry QA purposes.
Values in reports are based on codes contained in the CPF. Figure 71 is an example of a generated Daily Pipe Loading Report.
Figure 71
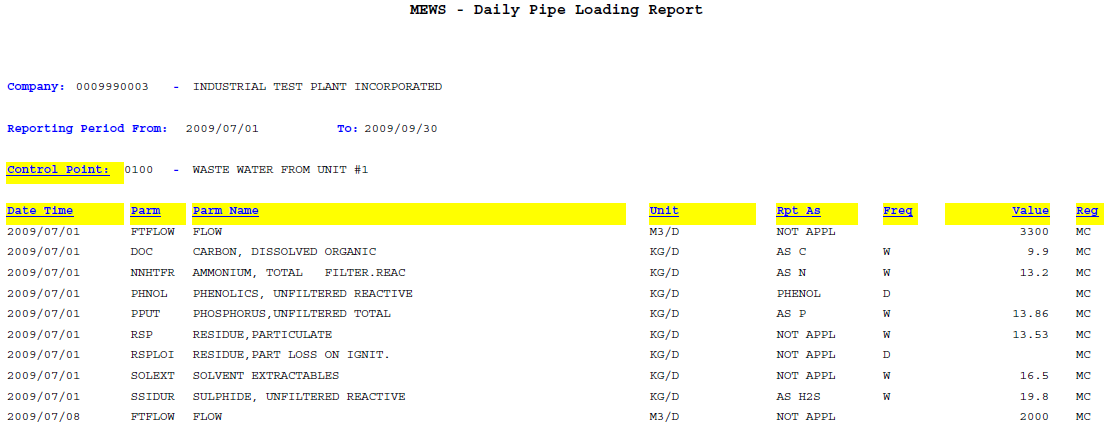
f. Generating the limit check report
The Limit Check Report provides a summary report of all exceedances for the given time period. This report is also known as the “Summary of Non-Compliance Report.” This report is typically not required to be submitted to the MOECC, and can be used for data entry QA purposes.
Values in reports are based on codes contained in the CPF. Figure 72 is an example of a Limit Check Report.
Figure 72
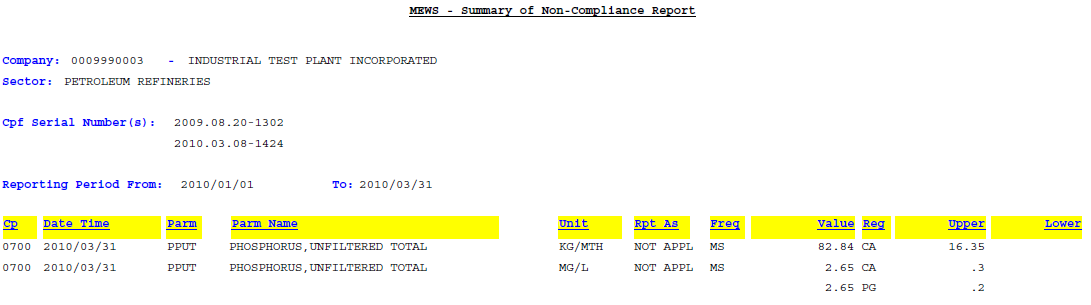
g. Generating the company profile report
Company Profile Files (CPFs) provide code to MEWS that generates the specific industrial data entry forms and instructs MEWS on the content of the various report options.
The MOECC creates each work site CPF and uploads the CPF to MEWS. Following upload to MEWS of a new or revised CPF, MEWS automatically regenerates the CPF Report. However, the user may also regenerate their CPF Report at any time, to ensure that all code revisions have been properly captured within the CPF (see Figure 73).
Figure 73
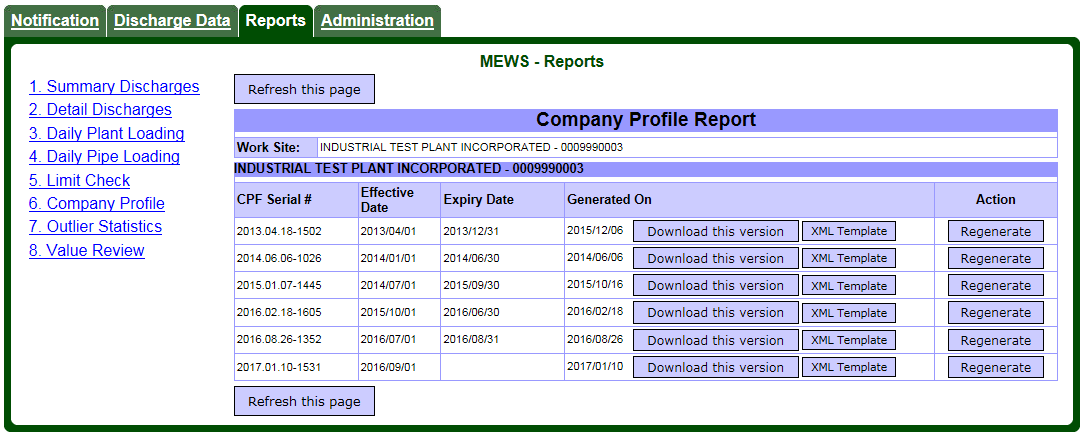
Note: The minimum length of time for which a company profile must be active is one calendar month. Therefore, the effective date will always be on the first of the month and the expiry date will always be at month end.
Figure 74 is an example of a Company Profile Report, page 1.
Figure 74
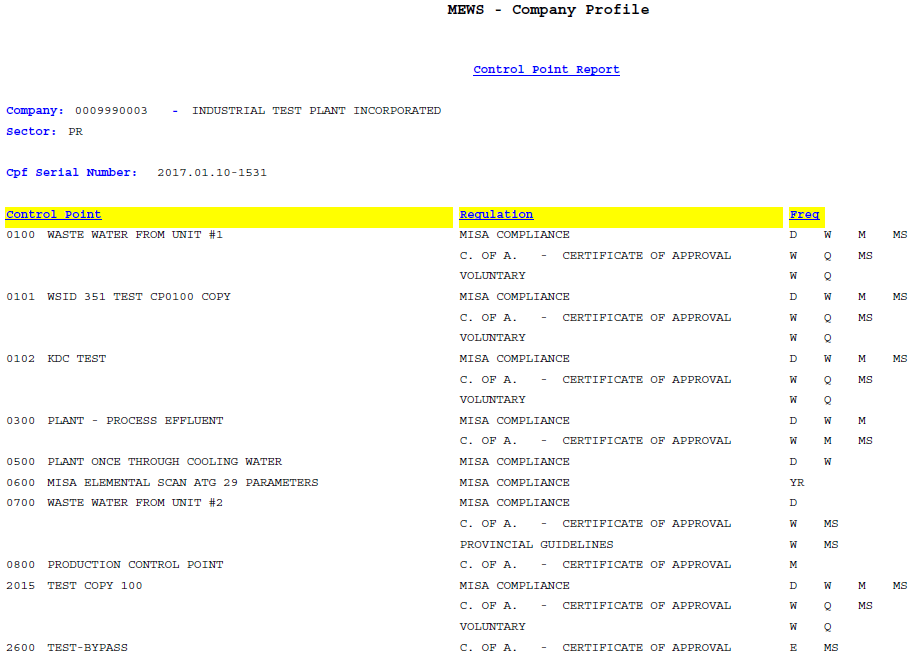
Figure 75 is an example of a Company Profile Report, page 2.
Figure 75
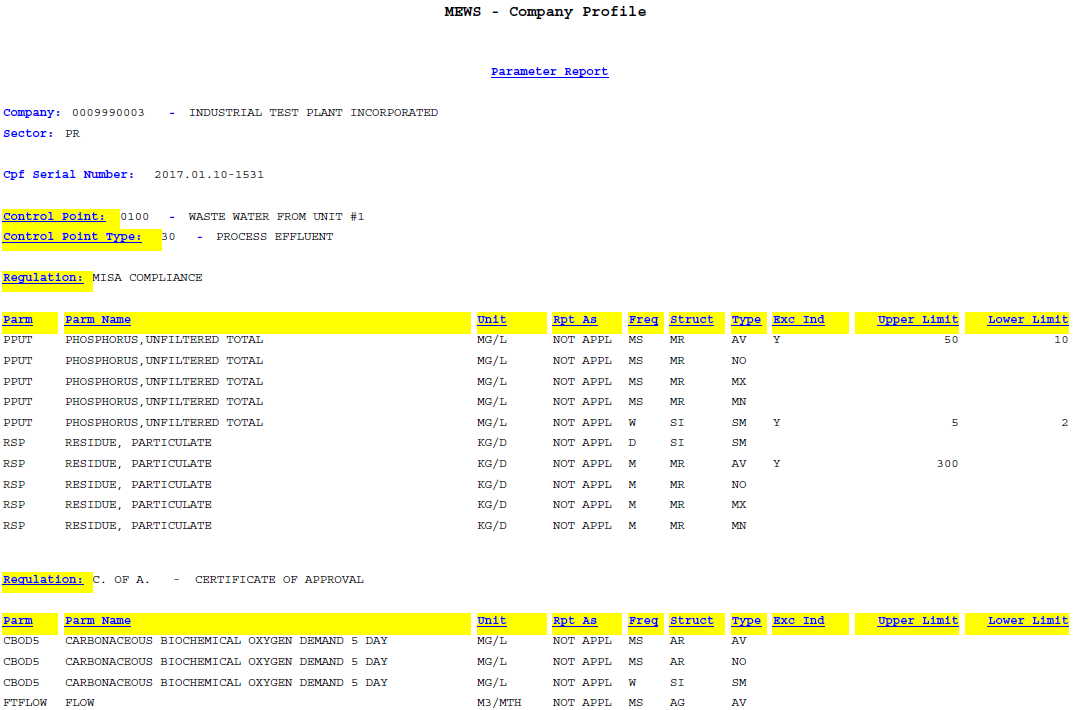
h. Generating the outlier statistics report
This report is not required for submission to the ministry. This report, also called “Value Outliers Report for Concentration and Loading”, can be used to track sample result values that fall outside your normal expected results. Use it for your own internal auditing and data entry QA purposes.
Note: This report is available only on an annual basis for each calendar year. The statistics do not carry past the calendar year (for example, October 2005 to April 2006).
Figure 76 is an example of an Outlier Statistics Report.
Figure 76
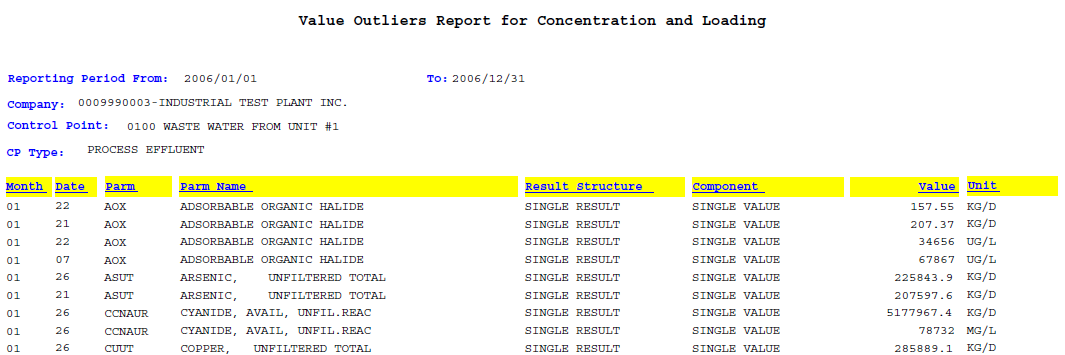
i. Generating the value review report
This report is not required for submission to the ministry. You can use it to review the completeness of your data entry for data entry QA purposes. The Value Review Report, or “Incomplete Data Entry Report”, does not currently distinguish between parameters of different frequencies—it lists all parameters not reported for each day that a sample is required, no matter which frequency and/or parameter. Also, the Value Review Report checks for the sample value only – it will list a result record as incomplete even though a remark code has been entered correctly instead of a value.
If you are concerned that a parameter result value was not entered for a particular day but should have been, you may wish to search the PDF report using the Edit / Find Adobe tool.
Hint: The difference between the Error Log and the Value Review is that the Error Log is strictly for load calculations and summary report calculations whereas the Value Review report does not review calculations but only the data entry.
Figure 77 is an example of a Value Review Report.
Figure 77
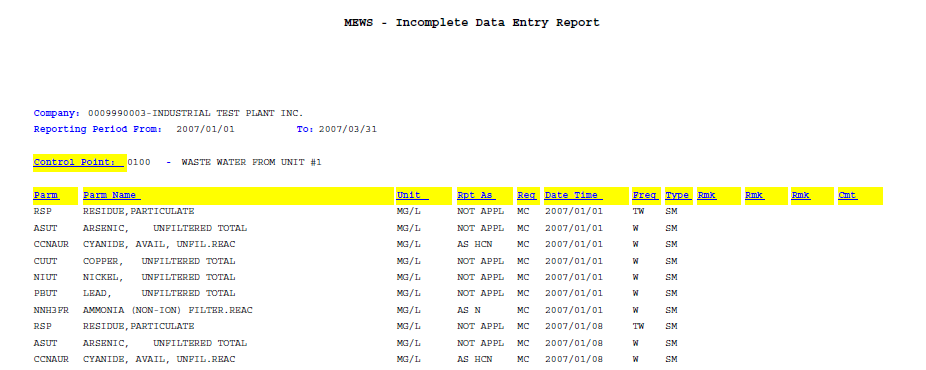
10. Submitting industrial data
Normally the discharger is required to submit summary information to the ministry under MISA/EMEL regulations. However, if requested or under some circumstances, the discharger may be required to complete a Detail Submission.
Note: an error message will appear if you try to submit Detailed Data after submitting Summary Data; contact the MOECC to first unlock your data prior to submitting the Detailed Data.
Quarterly
After you input the discharge samples, MISA/EMEL regulations require you to submit the data to the ministry within 45 days after the end of the quarter. The Submit Industrial Data module allows you to submit data for your Work Site, Year and Quarter. To access this module, you must have the “Industrial Officer” role. The following table illustrates the steps required to perform the Industrial data submission.
| Step | Description | What to do |
|---|---|---|
| 1 | Enter all discharge data for the quarter. | Enter all discharge data using:
|
| 2 | Generate the summary data by running reports. The MEWS application will perform the data calculations automatically when the discharges reports # 1 to 5 are run. | Generate reports # 1 to 5:
|
| 3 | As an option, you can use report # 7 and # 8 to perform additional QA. | Generate report # 7 and 8:
|
| 4 | Review all reports and error logs to ensure the discharge data is complete and accurate. | Review all reports and error logs.
Correct the discharge data if required via the Industrial Data Entry module or re-upload the corrected XML files. Repeat Step 2. |
| 5 | Confirm Contact information. | Ensure that the Contact information for the ministry and the Work site has been completed, under the Administration Module. If not, the Transmittal Sheet will not be properly formatted, and will not be suitable for mailing to the MOECC. |
| 6 | Submit the Quarterly Discharge Data. | Perform the data submission using the Submit Industrial Data Module. Note that the existence of an Error Log does not prevent the discharger from submitting data to the ministry. |
| 7 | Save the confirmation page. | If the submission is successful, a confirmation message will appear automatically at the top of the page.
To save this page as a text file:
|
| 8 | The report #1, Summary Discharges, will be automatically regenerated by MEWS following successful submission; the Transmittal Sheet will be added reflecting the submission. If the report does not regenerate automatically, complete Step 2. | Download this version of the re-generated report # 1. Print a hard copy of the Summary Discharges Report, sign the Transmittal Sheet, and mail the complete report to the MOECC District Office. |
| 9 | The report #2, Detail Discharges, will be automatically regenerated by MEWS following successful submission; the Transmittal Sheet will be added reflecting the submission. If the report does not regenerate automatically, complete Step 2. | Download this version of the re-generate report #2. If a Detail Submission is required, print a hard copy of the Detail Discharges Report, sign the Transmittal Sheet, and mail the complete report to the MOECC District Office. |
| 10 | Re-generate the reports # 3 to 5. | Re-generate reports # 3 to 5, and download these versions. These reports are for your records only, and do not need to be mailed to the MOECC District Office unless requested. |
Hint: MEWS currently creates default filenames for all reports, such as “Summary Discharges Report 2007Q2.pdf”. The discharger may wish to rename the file with a more meaningful filename, such as “Summary Discharges Report 2007Q2 Submitted.pdf”, prior to saving it to a local drive.
The MEWS application will perform the data calculations automatically when the discharges reports are generated.
When you create a data submission, the system:
- Verifies that the most up-to-date summary data is calculated.
- Flags the discharge sample in the reporting period as “submitted”.
- Prevents anyone from modifying the discharge sample within the “submitted” reporting period. MEWS will lock the data entry function for the period for which the submission has been made.
The confirmation page that appears after a successful submission must be saved by the user. This is the only document that will provide a definitive record of the date of your submission to the ministry (see Figure 80).
The submitted data is tagged and uploaded from MEWS to the ministry’s database. There are no physical files to be created to send to the ministry.
Note: To ensure that there are no problems of unauthorized persons performing the submit function, the Industrial Officer must complete this task. The Industrial Officer is defined as an owner or person in occupation or having the charge, management or control of a plant.
Monthly/Other
Some legal instruments require the reporting of sample result values and / or their analytical results on a frequency other than quarterly. Many Certificates of Approval or Environmental Compliance Approvals, for instance, require monthly reporting.
MEWS does not currently support the submission of data reports on a frequency other than quarterly. However, MEWS reports may still be generated even if the data has not been submitted. Data reports generated on a monthly (or other) basis may be generated, and will reflect the data input for the month.
The discharger may save the monthly report and submit / mail the report to the MOECC district / regional office, together with a covering letter of explanation (and a signature if required) in lieu of the Transmittal Sheet.
a. Filling out the data submission form
You must first identify the reporting period you will be submitting data for. Define the reporting period in the criteria section of the screen (see Figure 78).
Figure 78
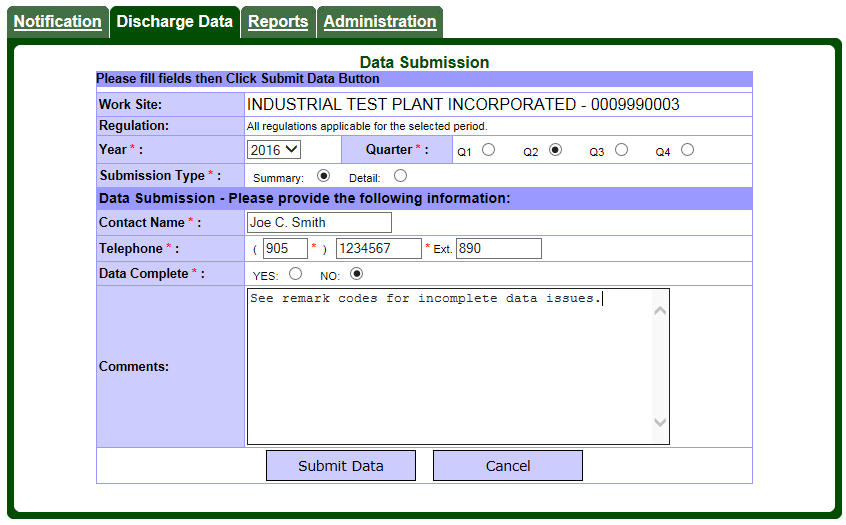
The following table identifies the data entry fields:
| Field / Button | Description | What to do |
|---|---|---|
| Year | Year of reporting period. | Select a four digit year (yyyy) from the pick list. |
| Quarter | Quarter of reporting period:
|
Select a radio button. |
| Submission Type | A choice of submission types (Summary or Detail).
The Summary report is typically required for submission by most regulated plants. The Detail report is required when the discharger is submitting only detailed data (i.e., pipe-level data, where no calculations are required), or when requested by the MOECC. An error will occur and the Detail report will not be submitted if the Summary report has already been submitted (or vice versa) — contact the MOECC to unlock your data. |
Select a radio button. |
| Contact Name | This field will be pre-populated with the Work site Contact information.
If the person making the submission is different than the person shown in the Work site Contact page, this person’s name must be entered. |
Enter the name of the contact for this submission, if required. |
| Telephone | Area Code (3-digit), telephone number (7- digit) and extension (up to 4-characters) of the contact, if the person making the submission is different than the Work site Contact.
This field will be pre-populated with the Work site Contact information. |
Enter the phone number of the contact for this submission, if required. |
| Data Complete | A radio button to identify whether the discharge data in the reporting period is complete (Yes/No). If you tag No, please explain why in the Comment Section. | Select a radio button. |
| Comments | User may enter an optional submission comment, which will appear on the Summary Discharges Report and the Detail Discharges Report.
Note that an error will result and submission will not be possible if the Submission Comment field includes more than the allowable limit of 2000 characters. |
Enter the optional comment, up to 2000 characters. |
Once you have identified the reporting quarter, you may proceed with the contact information. By default, the company’s work site contact information is automatically populated into the contact fields in the Contact Submission Information section. This information is maintained in the Maintain Contact Module (explained in Section 5b).
On the Data Submission page you may edit the contact information as you wish it to appear in the Summary Discharges Report and the Detail Discharges Report. The work site contact information will not be permanently changed. To permanently change the contact information, use the Maintain Contact Module (explained in section 5b).
b. Submitting quarterly industrial data
Once the reporting period and submission information has been entered, you may proceed to create a data submission. The following buttons are available:
| Button | Description |
|---|---|
| Submit Data | Submits discharge data based on the criteria. |
| Cancel | Exits the current page (not saving any changes to the data) and returns to the previous page without submitting data. |
Note: Please wait for the web browser to complete communication (activity icon stops) before proceeding with the next command.
The following validation message may appear:
| Validation message | Meaning/button |
|---|---|
| “Missing Contact Name”. | Add a contact name to the Contact Information section. |
| “Telephone number is not a valid format. Verify that the telephone number is 7-digits without the ‘-’.” | The telephone number is not valid. Re-enter the 7-digit telephone number without a ‘-’. |
| “The area code is not a valid format.” | Area code is not valid. Re-enter area code. |
| “Sample has been submitted. It cannot be modified.” | Data has already been submitted for the requested submission period. It cannot be submitted again. Contact the MOECC to unlock your data. |
| “There are no samples within requested submission period.” | There are no data in the submission period. Verify and enter a different period. |
| “XML currently uploading. This information cannot be submitted. Please wait for XML upload to complete” | Submissions cannot be completed while XML file are being uploaded. Complete the submission when all XML file uploads are complete. |
| “Report currently generating. This information cannot be submitted. Please wait for report generation to complete.” | Submissions cannot be completed if any of the corresponding quarterly reports are in the process of being generated. Complete the submission after all report generations are complete. |
A warning message will appear for any control points which, for the quarter, have no data entered and are not included the inactive control point section (see Figure 79)
The following buttons will be available:
Figure 79
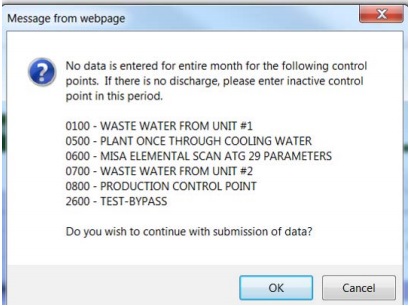
The following buttons will be available:
| Button | Description |
|---|---|
| ok | Allows the data to be submitted with no information for the months and control points indicated. |
| Cancel | Stops the submission, exits the warning message window and returns to the data submission page. Proceed to enter data or indicate inactive control point. |
c. Confirming your submission
If the submission is successful, a confirmation message will appear on the screen (see Figure 80).
Figure 80
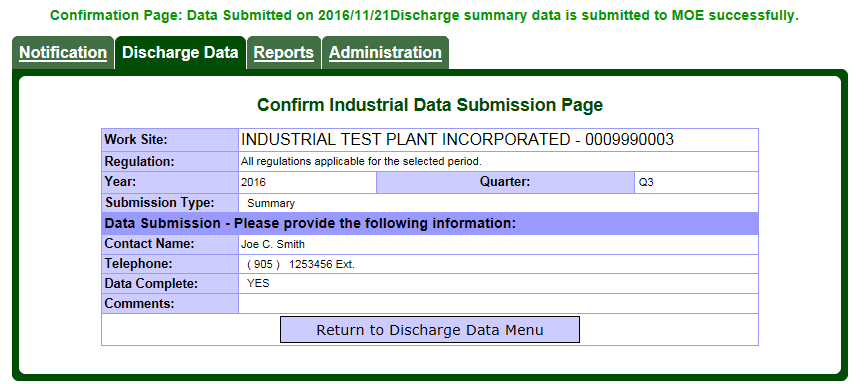
Print the confirmation page for your records. To do this:
- Click on File in your web browser.
- Click on Save As to open the save dialog box.
- Change the Save as type to TXT.
- Provide the page with a name and select a folder in your local drive.
- Click Save.
The Summary Discharges Report (and Detail Discharges Report) includes a Transmittal Sheet that states that the data has been submitted. This Transmittal Sheet must be signed and sent along with the Discharges Report to the MOECC district / regional office.
See below for examples of various forms of the Transmittal Sheet. Note that all details of the Transmittal Sheet will not appear unless the discharger has completed the Contact information under the Administration tab.
Figure 81 is an example of a Transmittal Sheet where the data has been submitted and the Contact data has been input.
Figure 81
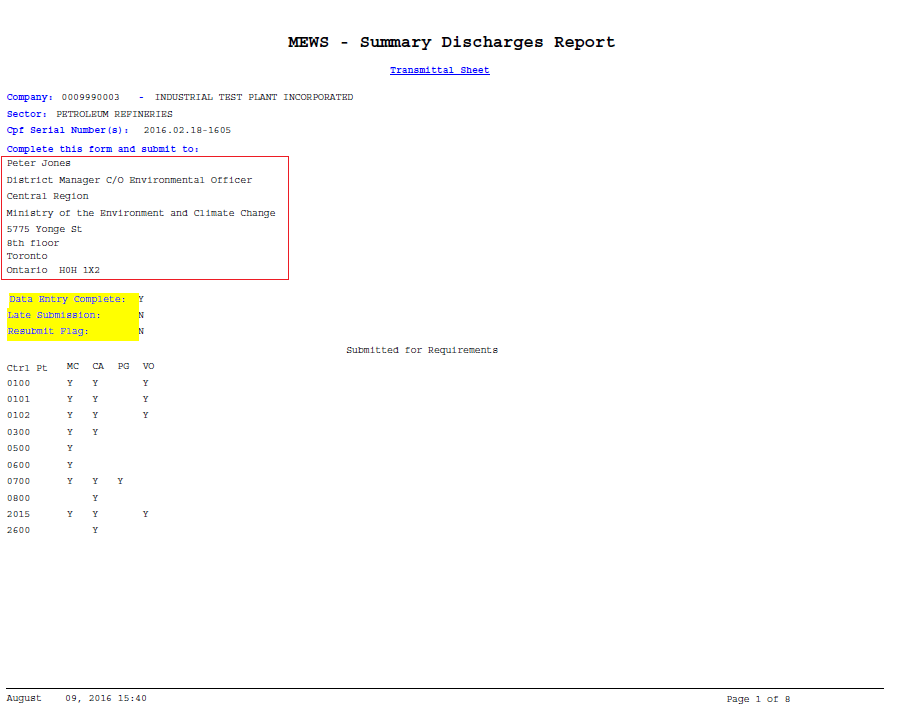
Figure 82 is an example of a Transmittal Sheet that is incorrectly formatted because Contact data has not been input.
Figure 82
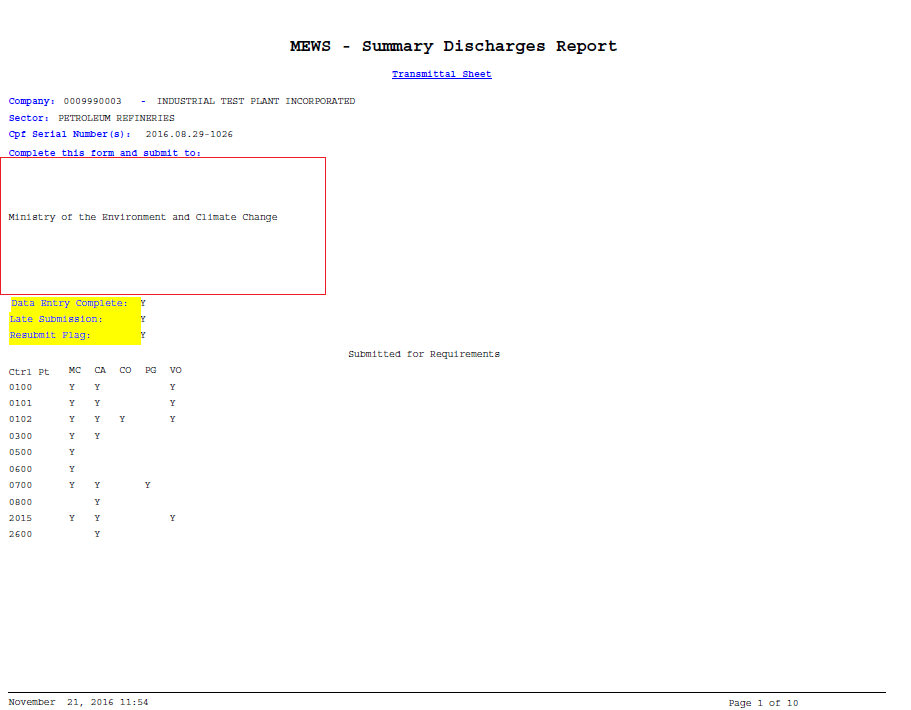
Figure 83 is another example of a Transmittal Sheet that is incorrectly formatted because Contact data has not been input.
Figure 83
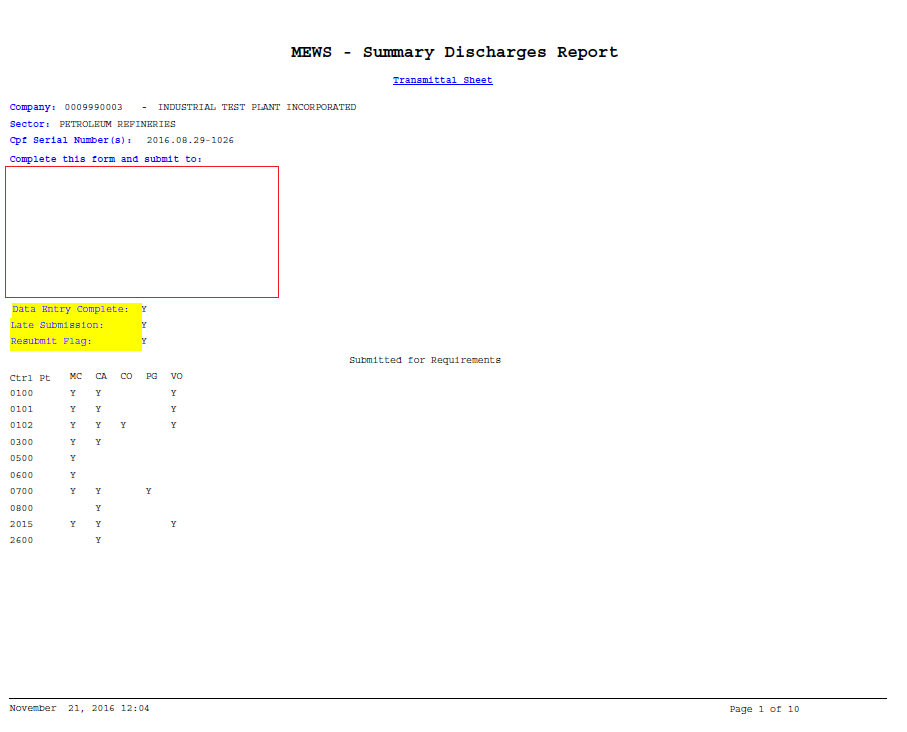
Figure 84 is an example of a Transmittal Sheet where data has not been submitted.
Figure 84
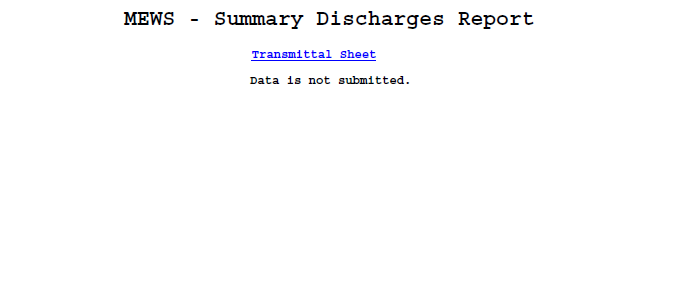
If you have edited the discharges data and have not regenerated the Reports #1 to 5, you will receive an error, as shown in Figure 85. Regenerate the reports # 1 to 5, and then submit the data.
Figure 85
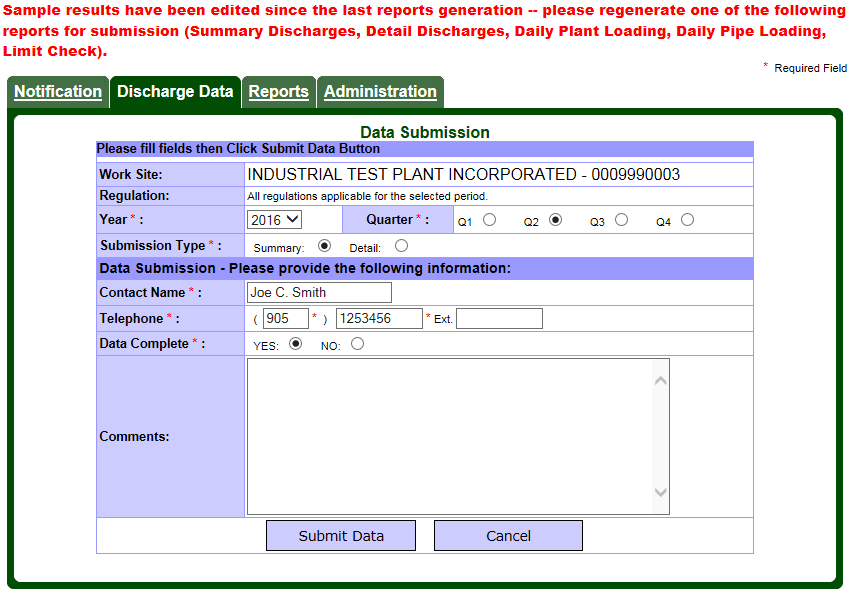
d. Requesting an unlock of data for resubmission
Once you have submitted your data, new data cannot be added and existing data cannot be edited; however, reports can be regenerated. The discharge sample data within the “submitted” reporting period can be retrieved for viewing by using the Industrial Data Entry Module (see Figure 86).
If there is a need to edit submitted discharge samples for resubmission, you must contact your local ministry District Office and follow up with a written request (an email may be acceptable) which contains the following information:
- Specify the year and quarter.
- Identify which data you are going to edit and why.
- Request that the ministry unlock the data.
- Provide an email address so that you can be notified when the data has been unlocked.
Once the quarter has been unlocked, you may edit your results and repeat the submission process.
e. Reviewing sample data after submission
Once the sample data for a quarter has been submitted successfully, all the sample data for that quarter will be locked from editing. If you visit the Industrial Data Entry – Search Samples screen, you will see that listed sample records will now have the status of “Submitted”, and the “Delete” button will no longer be available (see Figure 86).
Figure 86
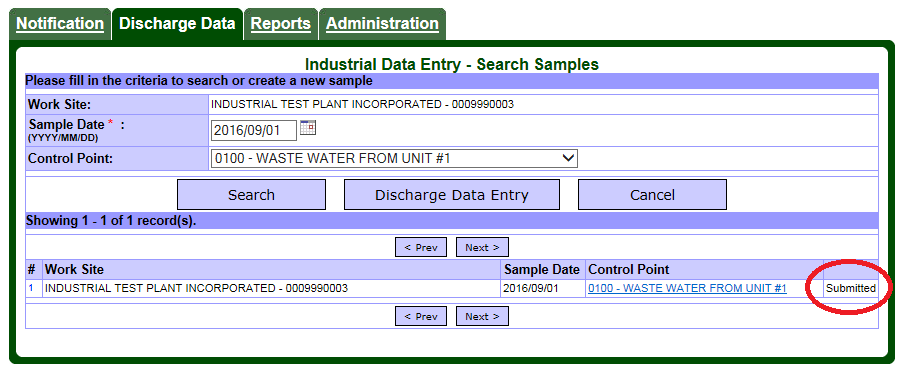
If you then select a Control Point and view the data entry screen, the sample discharge record will be shown as read-only upon which you will not be able perform any modifications (see Figure 87).
Figure 87
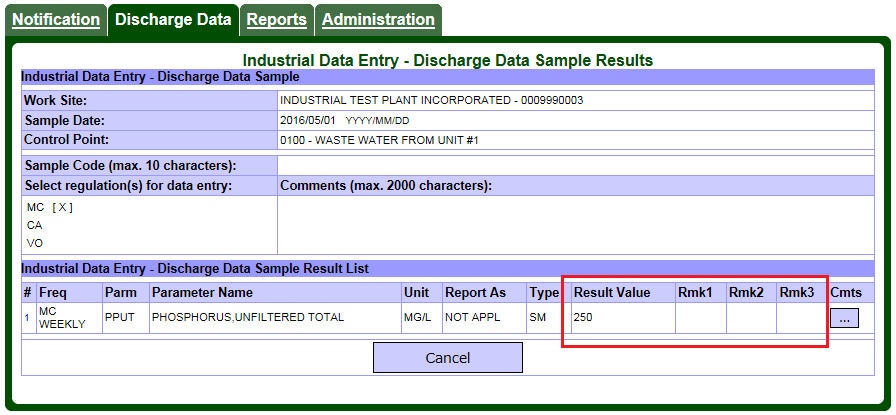
If you click the “Cancel” button here, it exits the current page and returns to the “Industrial Data Entry - Search Samples” page.
11. Logging out of MEWS
To exit the MEWS application, click the ‘logoff’ link located in the header section of the web page (see Figure 88).
Figure 88
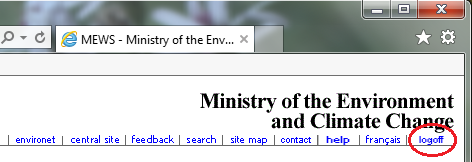
Once the link is activated, the session is terminated and you return to the MEWS log-in page.
Note: If there are pop-up boxes that have opened while you were working in MEWS, they may remain open even after you have logged out. However, they will no longer be active, and an error message may appear. Please ensure that you close all inactive pop-up boxes.
Appendices
Appendix A: Legal disclaimer for MEWS
General disclaimer
Introduction
This website is operated by the Ministry of the Environment of the Government of Ontario (“MOECC”) to (i) facilitate access to allow persons to submit wastewater discharge data as required under the MOECC Municipal / Industrial Strategy for Abatement (“MISA”), and (ii) for such other purposes as are prescribed.
Not advice
The contents of this website are provided in accordance with the Environmental Protection Act (“EPA”) and its regulations for informational purposes only and are not intended to provide specific advice or recommendations in any circumstances. Any reliance upon any information provided on this website is solely at the risk of the user of the site. Users of the Ministry of the Environment Wastewater System (“MEWS”) website should consider conducting their own due diligence with respect to related undertakings, in addition to reviewing information on this website.
Accuracy of information
The MOE cannot and does not guarantee that the information on this website is current, accurate, complete or free of errors, viruses, or other items of any kind that are of a destructive nature.
No liability
moe assumes no responsibility for errors or omissions in any of the information contained on this website. moe makes no representation or warranty of any kind whatsoever with respect to this website. moe specifically disclaims any express or implied warranties related to the use of this website and all contents including, without limitation, warranties of non-infringement or fitness for any particular purpose.
in no event shall moecc, the province of ontario and their respective officers, employees, servants or agents be liable for any failure to keep the contents of this website up to date, for errors or omissions contained on the website, or in no event shall moe, the province of ontario and their respective officers, employees, servants or agents be liable for any failure to keep the contents of this website up to date, for errors or omissions contained on the website, or for any damages (including without limitation, damages for loss of profits, business interruption, loss of information, or direct, indirect, incidental, special, consequential or punitive damages) arising out of or related to the use or inability to use this website (including all contents), whether under contract, in tort or under any other basis of liability.
Applicable law
This website is operated by MOE from its offices within the Province of Ontario, Canada. The terms and conditions upon which users may access and use this website are governed by the laws of Ontario and the laws of Canada applicable in Ontario. A user of this website irrevocably submits to the exclusive jurisdiction of the courts located in the Province on Ontario in connection with any legal matter arising from the use of this website. In no event shall any access to this website from any location outside Ontario be construed as an express or implied submission to, or waiver of any immunity from, the jurisdiction of the courts or regulatory authorities of that location by MOE, the Province of Ontario or their respective officers, employees, servants and agents.
Stakeholder Submission Of Data Disclaimer
It is important to note that you, as a wastewater discharger, are responsible for the quality of your data and for the information submitted to the Ministry of the Environment of the Government of Ontario (“ministry”). The ministry will not input information into the Ministry of the Environment Wastewater System (“MEWS”) website on your behalf—it is your responsibility to ensure that the information entered in the MEWS website is correct. Your reportable data will be stored for a period of three years plus the year of submission at the ministry. If your submitted data is found to be incorrect or the information you supplied on your MEWS website account contact form is incorrect, you may be subject to prosecution. For further information about completing your contact information and submitting your discharge data, please consult the MEWS User Manual and the Protocol for the Sampling and Analysis of Industrial/Municipal Wastewater.
Stakeholder log-ln disclaimer: Conditions of use
General
You are about to enter the Ministry of the Environment Wastewater System (“MEWS”), a password protected site. You will access this website using your password. Recognizing the importance of this password protected site, you acknowledge to the Ministry of the Environment of the Government of Ontario (“MOECC”) that you have implemented the necessary management of user names and passwords by your organization to ensure the integrity of your account in this website.
You as the password protected user of this account have determined in your sole discretion the information that is submitted to this website and kept in your account. You acknowledge that the ministry has not reviewed or determined the relevance of the information submitted by you into your account.
It is an offence under section 184(2) of the Environmental Protection Act to give false or misleading information to the MOE.
Once you complete the submission of information into your account, you will be required to certify that you are the contact person for this account and that you have undertaken reasonable inquiry to satisfy yourself as to the contents of this submission and that all of the information contained in this submission is accurate and complete to the best of your knowledge.
Verification of latest Company Profile
You acknowledge that the MOE may update your company profile file (“CPF”) on this website, and that you have undertaken reasonable inquiry to satisfy yourself as to the contents of this CPF and that all of the information contained in this CPF is accurate and complete to the best of your knowledge.
Changes to your CPF should be coordinated through your local MOE District Office—visit the MOE website for a current listing of MOE District Office contact information.
Time-out feature
Users of this website acknowledge that their session on this website will be terminated if there is no activity after 20 minutes.
Potential file transfer and report generation delays
Users of this website acknowledge that they may experience potential delays in uploading data and generating reports. To reduce this possibility, users are discouraged from submitting their data just prior to the legislated deadline (e.g., under the MISA/EMEL regulations, on the 45th day after the calendar quarter for most industrial dischargers).
Users experiencing undue delays with the MEWS reports should contact the MEWS Program Officer.
Suspension of website operation
You acknowledge that the MOE may suspend or terminate the operation of this website at any time without notice.
References
Links to the documents referenced herein may be found under the MOE website. These documents may be altered from time to time.
Appendix B: XML file Content
You may upload data to MEWS using an XML file you create based on your Company Profile File requirements.
To create an XML file, consult the MEWS guidance document, “XML Format Electronic File Transfer for Industrial Officers and Staff”, as amended from time to time. This document lists the codes required to create an XML file. See Section 8.h for using an XML template specific to your work site.
The following shows the generic content required for XML Data upload files.
<?xml version=“1.0” encoding=“UTF-8”?>
<!ELEMENT submission (sample*)>
<!ATTLIST submission
imis_company_code CDATA #REQUIRED
ws_name CDATA #REQUIRED>
<!ELEMENT sample (result*)>
<!ATTLIST sample
sample_date_time CDATA #REQUIRED
imis_cp_ext CDATA #REQUIRED
cp_name CDATA #IMPLIED
dischg_sample_cd CDATA #IMPLIED
sample_comment CDATA #IMPLIED>
<!ELEMENT result EMPTY>
<!ATTLIST result
rpttime_name CDATA #REQUIRED
sis_imis_code CDATA #REQUIRED
parm_name CDATA #IMPLIED
unit_abbrev CDATA #REQUIRED
rptas_abbrev CDATA #REQUIRED
result_structure CDATA #REQUIRED
component_type CDATA #REQUIRED
result_value CDATA #REQUIRED
remark_code_1 CDATA #IMPLIED
remark_code_2 CDATA #IMPLIED
remark_code_3 CDATA #IMPLIED
result_comment CDATA #IMPLIED
imis_regulation_code_1 CDATA #REQUIRED
imis_regulation_code_2 CDATA #IMPLIED
imis_regulation_code_3 CDATA #IMPLIED
imis_regulation_code_4 CDATA #IMPLIED
imis_regulation_code_5 CDATA #IMPLIED
imis_regulation_code_6 CDATA #IMPLIED
imis_regulation_code_7 CDATA #IMPLIED
imis_regulation_code_8 CDATA #IMPLIED
imis_regulation_code_9 CDATA #IMPLIED
imis_regulation_code_10 CDATA #IMPLIED>