Child Care Licensing System
Learn how to register for and use the Child Care Licensing System (CCLS) as a new applicant, existing applicant, licensee or service system manager.
Overview
Learn how to use the Child Care Licensing System (CCLS) as:
- a new applicant registering for the CCLS (you need to create an account)
- an existing applicant and/or licensee (you already have an account)
- a Service System Manager
For the best experience, use the Child Care Licensing System on a desktop computer or laptop, not a phone or tablet.
Using this guide
This guide includes instructions for individuals, corporations and First Nations. When required, it notes different processes are noted by group.
It also uses screenshots of the Ontario.ca Login and CCLS systems to provide points of reference. These screenshots may not:
- show all the fields in a system window
- match exactly what appears for you
Any data appearing in these screenshots is fake.
New applicants
To get access to the Child Care Licensing System (CCLS), you must:
When you get have a CCLS account, you can:
- view the orientation video
- create and update a profile
- apply for licences
Once you submit an application, you can also:
- check the status of the application
- send updates
- withdraw the application
- add staff members for the child care program
- request staff director approvals once a program advisor assigns the license application
Step 1: Create an Ontario.ca Login
You must have an Ontario.ca Login to access the Child Care Licensing System. If you already have an Ontario.ca Login, you can sign in with your existing account. You do not need to create a new one.
If you do not have an Ontario.ca Login, you must register for one.
Ontario.ca Login is a Government of Ontario login service. It lets you sign in quickly and securely to our services using a single login. You can use the same account to access multiple government services. Find more information about the Ontario.ca Login.
You can use either:
- an email and password
- the Sign-In Partner Interac® sign-in service
You can access the Ontario.ca Login login page by visiting the Child Care Licensing System landing page and Selecting the “Login/Register >” button there.
You will be asked to sign in with an Ontario.ca Login.
If you already have an account, you do not need to create a new one. You can sign in and start Step 2: Create a Child Care Licensing System account.
If you do not have an Ontario.ca Login, you must register for one. To register:
- Select “Create Account” and enter an email address and password.
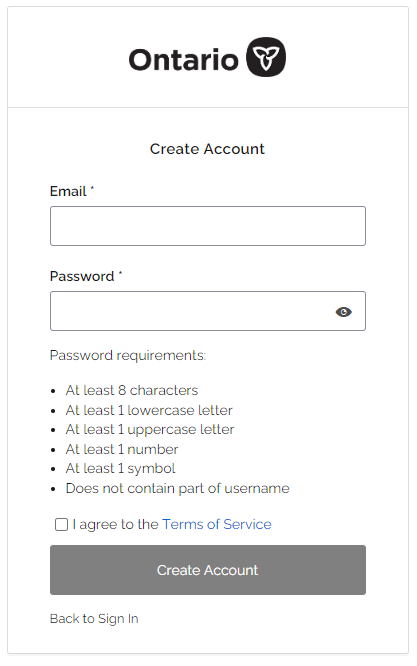
- Review the Terms of Service.
- Select the “Create Account” button to continue.
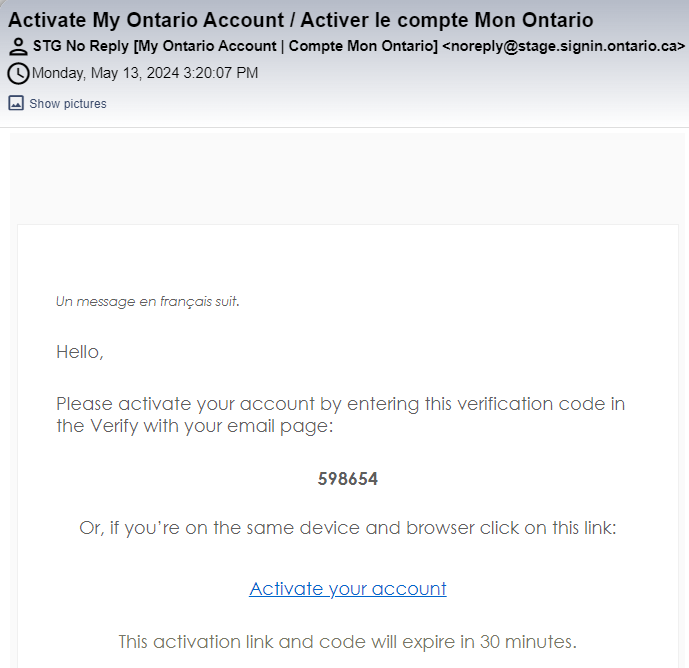
- Verify yourself. You will get an email with a verification code. Open your email and copy the verification code.
- Go back to your browser.
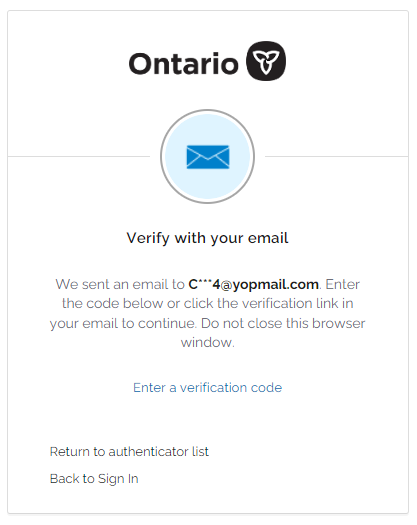
- Select “Enter a verification code”.
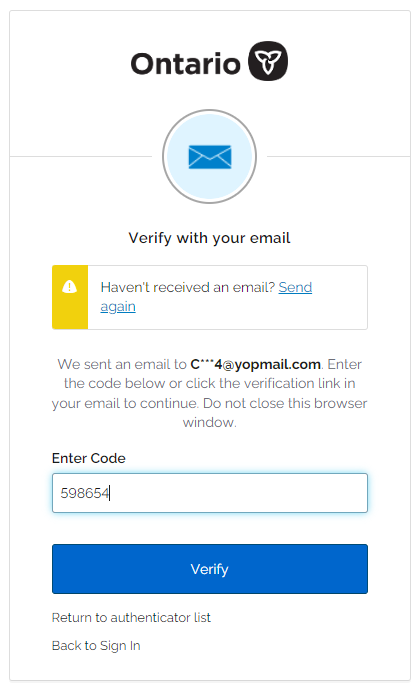
- Enter the verification code from the email.
- Click the “Verify” button.
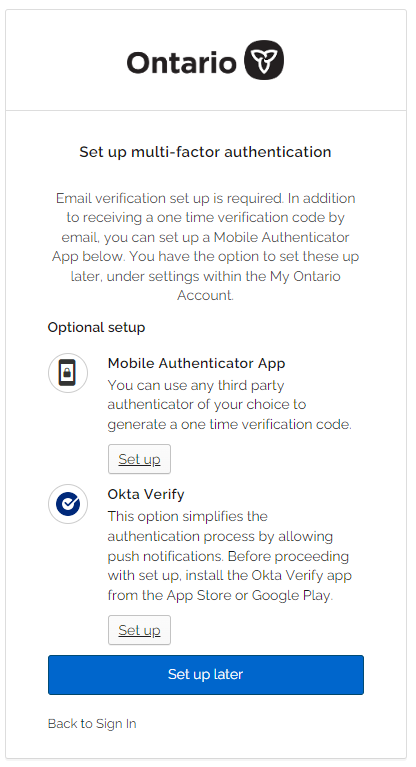
Optional: Set up multi-factor authentication. Follow the on-screen instructions to continue or click “Set up later” to set it up later.
You have successfully created your Ontario.ca Login. Now you can start creating your Child Care Licensing System account. You will be automatically directed to the next step.
Select “Create new account” and follow Step 2: Create a Child Care Licensing System account.
Step 2: Create a Child Care Licensing System account
After logging in through Ontario.ca Login, create a new Child Care Licensing System account.
- Once you select the “Create new account“ button, the Register New User window appears.
- Complete the information. A red asterisk (*) indicates that the information is mandatory.
- Select “Save“
- Select the Licensee Orientation tab and watch the video to continue.
Step 3: Start your profile
Before you can submit your first application, you must create a profile. The information you need to provide varies depending on whether you are applying as an individual, corporation or First Nation.
Select the Profile tab, then the Profile Information sub-tab. The Applicant/Licensee Type window will appear.
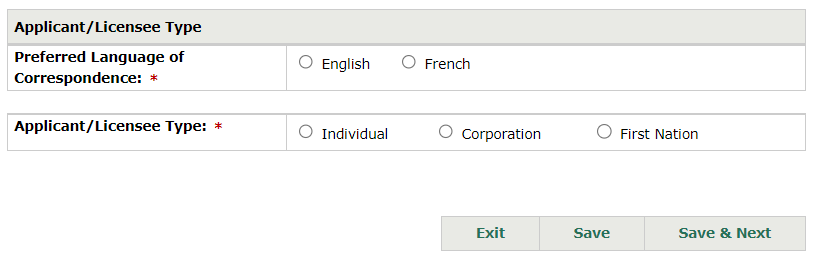
Select the language for your communication with us and then select your applicant/licensee type. The window will expand automatically.
Fill in the required information to create your profile. The information that is required depends on applicant type you select. The mandatory fields will be marked with a red asterisk (*).
For more information on how to enter information, including how to upload police record check documentation, read the CCLS reference guide for applicants and licensees (PDF). You can also find this guide under the Tools and Resources tab on the CCLS.
Once you have created your profile, you can submit your first child care licence application. For more information on the application process, read the:
- CCLS reference guide for applicants and licensees (PDF)
- Child Care Centre Licensing Manual
- Home Child Care Licensing Manual
Existing applicants and licensees
Once your child care licence has been issued, you are a licensee and can use the system to:
- renew licences
- report a serious occurrence
- request staff director approvals
- ask for a licence revision (if required)
Read our step-by-step guide to find out how to do these actions in the Child Care Licensing System.
Download the CCLS reference guide for applicants and licensees.
Service System Managers
Consolidated Municipal Service Managers (CMSMs) and District Social Services Administration Boards (DSSABs) can use the Child Care Licensing System to view and/or generate reports for:
- current licences
- new licence applications
- home child care premises locations
- licence revision requests
- serious occurrences
- licensed complaints
Service System Managers can also use the CCLS to:
- advise applicants and licensees looking to enrol in the Canada-wide Early Learning and Child Care (CWELCC) system
- add notes to serious occurrences and licensed complaints
Read our step-by-step guide to find out how to do these actions in the Child Care Licensing System.
Download the CCLS reference guide for Service System Managers.
If you have not yet registered for the CCLS, find instructions in the “Managing User Access” section of the guide.
Contact us
For help with using the Child Care Licensing System, email the helpdesk at childcare.helpdesk@ontario.ca.
For more information about child care licensing, contact us at: