Identify and control excess lead in drinking water in schools and child care centres
Use the four steps on this page to identify and control sources of chronic excess lead in your facility’s drinking water.
A message to operators
Ontario Regulation 243/07 (Schools, Private Schools and Child Care Centres) under the Safe Drinking Water Act, 2002 (O. Reg. 243/07), requires you (or a professional you hire) to sample the drinking water in your facility to determine its lead levels. This guide may help you if the lead concentration in water samples from your facility exceeds 10 µg/L (micrograms per litre), which is the maximum acceptable concentration for lead in drinking water in Ontario.
Lead in drinking water that comes from the public water supply is typically well below the maximum acceptable concentration. If there is excess lead in your facility’s drinking water, it likely got there by leaching out of the pipes, fixtures and/or service line for your facility. Your facility’s lead levels may be influenced by its plumbing materials, water use patterns, and the incoming water’s corrosiveness. Corrosiveness is the extent to which water can cause a chemical reaction that will dissolve and wear away metal in pipes.
This manual includes advice on how you can locate the source of excess lead in your facility’s drinking water and actions to reduce excess lead. The actions are not all necessarily required by regulation. However, any actions directed by your local health unit as a result of an exceedance to the lead standard must be followed.
You and your staff may have the expertise to use this manual and to locate the problem areas within your buildings and service lines without outside assistance. Alternatively, you may choose to engage a plumbing professional.
This manual uses a number of technical terms. Go to Appendix 1 for definitions.
The four step process
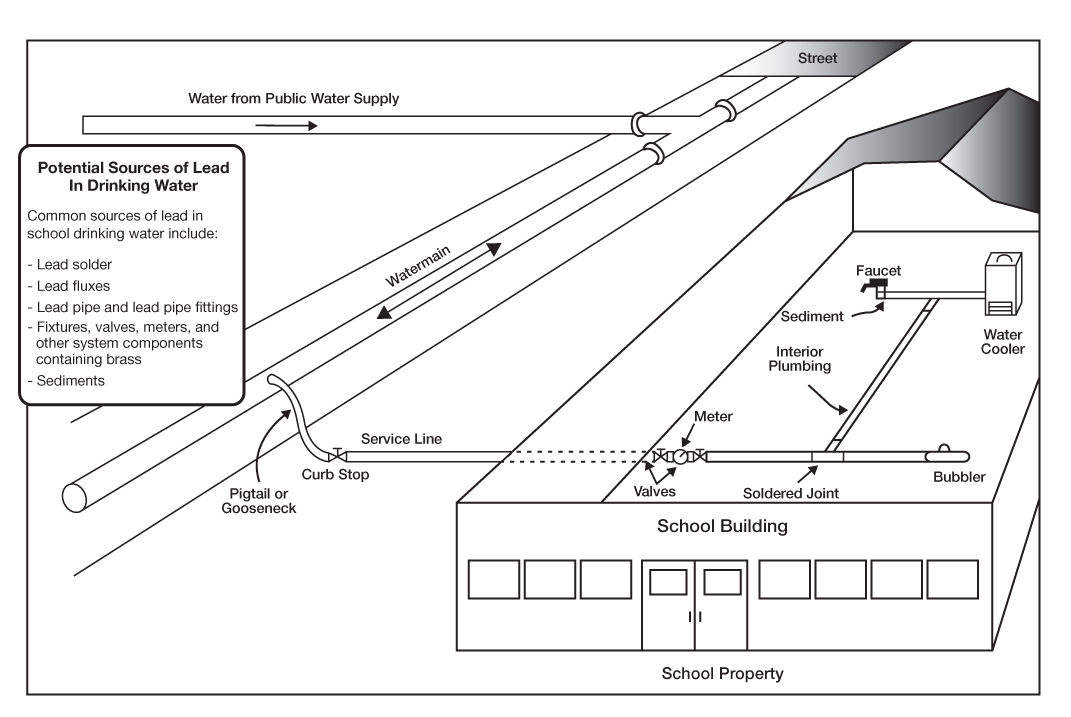
Certain areas of each plumbing system are more likely to cause excess lead concentrations in a facility’s drinking water than others. Figure 1 shows you the most common areas you may need to assess.
Figure 1: Potential sources of lead in drinking water
Step 1: Assess your plumbing
Begin by assessing your plumbing and developing a plumbing profile of each building.
The plumbing assessment survey found in Appendix 2 gives you questions to ask and actions to take to create your facility’s plumbing profile. It also provides the rationale for these questions and actions. You will need to have a facility plumbing map on hand to answer the questions.
Step 2: Prepare to collect water samples
It is important that you have been testing your lead as required by O. Reg. 243/07 and have completed Step 1 of this manual to create your facility’s plumbing profile before taking these next four steps.
- Prepare to collect your water samples by first repairing any leaking fixtures (such as bubblers, drinking water fountains, water coolers and taps/faucets).
- Obtain sample bottles from your licensed laboratory.
- Identify on your plumbing map where and when sampling will occur.
- Be prepared to fill out your records by knowing how you will give each sample its own unique number identifier.
- Each drinking water tap and fountain should already have its own unique identifier that you use in your records for O. Reg. 243/07 flushing, sampling and filter maintenance. For example, “T-001” for tap number one. You may want to use a similar numbering system for each sample, or include the date of the sample, for example, “T-001-06/01/2017.” You can obtain templates to help track your drinking water fixture inventory, flushing, sampling and filter maintenance by sending an email to waterforms@ontario.ca.
Step 3: Collect water samples and interpret the test results
How to collect water samples
- Open the fixture to produce a normal, steady flow of water.
- Collect 250 millilitres (mL) of water in the sample bottle. This small sample can more effectively identify the location of lead sources than a larger sample. (Note that this procedure differs from the sampling procedure required by O. Reg. 243/07 and should not be used for routine lead sampling)
- Assign a unique, specific sample identification number to each sample you collect.
- Make a record of the sample.
Sampling procedure
The following procedure will help you pinpoint the exact location(s) from which excess lead is getting into drinking water:
- Collect initial first draw (standing) samples from all fixtures used to obtain drinking water in your facility. Make sure to take these samples before your facility opens but after the water has been sitting in the pipes for at least six hours. Collect these water samples immediately after opening the valve, without allowing any water to run into the drain.
- Collect initial service line and water main flushed samples. The service line sample should come from a fixture located as near as possible to the location where your facility’s internal plumbing is connected to its service line. To ensure that your sample represents water in the service line in the public water system or where your facility is connected, take both samples immediately after you have flushed the fixture for the time specified in Appendix 3.
- Compare all initial sample results. Information on how to interpret sample results is in Appendix 4.
Follow-up with interior flushed samples. This is necessary if your initial samples reveal lead concentrations greater than 10 µg/L for a given fixture and the concentrations coming from the service line and water main do not account for all of the lead found in the initial first draw samples. Comparison of your initial and follow-up sample test results will help you assess whether the lead contamination results are from the fixture itself or from interior plumbing. You may need to take additional follow-up samples from the interior plumbing within the building to further pinpoint the sources of lead contamination.
As when you collected initial first draw samples, you must take follow-up flushed samples before your facility opens and before it has used any water from the fixtures you are testing. Where this is not possible, make sure that at least the branch of plumbing serving that fixture has not been used. Make sure to collect the flushed samples immediately after the water has run from the fixture for at least 10 seconds, not immediately after opening the fixture.
Where to collect water samples and how to do the sampling
Collect and test water from the following plumbing locations, in the following order:
- drinking water fixtures
- interior upstream plumbing such as laterals, headers and riser pipes and/or
- service line and/or water main.
Figure 2 shows an example of the order in which you would test the interior plumbing components listed above in a single-level building.
Figure 2: Plumbing configuration for a single-level facility
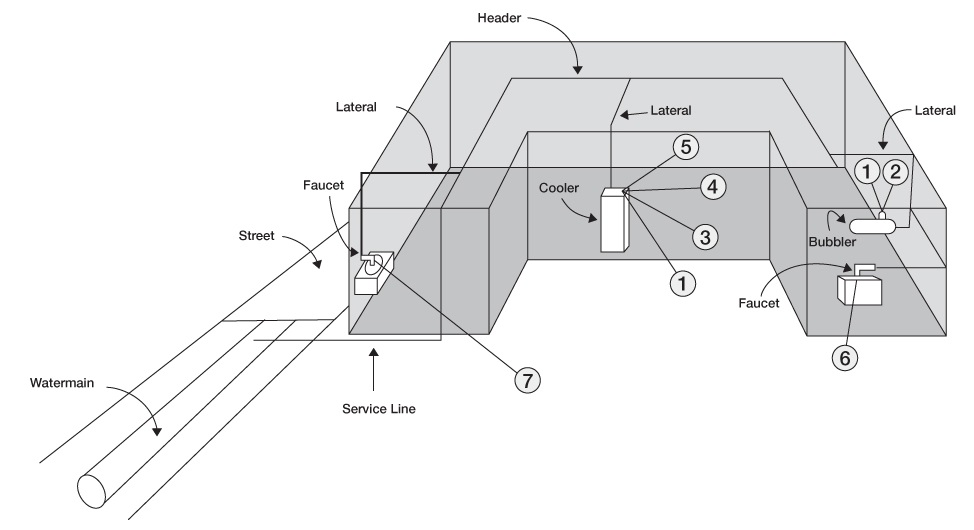
Note: Simplified header and lateral configurations are shown for clarity.
1 - Morning first-draw samples from coolers, faucets, bubblers, etc. (Initial Screening Samples 1A, 1C, 1D, 1E, 1F.)
2 - Samples from lateral after 10-second flush from designated outlets. (Follow-up Samples 2A, 2E, 2F, 1G.)
3 - Samples from coolers after 15-minute flush. (Follow-up Sample 2C.)
4 - Samples from coolers morning first-draw. (Follow-up Sample 3C.)
5 - Morning first-draw from coolers at disconnected plumbing outlet. (Follow-up Sample 4C.)
6 - Sample from header pipe taken from faucet from service line. (Sample 1H.)
7 - Sample from service line and distribution main taken from faucet closet to service line. (Samples 1M, 1S.)
Note: All of these samples should not be collected on the same day.
Figure 3 provides a similar example for a multi-level building.
Figure 3: Plumbing configuration for a multi-level facility
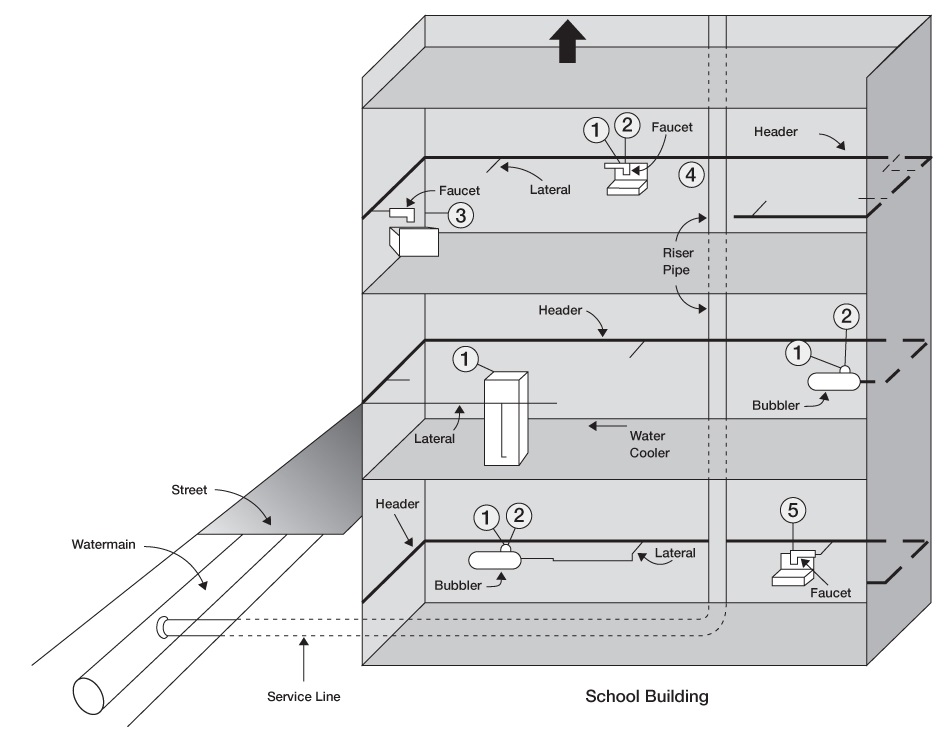
Note: Simplified header and lateral configurations are shown for clarity.
1 - Morning first-draw samples from coolers, faucets, bubblers, etc. (Initial Screening Samples 1A, 1C, 1D, 1E, 1F.)
2 - Samples from lateral after 10-second flush from designated outlets. (Follow-up Samples 2A, 2E, 2F, 1G.)
3 - Sample from header pipe taken from faucet farthest from riser pipe. (Sample 1H.)
4 - Sample from riser pipe taken from faucet closest to riser pipe. (Sample 1J.)
5 - Sample from service line and distribution main taken from tap closet to service connection. (Sample 1H.)
Note: All of these samples should not be collected on the same day.
How to sample different drinking water fixtures and plumbing
How you collect samples varies for each type of drinking water fixture.
See Appendix 4 for sampling instructions, possible scenarios, and remedies for the following:
Step 4: Take control measures
You should begin taking interim measures to control identified lead problems while waiting for the test results.
Once you know the exact source(s) of the lead within your facility then you can implement a permanent solution and determine through testing that your drinking water no longer reflects excessive levels of lead.
Once a permanent solution is in place then you should use routine control measures to prevent excessive levels of lead from creeping up again in your drinking or cooking water.
Interim (short-term) control measures
Flush the piping system in your facility
The degree to which flushing helps reduce lead levels can vary depending on the age and condition of the plumbing and the corrosiveness of the water. But this is still the quickest and easiest measure to reduce high lead levels, especially when contamination is localized in a small area or building.
Flushing of the schools' and child care centres' plumbing before the students/children arrive is a regulatory requirement. Additionally, you must follow the regulated flushing protocol.
In general, in the morning before your facility opens, turn on the last tap/faucet (not a fountain) on each run or branch of plumbing, and let the water run for at least five minutes. The actual amount of time you will need to flush a particular tap depends on the type of tap and its location within the plumbing (distance from the water main in the street). For best results, calculate the volume of the plumbing and the flow rate at the tap, and adjust the flushing time accordingly (see Appendix 3).
After the end-of-run taps are flushed, you will need to flush, for at least 10 seconds, all other fixtures within your facility that can provide cold water and may be used for drinking by children under 18 years of age.
Additional measures
Here are a few additional recommendations for flushing specific types of non-end-of-run fixtures:
- Drinking water fountains without refrigeration units: let the water run for at least 15 seconds, or until water is cold.
- Refrigerated water fountains: let the water run for 15 minutes. If it is not feasible to flush these for such a long time, consider replacing these with fixtures that meet NSF standards (see Appendix 5 for information on NSF/ANSI standards).
- For all kitchen faucets and other faucets where cold water is used for drinking or food preparation let the water run for at least 10 seconds or until water is cold.
- Be careful not to flush too many taps at once. This could dislodge sediments that might create furtherlead problems, or could reduce pressure in the system below safe levels. If the flow from fixtures is reduced noticeably during flushing, you are probably turning on too many taps at once.
- To save water, thoroughly flush several designated drinking water fixtures daily while taking all others temporarily out of service. Replace cold and hot water taps in washrooms with automatically pre-mixed warm-water-only faucets, which do not need to be flushed. Flushing is not a practical remedy for water coolers.
- Provide water coolers. This can be expensive, but might be worth considering if widespread contamination is a possibility or reality, and flushing is not sufficiently reducing the lead concentrations. If you opt for bottled water, get a written guarantee from its distributor that the bottled water meets federal standards.
- Temporarily shut off problem fixtures. If flushed sample results from a fixture exceed 10 µg/L, you must shut it off or disconnect it until the problem is resolved.
Permanent control measures
These are actions you can take to permanently reduce or eliminate the sources of lead that originate in your facility’s plumbing. You will need to base your decision on factors such as the extent and severity of the lead problem in your facility, the cost and likelihood of success of a particular remedy, availability of water, and staffing requirements.
Replace fixtures or other components
If your facility’s sources of lead contamination are localized and limited to a few fixtures, the most practical solution might be to replace these fixtures or upstream components with those that meet NSF standards (see Appendix 5 for information on NSF/ANSI standards). If you need to replace many bubbler valves or other specific components, purchase and install only one or two initially. Take follow-up water samples(s) to confirm that that particular product does not leach unacceptable levels of lead before purchasing this component for other locations.
If you need to replace lead pipes, the property owner would normally be responsible for replacing the portion of a lead service line located on your facility’s property. You can replace lead pipes within the property and arrange for the replacement of the portions of the lead service lines under the public water supplier’s jurisdiction (check with the public water supplier).
Reduce lead levels at the tap
Point of use (POU) devices such as reverse osmosis units (certified for lead reduction under NSF/ANSI 58) can effectively remove lead from drinking water at faucets or taps but they are not for drinking water fountains. Since these devices also tend to make the water corrosive to the lead in the pipe material, they should only be used when placed at water fixtures. Use only NSF/ANSI 53, 58, or 62 certified filters for lead reduction (see Appendix 5 for information on NSF/ANSI standards), and adhere to the manufacturer’s recommended equipment maintenance schedule.
Check grounding wires
If any of your electrical equipment is grounded to water pipes, the electric current travelling through the ground wire could be accelerating the corrosion of lead in your plumbing. Ask your local building inspector whether the building codes will allow you to remove existing wires already grounded to the water pipes, and replace them with an alternative grounding system. Hire a qualified electrician for this job: removing grounding from water pipes can create a shock hazard unless an acceptable, alternative ground is provided.
Reconfigure plumbing
Once you are certain of the sources of lead contamination, you may be able to modify your plumbing system to redirect drinking or cooking water so it bypasses the sections of plumbing that are the source of lead contamination. You will need follow-up testing to ensure that this really does reduce lead levels at the tap.
Set up automatic flushing for the main pipes
You can install and set time-operated solenoid valves to automatically flush some or all of the fixtures that you are required to flush. For facilities that have a legal regulatory requirement for flushing, every flushing by an automatic flushing device must be verified, and the name of the person verifying that the flushing took place must be recorded along with the date, time and location.
Use lead-free materials
Work closely with plumbers and other persons who repair or replace your facility’s plumbing system to make sure they use only "lead-free" solders and other materials. Report any violations of the "lead-free" requirements to the plumbing inspector.
Shut off problem fixtures
If initial sample results from a fixture exceed 10 µg/L, and if you don't use that fixture frequently, you can shut off or permanently disconnect the fixture.
Routine control measures
To prevent exposure to elevated levels of lead:
- Keep screens/aerators clean.
- Heat up water from the cold water tap on a stove or in a microwave oven for food and beverage preparation, rather than using hot water from the tap. Hot water dissolves lead more quickly than cold water and is likely to contain increased lead levels.
Appendix 1: Glossary of terms
- Bubbler
- A fixture consisting of a bubbler valve, bubbler receptacle and all associated piping, valves and mounting accessories for attaching the fixture to a wall or mounting surface. Some bubblers are attached to central chiller units, while others are not. None contain a refrigeration unit.
- Bubbler valve
- The valve and discharge device that mounts on top of the bubbler fixture and discharges water for consumption.
- Chiller
- A central refrigeration unit that provides cold water to some types of bubblers.
- Corrosion
- The dissolving and wearing away of metal caused by a chemical reaction, such as a reaction between water and piping the water contacts.
- Drinking water fountain
- A fixture connected to the water supply that provides water as needed. There are four types of drinking water fountains: bubblers without central chillers, bubblers with central chillers, water coolers and bottled water dispensers.
- Faucet (tap)
- A valved fixture device attached to a pipe that normally serves a sink or tub fixture. A faucet discharges hot and/or cold water for consumption, including drinking, cooking, and washing.
- Fittings
- Static parts used to join sections of pipe or to join pipe to fixtures.
- Flux
- A substance applied during soldering to facilitate the flow of solder. Because flux often contains lead, it can be a source of lead contamination in water.
- Header
- The main water supply pipe, which supplies water to laterals on each floor of a building. In smaller buildings, a header may be very short, and have the same diameter as its laterals.
- Laterals
- Plumbing branches between a fixture or a group of fixtures (such as taps, water fountains, etc.).
- Public water system
- A drinking water system subject to regulatory requirements under the Safe Drinking Water Act, 2002.
- Riser pipe(s)
- The vertical pipe(s) that carry water from the basement header to the headers (or individual laterals) on one or more floors of the building. In some buildings, the laterals are connected directly to individual riser pipes instead of floor headers.
- Sediment
- Debris that settles to the bottom of the water. Lead sediments can form if lead components are used in plumbing materials, and result in elevated water lead levels.
- Source water
- Untreated water from streams, rivers, lakes, or underground aquifers, used to supply private and public drinking water systems.
- Solder
- A metallic compound used to seal the joints between pipes.
- Solenoid Valve
- A valve controlled by electric current.
- Valves
- Mechanical devices that include a movable part that opens, shuts, or partially obstructs.
- Water cooler
- Any mechanical device affixed to drinking water supply plumbing that actively cools water for human consumption. The reservoir can consist of a small tank or a pipe coil.
Appendix 2: Plumbing assessment survey
Download plumbing assessment survey
Appendix 3: How long to flush?
When you are testing your upstream plumbing, you will need to estimate the amount of time to wait before you take a follow-up flushed water sample. This time can vary, depending on the pipe size and water flow rate you will use during flushing. Some ways to determine how long to wait include:
- calculating the pipe volume, in litres, between the fixture and the location in the plumbing that a water sample is to represent
- measuring the fixture flow rate in litres per minute
- dividing the pipe volume in litres by the fixture flow rate in litres per minute.
The following chart can assist you in these calculations.
| Nominal pipe diameter in millimetres (inches) | Approximate Capacity (litres of water per metre of length) Type K Copper (soft) | Approximate Capacity (litres of water per metre of length) Type L Copper (rigid) |
|---|---|---|
| 9.53 (3⁄8) | 0.0818 | 0.0930 |
| 12.70 (½) | 0.1401 | 0.1500 |
| 19.05 (¾) | 0.2802 | 0.3112 |
| 25.40 (1) | 0.5010 | 0.5320 |
| 31.75 (1¼) | 0.7837 | 0.8097 |
| 38.10 (1½) | 1.1098 | 1.1458 |
| 50.80 (2) | 1.9418 | 1.9927 |
| 63.50 (2½) | 2.9909 | 3.0740 |
| 76.20 (3) | 4.2755 | 4.3871 |
Appendix 4: Bubblers or drinking water fountains
Figure 4: Bubblers or drinking water fountains (without central chillers)
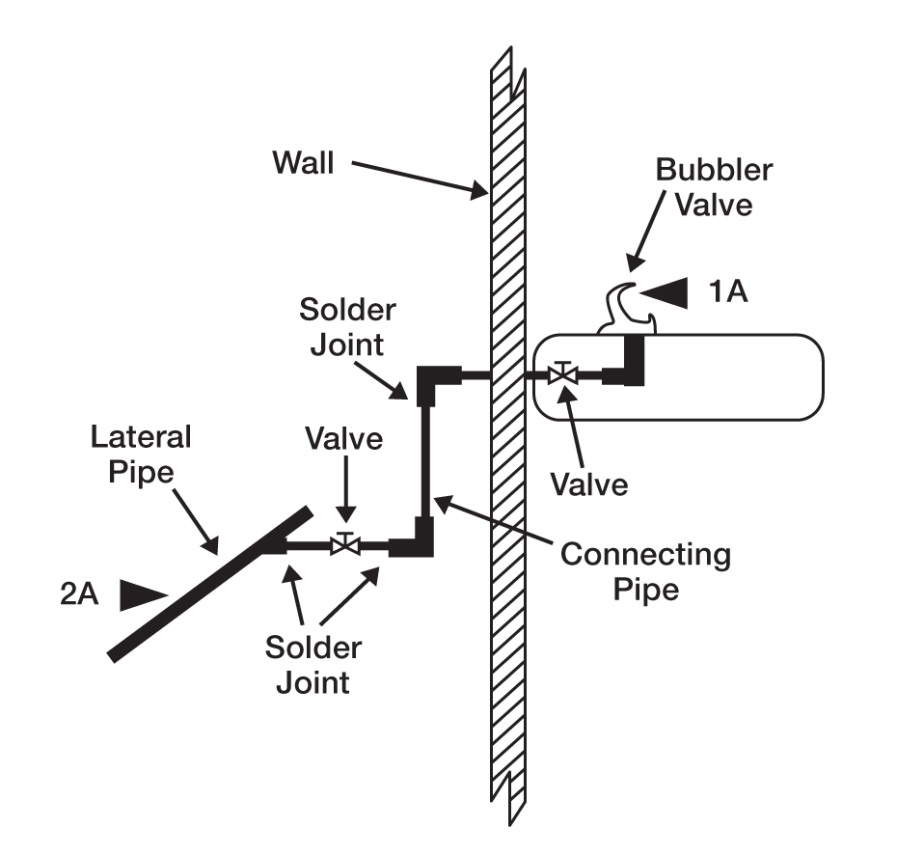
Before you collect this sample, do not close or adjust the shut-off valves to the water fountain or bubbler to prevent their use. Minute amounts of scrapings from the valves will produce inaccurate results showing higher than actual lead levels in the water.
Initial first draw sample
Take your initial first draw sample from Location 1A. Collect Sample 1A (see Figure 4) immediately after opening the valve, without allowing any water to run into the drain. Take the sample before your facility opens and before any water is used on the plumbing branch (lateral) serving this fountain. This sample is representative of drinking water at the beginning of the day, or after several hours when the fountain has not been used.
Follow-up flushed sample
If the test result indicates a lead level over 10 µg/L, take a follow-up flushed sample from Location 2A of this bubbler. Collect Sample 2A (see Figure 4) after the water from the fountain has run for 15 seconds. This sample is representative of the water in the plumbing, upstream from the point where the bubbler’s connecting pipe joins the plumbing lateral (back toward the service line and the water main). If several bubblers are served by the same plumbing lateral (branch), take samples from different bubblers on different days.
Interpreting the test results
If the lead level in Sample 1A is higher than in Sample 2A the bubbler and/or the plumbing immediately upstream from the bubbler contributed a portion of the lead in the drinking water.
If the lead level in Sample 2A is very low (less than 5 µg/L) the bubbler contributed most or all the lead in the water and the water picked up very little lead from plumbing upstream from the fixture.
If the lead level in Sample 2A exceeds 10 µg/L the plumbing upstream from the bubbler also contributed lead in the drinking water.
If the lead level in Sample 2A exceeds 20 µg/L collect follow-up flushed samples from the header supplying water to the lateral to locate the source of the contamination.
Sample scenario and remedy
- The lead level in Sample 1A (31 µg/L) exceeds that of Sample 2A (7 µg/L), therefore 24 µg/L of lead is contributed from the bubbler and/or its connecting pipe.
- The lead level in Sample 2A (7 µg/L) does not significantly exceed 5 µg/L, therefore the bubbler and/or its connecting pipe is contributing most of the lead in the water. Very little lead is being picked up from the plumbing upstream from the bubbler.
- The lead level in Sample 2A (7 µg/L) does not exceed 20 µg/L, therefore sampling from the header supplying water to the lateral is not necessary.
Possible remedy: Replace the fixture (bubbler) as well as the associated connecting pipe, valves, and fittings, with lead-free devices, fittings and materials.
Appendix 4: Sampling water coolers
Figure 5: Water cooler fountains
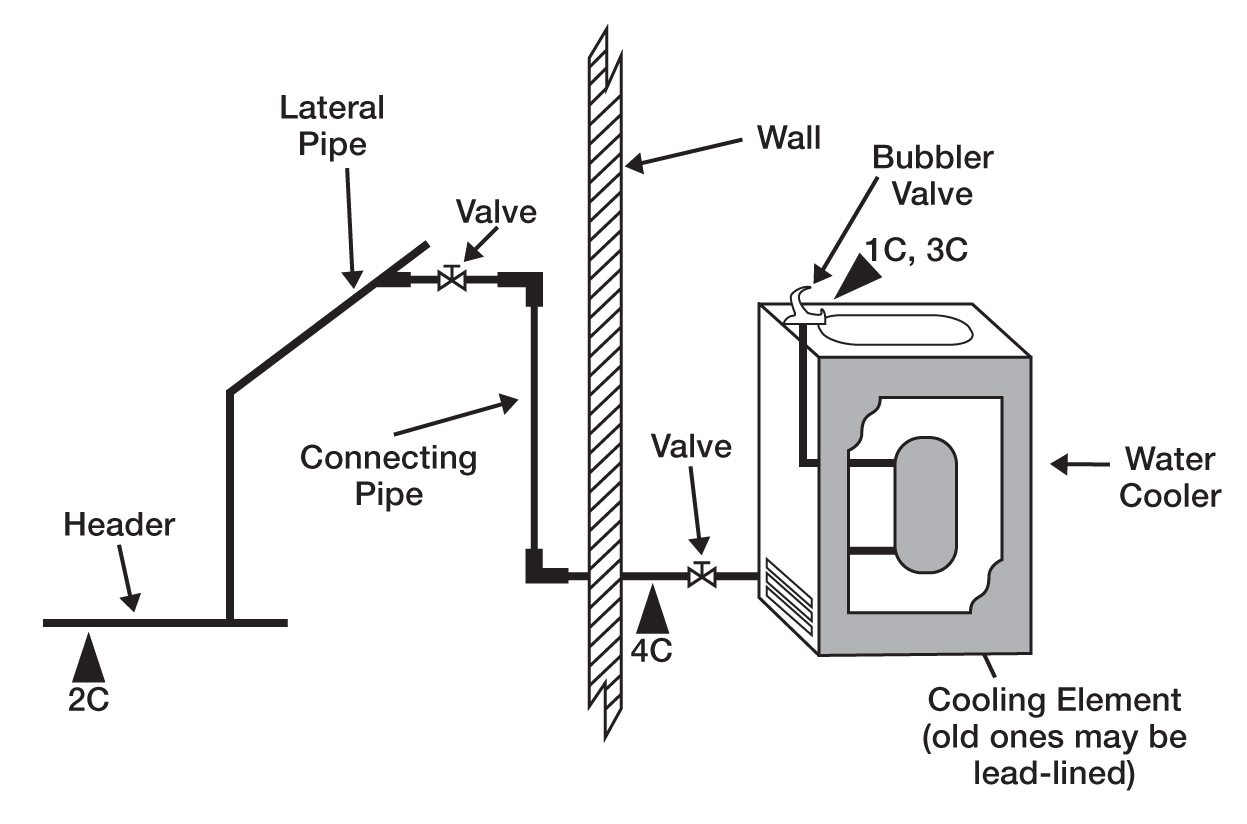
Note: The valve shown upstream of the water cooler may be located inside the cooler.
There are two types of water coolers: wall mounted and freestanding. They are both supplied by water from the building’s plumbing and equipped with their own cooling and storage systems. Water coolers store water in a pipe coil or in a reservoir. Refrigerant coils in contact with these storage units cool the water.
Lead in the water from these devices could come from:
- the internal components of the cooler, including a lead-lined storage unit
- the section of the pipe connecting the cooler to the lateral pipe and/or
- the interior plumbing of the building.
Initial first draw sample
Take your initial first draw sample from location 1C (see Figure 5) immediately after opening the valve, and without allowing water to run into the drain. If the fountain is infrequently used, you can take this sample at any time of the day, as long as the water has not been used in more than six hours. Sample 1C is water that people drink at the beginning of the day or after six or more hours of non-use. It consists of water that has been in contact with the cooler’s interior piping, the valve and fittings, the storage unit, and the section of plumbing connecting the cooler to the plumbing lateral.
Follow-up flushed sample
If the test result indicates a lead level over 10 µg/L, take a follow-up flushed sample from Location 2C (see Figure 5). Take Sample 2C after your facility closes and after you have run the water for at least 15 minutes. It is representative of the water that is in contact with the plumbing’s header or riser pipe upstream of the cooler.
Take the follow-up flushed Sample 3C (see Figure 5) from this water cooler the next morning immediately after opening the valve, before your facility opens and before any water is used on the plumbing branch (lateral) serving this cooler. Because the water in the cooler was flushed the previous afternoon, this sample is representative of the water that was in contact with the cooler overnight, but not in extended contact with the plumbing upstream.
Interpreting the test results
If the lead level in Sample 3C is greater than in Sample 2C, the water cooler may be contributing lead.
If the lead level in Sample 3C is greater than in Sample 2C, and Sample 1C is greater than Sample 3C, then the upstream plumbing and/or the service line, in addition to the cooler, may also be contributing lead.
If the lead level in Sample 2C is close or equal to that in Sample 3C, then the water cooler is probably not contributing lead.
If the lead level in Sample 1C is greater than that in Sample 3C, and Sample 2C is close or equal to Sample 3C, then the upstream plumbing is probably contributing lead.
If the lead level in Sample 2C is greater than 10 µg/L and is greater than or equal to that in Sample 1C and Sample 3C, the source of lead may be dislodged sediments or other particulate matter in the cooler storage tank, screens, or the plumbing upstream from the cooler.
To determine whether or not the cooler is the source of lead, you will need to take a follow-up first draw Sample 4C (see Figure 5). The day before you take this sample, turn off the valve leading to the cooler. Look for and remove any screens at the inlet or bubbler fixture. If you find any debris on these screens, in the pipe, or at the fixture, send a sample to a licensed laboratory for analysis. If your cooler has a drain valve at the bottom of the water reservoir, sample water from the bottom of the water reservoir and analyze any debris. Then, on the day you are taking this sample, clean and flush the plumbing fixture, then collect this sample from the connected plumbing fixture in the same manner as you collected Sample 1C. This sample is representative of the water that was in contact with the cooler overnight, but not in extended contact with the plumbing upstream.
Here is how to interpret the results:
- If the lead level in Sample 4C is less than 5 µg/L then the cooler is likely an older one. Lead in the other samples is coming from its cooling element, or from debris in the cooler or on the cooler’s screens.
- If the lead level in Sample 4C is much greater than 5 µg/L and less than in Sample 1C then the source of lead could be the cooler (from its cooling element, debris inside and/or from its screens) and/or upstream plumbing.
- If the lead level in Sample 4C is close or equal to Sample 1C then the cooler is not the problem and all the lead comes from your plumbing.
Sample scenarios and remedies
Example 1
- The lead level in Sample 1C is 54 µg/L. The plumbing upstream from the cooler (anywhere up stream, including the building’s service line) and/or the water cooler is contributing lead.
- The lead level in Sample 3C (40 µg/L) exceeds that of Sample 2C (5 µg/L). The water cooler is contributing 35 µg/L of lead.
- The lead level in Sample 3C (40 µg/L) exceeds that of Sample 2C (5 µg/L), and the lead level in Sample 1C (54 µg/L) exceeds that of Sample 3C (40 µg/L). The plumbing upstream from the cooler (anywhere upstream, including the service line) is contributing 14 µg/L of lead.
Possible remedy: Replace the cooler with one that contains lead-free components and retest the water. Locate and eliminate the source of lead in the plumbing.
Example 2
- The lead level in Samples 1C (44 µg/L), 3C (42 µg/L) and 2C (41 µg/L) are approximately equal. The likely source of the lead is neither the cooler nor the plumbing immediately upstream of the cooler (including the plumbing lateral).
- The lead level in Sample 4C (43 µg/L) significantly exceeds 5 µg/L. The plumbing upstream from the cooler is the source of lead.
Possible remedies: If the water continues to test high, the header, building’s service line and/or public water supply may be the problem. You will need to test them all to determine which is responsible. If you identify the source of lead in plumbing pipe upstream between the header and cooler, replace it with lead-free materials and retest the water for lead.
Appendix 4: Sampling a water tap or faucet
Figure 6: Water tap (faucet)
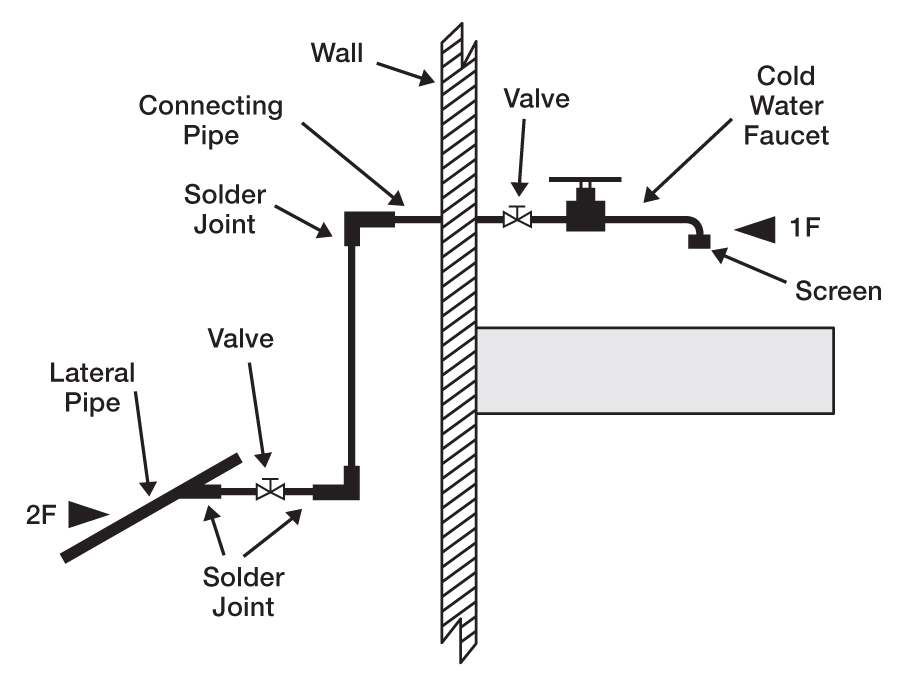
If you periodically remove, clean, and replace aerators you can continue to do so, and flush the tap after replacement, but you must wait at least six hours before you take your initial first draw sample. This is to ensure that you are taking a true first-draw sample. One cause of high lead levels could be recent repairs, dislodged sediment or other debris in the plumbing. If cleaning is performed, any debris found on tap screens/aerators should be sent to a licensed laboratory for lead analysis.
Initial first draw sample
Take your initial first draw sample from location 1F (see Figure 6). Collect this water sample from the cold water tap (or the cold water setting in an adjustable dual line faucet) immediately after opening the faucet, without allowing any water to run into the drain. You must take this sample before your facility opens and before any water is used on the plumbing branch (lateral) serving this tap.
This sample is representative of the water that people might drink at the beginning of the day or after the tap has not been used for several hours. It consists of water that has been in extended contact with the fixture and the plumbing connecting the faucet to the lateral pipes.
Follow-up flushed sample
If the first-draw sample result from a faucet indicates lead levels of over 10 µg/L take a follow-up flushed Sample 2F (see Figure 6) before your facility opens and before any water is used in the building. Let the water from the faucet run for 10 seconds before collecting Sample 2F. Try to ensure that no water is used in the building before you take this sample or that at least no water is running through the branch of plumbing serving this fixture. This sample is representative of the water that is in the plumbing upstream from the point where the faucet’s connecting pipe joins the plumbing lateral.
Interpreting the test results
If the lead level in Sample 1F is higher than that in Sample 2F then the source of lead is the water faucet and/or the plumbing immediately upstream from the faucet.
If the lead level in Sample 2F is very low (less than 5 µg/L) then most or all the lead in the water is from the faucet and/or the plumbing connecting the faucet to the lateral, and very little lead is from the plumbing farther upstream from the faucet.
If the lead level in Sample 2F exceeds 10 µg/L then the plumbing farther upstream from the faucet may be contributing lead.
If lead is found in the aerator/screen debris sent for analysis then a separate investigation by a plumbing professional may be necessary to pinpoint its source and identify appropriate remedies.
Sample scenarios and remedies
Example 1
- The lead level in Sample 1F (39 µg/L) exceeds that of Sample 2F (6 µg/L). The water faucet and/or its connecting pipe is contributing 33 µg/L of lead.
- The lead level in Sample 2F (6 µg/L)is close to 5 µg/L. Most of the lead is coming from the faucet and/or the plumbing connecting the faucet to the lateral and very little is coming from the plumbing farther upstream from the faucet.
Possible Remedies: Replace the faucet with an NSF certified lead-free device (see Appendix 5 for information on NSF/ANSI standards). Replace the plumbing that connects the faucet to the lateral with lead-free materials. Flush the fixture and connecting plumbing each day. Install a point-of-use (POU) device that is certified for lead reduction in accordance with O. Reg. 243/07.
Example 2
- The lead level in Sample 1F (49 µg/L) exceeds that of Sample 2F (25 µg/L). The water faucet and the plumbing immediately upstream from the fixture is the source of 24 µg/L of lead, and the plumbing farther upstream of the fixture is responsible for 25 µg/L of lead.
- The lead level in Sample 2F (25 µg/L) significantly exceeds 5 µg/L. A significant amount of the lead may be coming from upstream of the faucet.
Possible remedies: Replace the faucet with an NSF certified lead-free device (see Appendix 5 for information on NSF/ANSI standards). Replace the plumbing connecting the faucet to the lateral with lead-free materials. Do additional tests upstream from the faucet to ascertain what parts of the upstream piping might be contributing lead and replace this interior plumbing with lead-free materials. Flush the fixture and interior plumbing each day. Install a POU device that removes lead.
Appendix 4: Sampling the service line and water main
Figure 7: Service line and water main
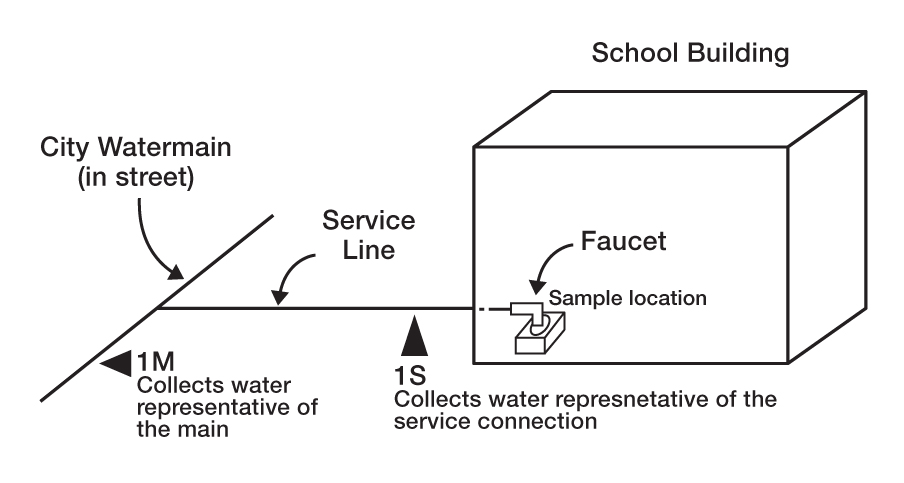
The following two samples are taken from the same sample location (see Figure 7). Sample 1S represents water from the service line. Sample 1M represents water from the water main.
You will need to compare the results of this sampling and testing to the results from fixtures inside your facility to determine what specific contributions your service line and your water main are making to lead concentrations in your facility.
Service lines are usually made of copper, galvanized steel, plastic, and/or iron. But some service lines still include lead pipes. These, or the flowmeter normally installed at the junction between the service line and the internal plumbing, can produce significant lead levels in the drinking water.
Sample 1S
Before your facility opens for the day take Sample 1S (see Figure 7) from the cold water tap closest to where your building’s internal plumbing connects to your facility’s service line. The service line is the pipe connecting your building(s) to the water main in the street or to your facility’s private well. It is normally a tap in the basement close to the building’s shut-off valve. If your facility is large enough to be connected to the water main through more than one service line, you will need to take samples from each. Let the water run to make sure you will be testing water in the service line, not water that has been in your facility’s interior plumbing overnight. Appendix 3 provides guidance on how long to run the water before taking your 250 mL sample. Collect the sample after this flushing time.
Sample 1M
Take Sample 1M from the same location as Sample 1S. Let the water run to make sure you will be testing water from the water main, not water that has been in your facility’s interior plumbing or service line overnight. Appendix 3 provides guidance on how long to run the water before taking your 250 mL sample. Collect the sample after this flushing time.
Interpreting the test results
If the lead level of Sample 1S significantly exceeds 10 µg/L and is higher than in sample 1M then the service line is contributing the lead.
If the lead level of Sample 1M (water main) significantly exceeds 10 µg/L then lead may be coming from source water, sediments in the main, or lead in the distribution system such as from lead joints used in the installation or repair of cast iron pipes.
If the lead levels of Samples 1S and 1M are very low (well below 10 µg/L) then the service line or the distribution main are not contributing the excess lead into your system.
Sample scenarios and remedies for the service line and water main
Example 1
- The lead level in Sample 1S (20 µg/L) exceeds that of Sample 1M (5 µg/L). The service line is contributing 15 µg/L of lead and the lead amount in the water main does not exceed 5 µg/L.
Possible remedy: Once you have confirmed that other fixtures in your facility are not leaching excess amounts of lead, check for lead in your service line or its gooseneck (a 180° pipe fitting at the top of a vertical pipe that prevents entry of water), and replace if you find any.
Example 2
- The lead level in Sample 1M is 10 µg/L and Sample 1S is 10 µg/L. The service line is contributing very little lead.
Possible remedy: The source of lead is most likely the water main. Contact your local public water supplier.
Example 3
- The lead level in Sample 1S (7 µg/L) and Sample 1M (6 µg/L) are close to 5 µg/L. The water is picking up very little lead from the service line, the distribution main or the source water.
Possible remedy: You can rule out the service line, the distribution main and source water as sources of the problem. You will need to continue testing other locations such as fixtures that show significantly higher lead levels, and/or the interior plumbing.
Interior upstream plumbing
If lead levels exceed 10 µg/L in follow-up samples taken from drinking water fixtures then you will need to collect additional samples upstream from one or more of the following interior pipes, depending on use patterns in your building(s):
- Laterals
- Header
- Riser pipe(s) (where applicable)
Laterals
Begin by taking follow-up Flushed Sample 1G (see Figures 2 and 3). Open the fixture you have designated as the sample location for the lateral. Let the water run for 10 seconds and collect a 250 mL sample. You do not need to take this sample from sites where samples have already been taken.
Interpreting the test results
The lead level in Sample 1G is close or equal to the initial first draw sample results from a downstream fixture. This lateral and/or interior plumbing upstream from this lateral (i.e., a header, riser pipe and/or basement header), and/or the building’s service line is contributing lead.
The lead level of Sample 1G is 5 µg/L or less. The main source of lead is downstream from this location. The portion of the lateral upstream from this sample location and the rest of the upstream plumbing (including the building’s service line) that supply water to the lateral are not likely contributing significant quantities of lead.
The lead level of Sample 1G is 10 µg/L or greater and is less than the initial results from a downstream fixture. The lead in the initial results from the downstream fixture likely came from plumbing downstream from Sample Location 1G as well as this lateral and/or interior plumbing upstream from the lateral (header, riser pipe, basement header), and/or the building’s service line.
Headers
Take Follow-up Flushed Sample 1H (see Figures 2 and 3). Open the faucet closest to the header (or riser, if there is no header on the floor) and let it run for 30 seconds, then collect a 250mL sample. If you find any debris on tap screens, send it to a licensed laboratory for analysis along with the water samples.
If the lead level in Sample 1H is much greater than 10 µg/L collect additional samples from the plumbing farther upstream that supplies water to the header, i.e., a riser (if applicable), the basement header or service line.
Interpreting the test results
The lead level in Sample 1H is close or equal to the initial first draw screening sample results from a downstream fixture. Then the header, the interior plumbing upstream from the header (the riser pipe, basement header) and/or the building’s service line are contributing the lead.
The lead level in Sample 1H is equal to or less than 5 µg/L. Then most of the lead is coming from downstream of Sample Location 1H. The portion of the header upstream from Sample Location 1H and the rest of the upstream plumbing supplying water to the header are probably not contributing lead.
The lead level in Follow-up Flushed Sample 1H is 10 µg/L or greater and is less than the initial results from a downstream fixture. Then the plumbing downstream from Sample Location 1H, this header, interior plumbing upstream from the header (riser pipe, basement header), and/or the building’s service line could be responsible for the lead concentration in the initial results from the downstream fixture.
Riser pipes
Take follow-up Flushed Sample 1J (see Figures 2 and 3). Open the tap closest to the riser pipe, let the water run for 30 seconds, then collect a 250 mL sample. If you find any debris on tap screens, send it to a licensed laboratory for analysis along with the water samples.
If the lead level in Sample 1J is greater than 10 µg/L then collect additional samples from the plumbing farther upstream that supplies water to the riser, i.e., the basement header or the service line.
Interpreting the test results
If the result for the Follow-up Sample 1J is close or equal to the initial first draw screening sample results from a downstream fixture then the riser pipe, the interior plumbing upstream from the riser pipe (basement header) and/or the service line are contributing the lead.
If the lead level in Sample 1J equals 5 µg/L or less then the main source of lead is downstream from the Sample Location 1J. The portion of the riser upstream from Sample 1J and the rest of the upstream plumbing supplying water to the riser are probably not contributing lead.
If the lead level in Sample 1J is 10 µg/L or greater, and is less than the initial results from a downstream fixture then the plumbing downstream, this riser pipe, interior plumbing upstream, and/or the service line could be responsible.
Sample scenarios and remedies for interior upstream plumbing
Where further sample collection is recommended, use Appendix 3 to determine how long you will need to flush.
Example 1
- The lead level in Sample 1G (22 µg/L) exceeds 20 µg/L. You will need to collect additional samples from the plumbing upstream to further pinpoint the source of lead (i.e., from the service line, the riser pipe, or the header supplying water to the lateral).
- The lead level in Sample 1G (22 µg/L) significantly exceeds 5 µg/L and is less than a downstream site or sites (35 µg/L). Somewhere downstream from the sample site is contributing a portion of the lead (13 µg/L) and the rest (22 µg/L) comes from the lateral and/or other upstream locations.
- The lead level in Sample 1G (22 µg/L) is not similar to downstream site (35 µg/L), but both exceed 20 µg/L. The lead is coming from the lateral or from interior plumbing upstream from the lateral. Its possible sources could be the header, riser pipe, or service line. Further sampling is necessary.
Possible remedy: Once you have conducted testing as recommended above to pinpoint the exact sources of lead, replace plumbing with lead-free materials and retest to ensure that this remedy is effective.
Example 2
- The lead level in Sample 1H or 1J (23 µg/L) exceeds 20 µg/L. Collect additional samples from the plumbing upstream supplying water to the header, and compare the results with those taken from the service line or riser pipe that supplies water to the header.
- The lead level in Sample 1H or 1J (23 µg/L) significantly exceeds 5 µg/L, and Sample 1H or 1J is insignificantly less than the downstream site (25 µg/L). The lead is coming from the header or the plumbing upstream of the header, and only an insignificantly small portion of the lead (2 µg/L) is coming from downstream of the sample site.
Possible remedy: Once you have conducted testing as recommended above to pinpoint the exact sources of lead, replace the affected plumbing with lead-free materials.
Example 3
- The lead level in the downstream site is 25 µg/L, that of Sample 1S is 4 µg/L, and that of Sample 1J (6 µg/L) is less than 20 µg/L. There’s no need to collect additional samples from upstream because 19 µg/L of lead has come from the downstream site.
- The lead level in Sample 1J (6 µg/L) is close to 5 µg/L. The source of lead is downstream of the sample site, and the portion of the riser pipe and plumbing upstream from Sample Site 1J and the service line are not contributing significant amounts of lead to the water.
Possible remedies: After you collect and test samples from the interior plumbing downstream from the riser pipe and the affected fixture to pinpoint the source of lead, replace the affected plumbing with lead-free materials.
Appendix 5: NSF/ANSI Standards
What is NSF/ANSI?
NSF International is an independent, third-party testing organization that developed voluntary industry standards in cooperation with Canada, the United States, and the plumbing industry to minimize the amounts of lead leached from products. It cooperates with the American National Standards Institute (ANSI) on standards.
Filters
A filter or other device that treats water is considered certified for lead reduction if it is NSF/ANSI standard 53, 58 or 62 and if lead is listed on the device or packaging as a contaminant that will be reduced. These standards are mentioned within O. Reg. 243/07.
Fixture replacement
If you need to replace fixtures, it is strongly recommended that they meet NSF/ANSI standard 61.
NSF/ANSI Standard 61, Section 4 covers pipes, fittings and small drinking water storage devices with domestic or residential applications, including the products or water contact materials of pipes, fittings, tubing, hoses, well casings, drop pipes and screens.
NSF/ANSI Standard 61, Section 8 covers inline mechanical devices used to measure or control the flow of water in a building. They are generally installed on service lines or building distribution systems downstream of the water main and before endpoint devices, such as water meters, building valves, check valves, meter stops, valves and fittings and backflow preventers.
NSF/ANSI Standard 61, Section 9 covers endpoint devices such as kitchen and bar faucets, lavatory faucets, water dispensers, drinking fountains, water coolers, glass fillers, residential refrigerator ice makers, supply stops, and endpoint control valves.
Further information and product listings are on the NSF website or ANSI website.
We would like to acknowledge and thank the United States Environmental Protection Agency for use of illustrations from their booklet 3Ts for Reducing Lead in Drinking Water in Schools.