

User guide: Navigate Collective Bargaining Ontario reports and search tools
Learn how to navigate, search and explore information in Collective Bargaining Ontario interactive reports and search tools.
Purpose
This guide provides practical guidance for using Collective Bargaining Ontario interactive reports and search tools. It explains how to use common features such as filters, charts, and maps to find and explore information more efficiently.
Mobile view
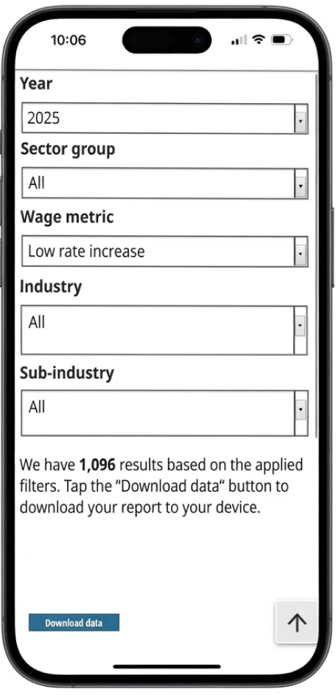
Interactive reports and search tools adjust to fit mobile screens, although their layout may differ from the desktop version. Report filters, charts and maps remain available. The Provision library provides the same search, filter, results and navigation functions on mobile devices.
To support accessible use on smaller screens, interactive-report tables are not displayed in the mobile view. Instead, the mobile view provides the number of matching results and a Download data button.
To use interactive-report table features such as column filters, column resizing, column selection and column reordering, access the report on a desktop or laptop computer.
Interactive reports
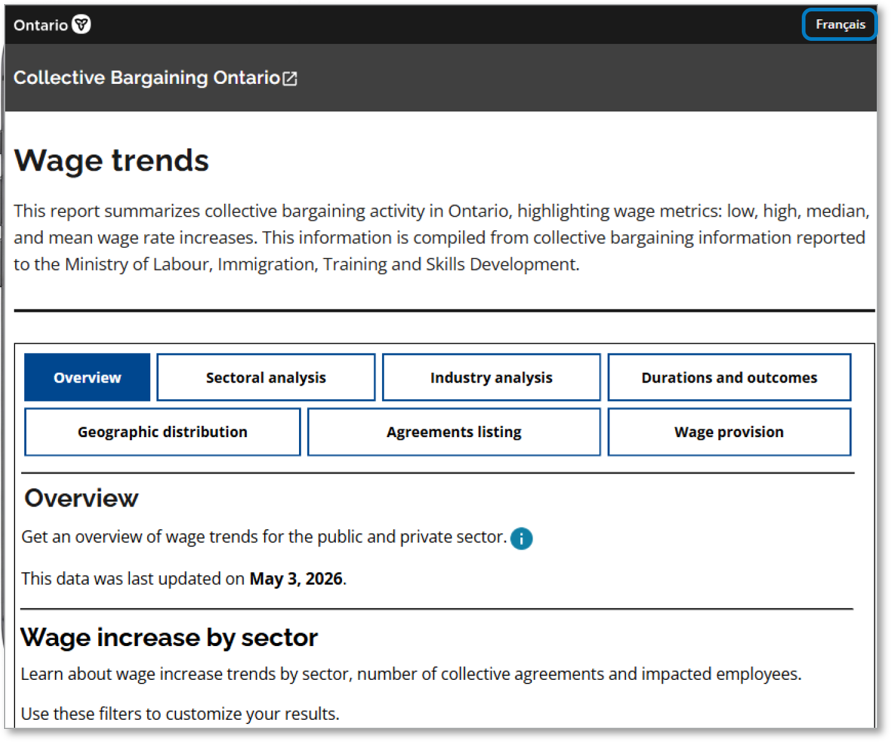
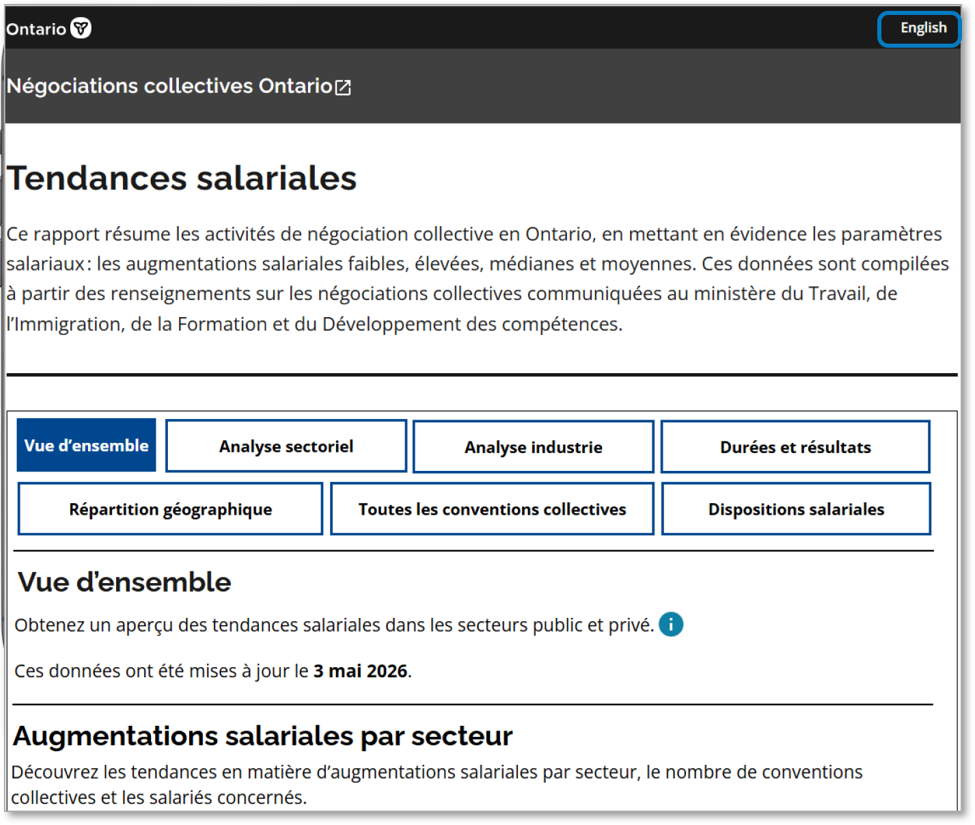
Reports available in English and French
Select the language toggle in the upper-right corner of the page to switch between English and French. Selecting Français reloads the same report in French with the same structure and content.
Navigate reports
Tabs
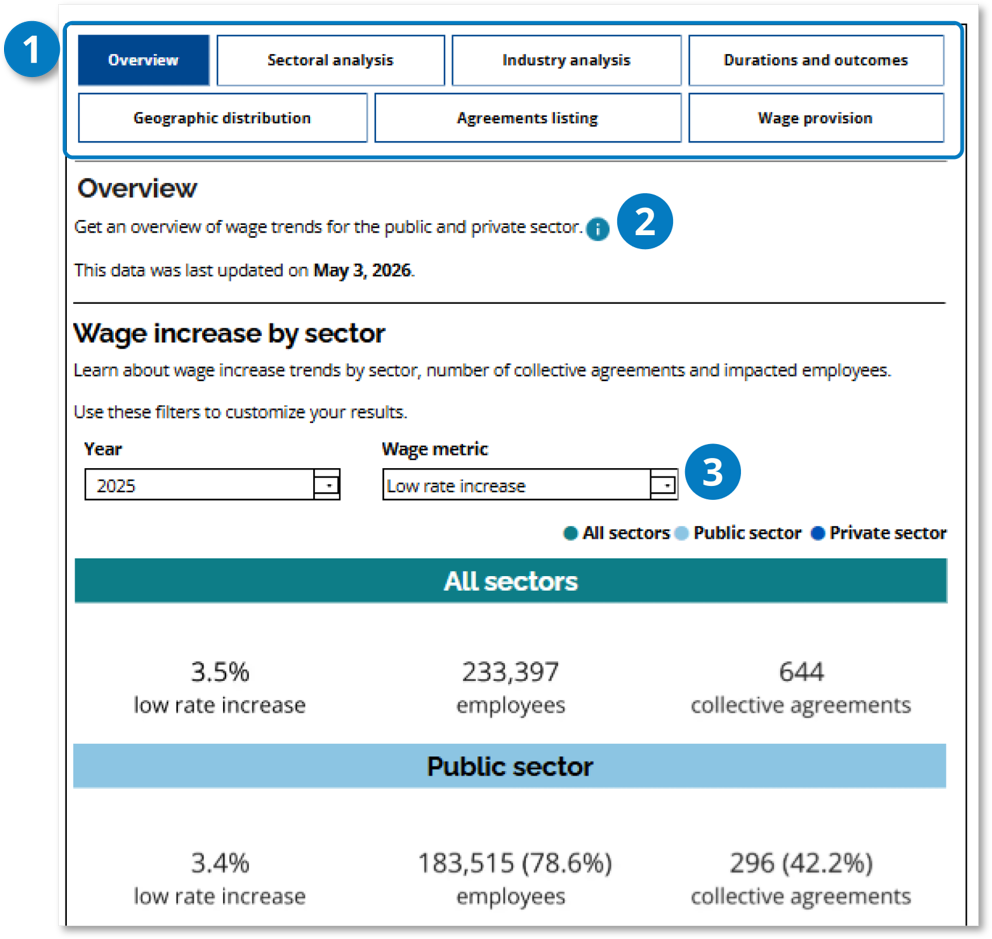
- Use the tabs near the top of the page to switch between report views.
- Each tab presents the report data from a different perspective.
- Tabs remain visible so you can move between views without losing context.
Information icon
Select the information icon to display information about the report, report sections and filter definitions. Select X to close the information panel.
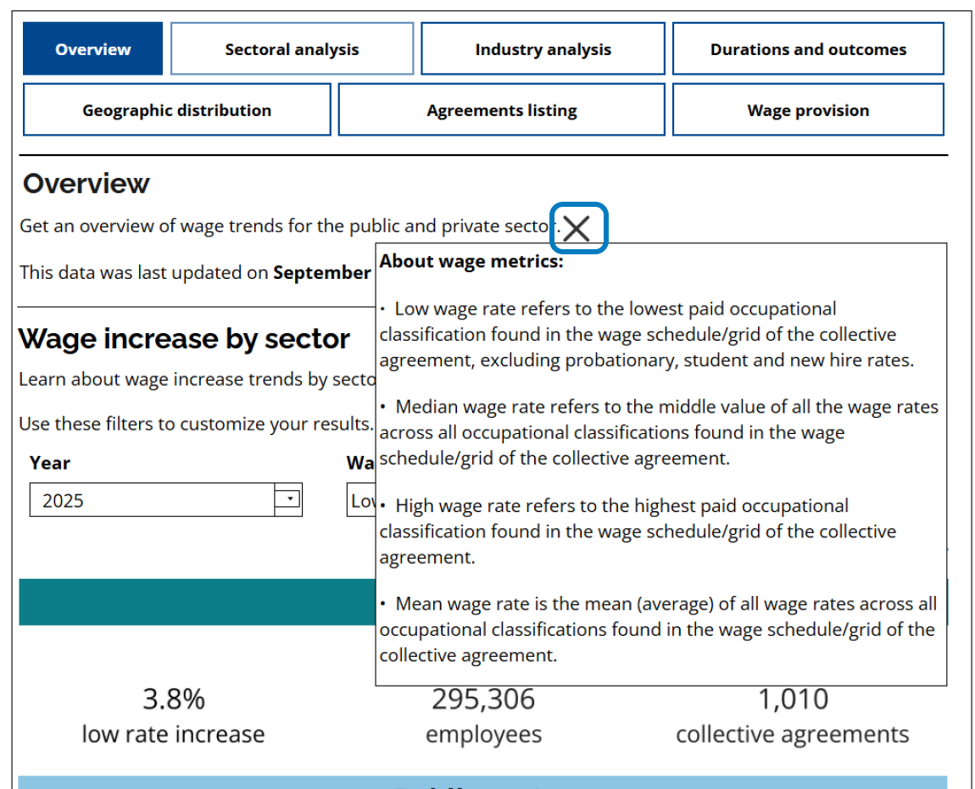
Figure 5. Information panel expanded after selecting the information icon. Filters
- Summary figures and charts update automatically based on your filter selections.
- Filters apply automatically and work together.
Searchable dropdown
- By default, “All” is selected in searchable dropdown menus.
- To select specific options, select All to clear the default selection, then search for or select the options you need.
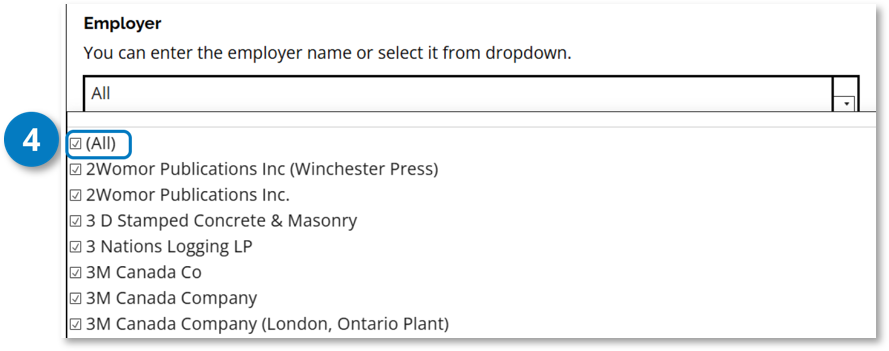
Figure 6. Employer dropdown with All selected. Search and select
- Enter all or part of a name in the search field.
- Select one or more options from the list.
- Select the X beside the search field to clear the search.
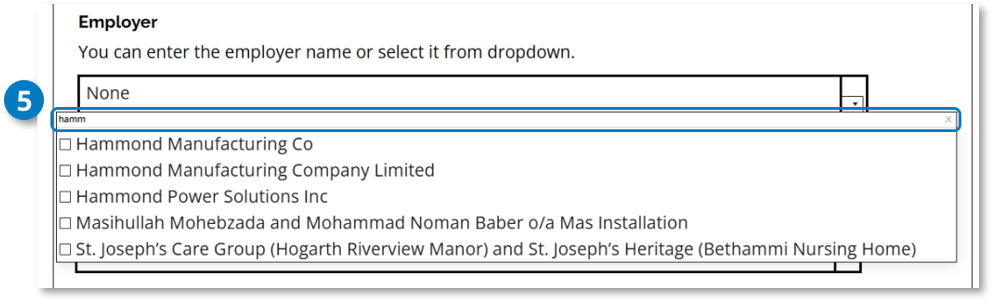
Figure 7. Search field in the employer dropdown
Use the data dictionary
Access the data dictionary
At the bottom of each report, you’ll find a link to the data dictionary, which provides definitions and report methodology.
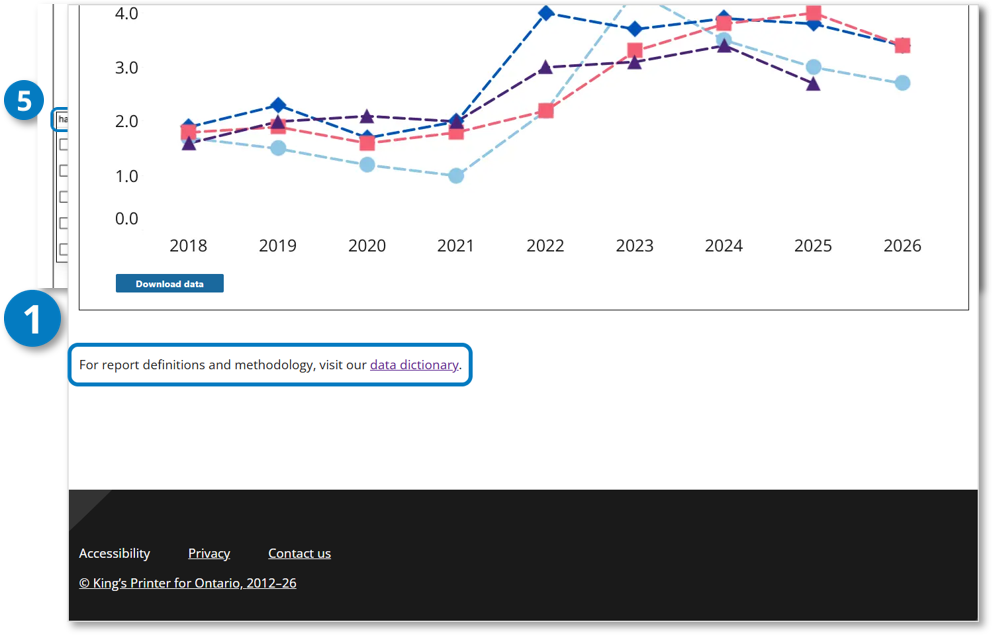
Figure 8. Data dictionary link at the bottom of a report.
Explore report data
Expand report results
- Select the arrow beside an industry name to expand the detailed view.
- When an industry is expanded, its annual wage increases appear beneath the industry name.
- Select the arrow again to collapse the detailed view.
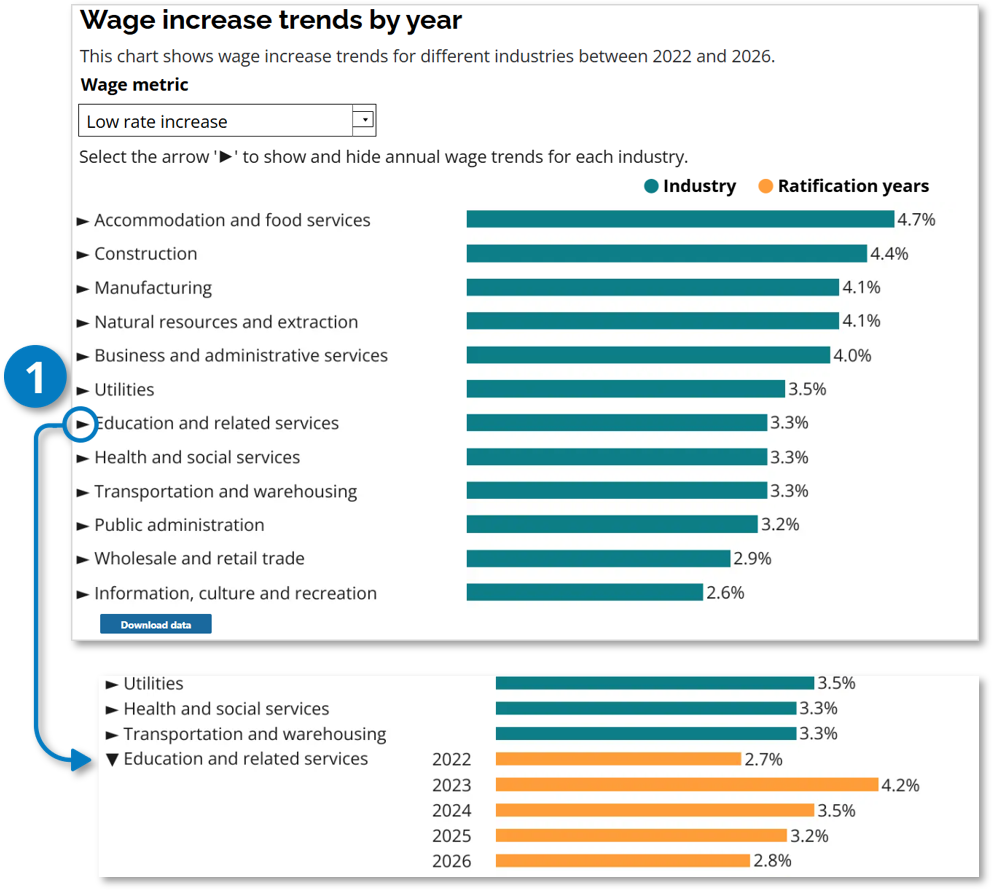
Figure 9. Industry results expanded by year. Tooltip on hover
Hover over or select a data point to display additional details.
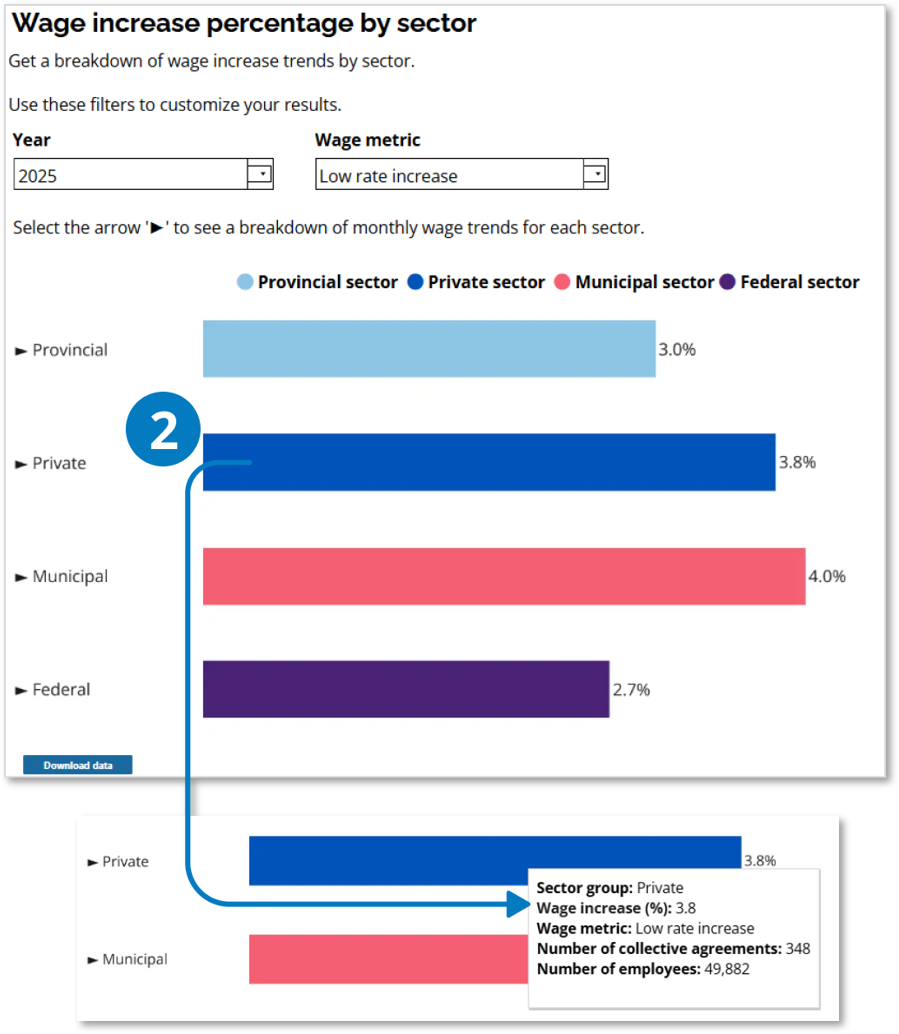
Figure 10. Expanded sector view showing a tooltip on hover.
Explore charts and report details
Tooltip on hover
Hover over or select a circle, bar or line point to display additional details.
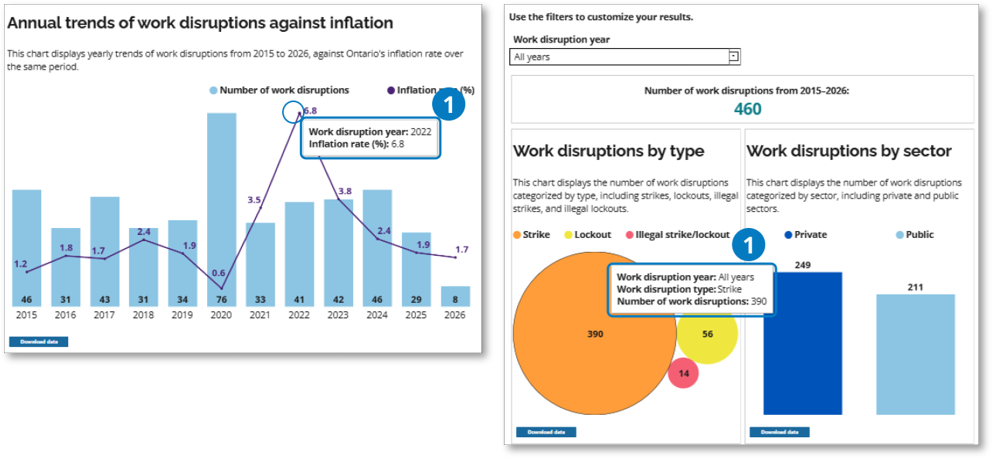
Figure 11. Tooltip displayed for a chart data point.
Navigate tables
Move between pages
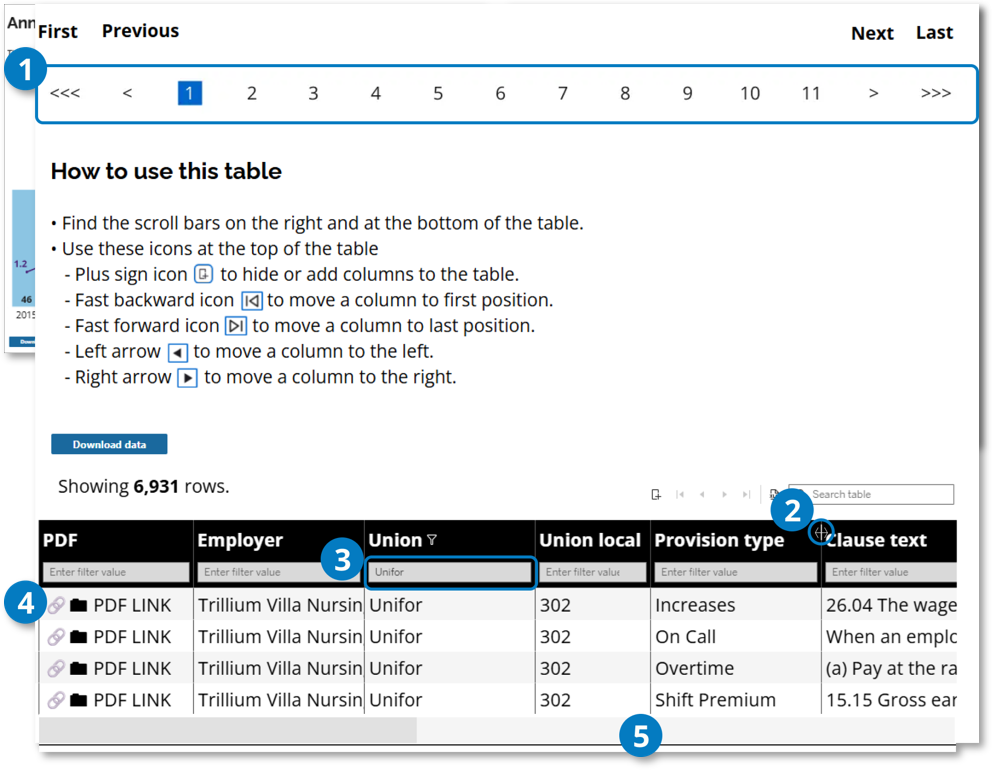
Use page controls to move through more results.
Adjust column width
- Hover over the edge of a column header until the resize cursor appears. Drag left or right to adjust the column width.
- Select a table cell when you have finished resizing the column.
Narrow results in a table
- Use column filters to quickly narrow results to specific employers, unions, or provision types.
- To clear a column filter, delete the text from the filter field. The table will again include all values for that column.
- Combine column filters for more targeted results.
Open an agreement
Select the PDF link to open the agreement in a new tab and go directly to the related section.
Scroll to display additional columns
- Hover over the bottom of the table to display the scroll bar.
- Drag the scroll bar left or right to display additional columns.
Customize the table view
Use the column-selection control to show or hide columns. Columns with a checkmark are visible, and columns without a checkmark are hidden. All columns are visible by default.
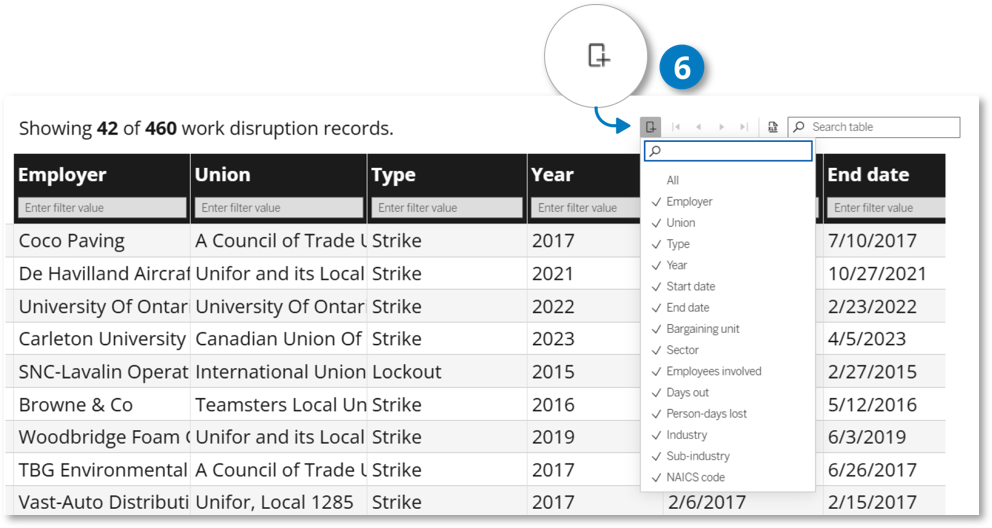
Figure 13. Column-selection menu for showing or hiding table columns. Reorder columns
- Select the column you want to move. The selected column is indicated in the customization panel and is also highlighted in blue.
- Use the single-arrow controls to move the column one position to the left or right.
- Use the double-arrow controls to move the column to the beginning or end of the table.
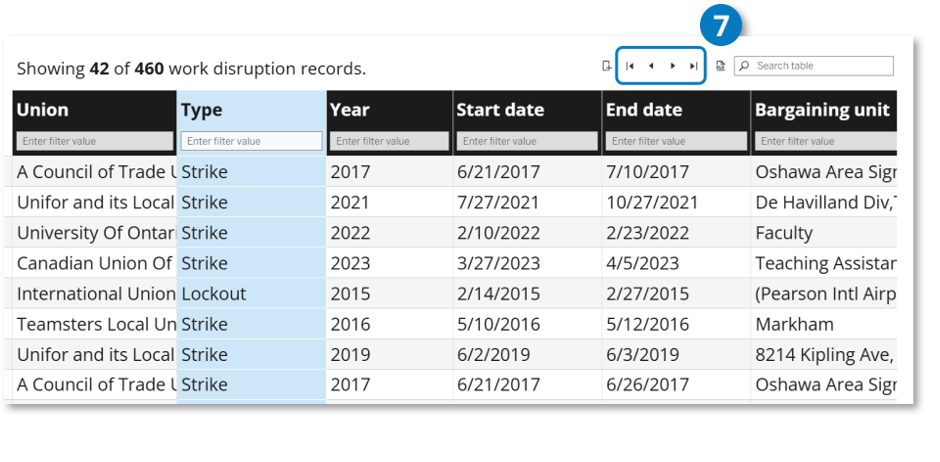
Figure 14. Controls for reordering table columns.
Export data
Export graph and chart data
Each report section includes a Download data button. Select it to export the numerical values represented in the visualization to an Excel file.
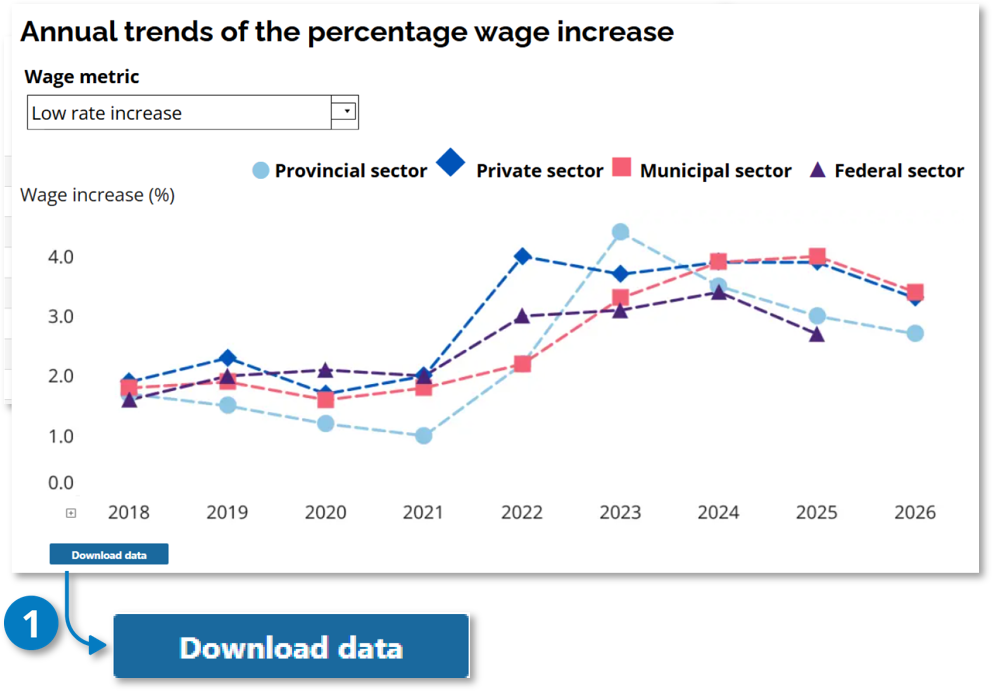
Figure 15. Download data button for exporting chart values. Export table data
For sections with tables, select Download data to export the results to Excel. You can:
- Sort and filter data.
- Explore data in more detail.
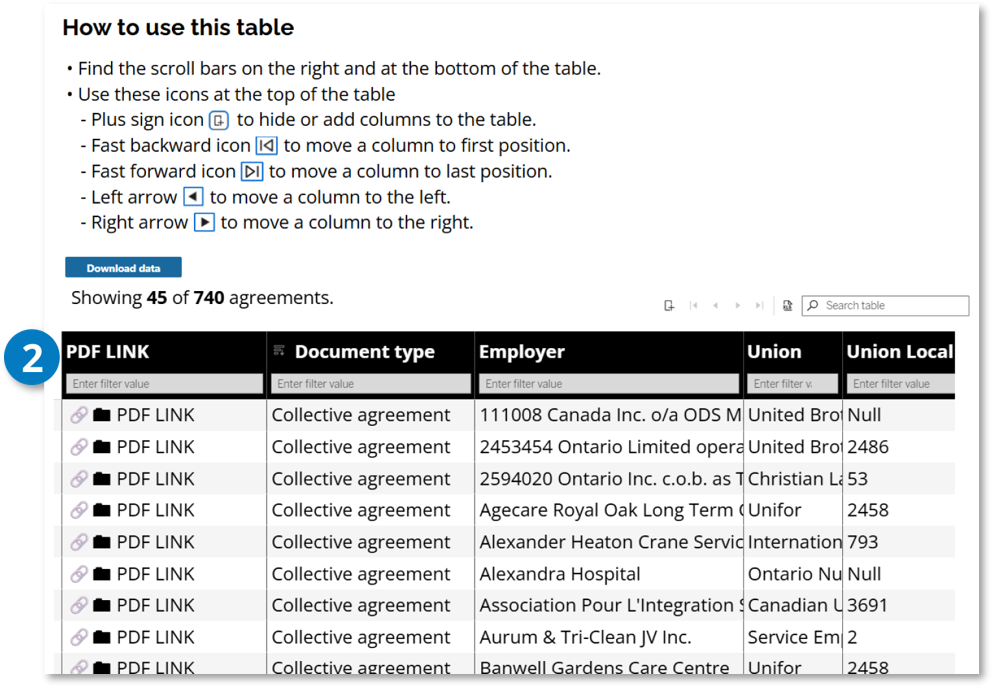
Figure 16. Download data button for exporting table results to Excel.
Navigate maps
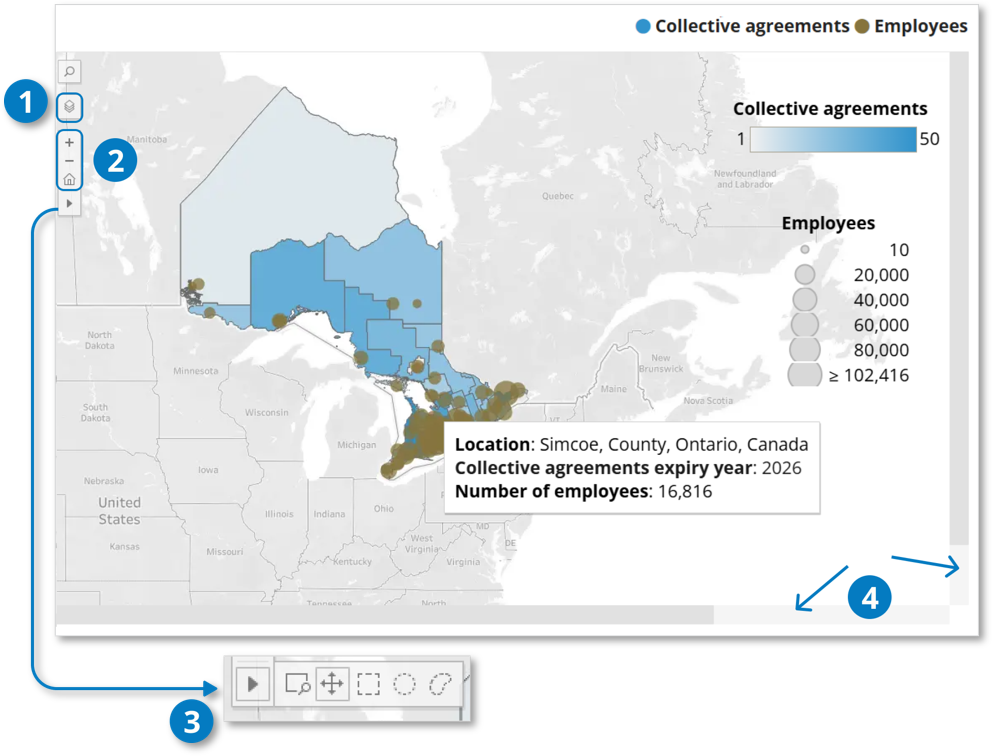
Display or hide map details
Select the Layers control to display or hide map details, such as shaded regions.
Map controls
- Select the + or – controls to zoom in or out.
- Select Home to return to the default map view.
More map tools
Use the additional map tools to zoom in on specific areas, select one or more regions and examine locations more closely.
Move across maps
- If a horizontal scroll bar is available, drag the scroll bar left or right to move across the map.
- Drag the map left or right to display areas outside the current view.
Search tools
Collective agreement e-Library portal
Search for a keyword or phrase within collective agreements and interest arbitration awards using the collective agreement e-Library portal.
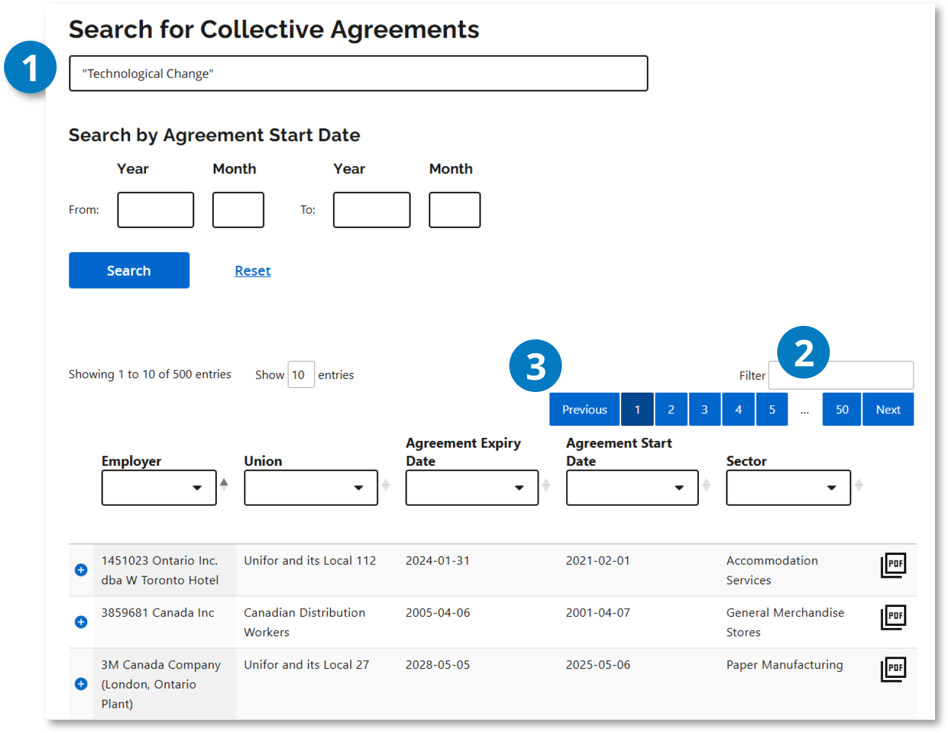
Start a search
- Enter a keyword or phrase in quotation marks, for example, “Technological Change.”
- Enter one keyword or phrase at a time. Boolean operators such as AND and OR and commas are not supported.
- Select Search to display the results.
Filter results
Use the filter field to narrow the displayed results.
Navigate pages
Use pagination controls (Previous, Next, or page numbers) to move through results.
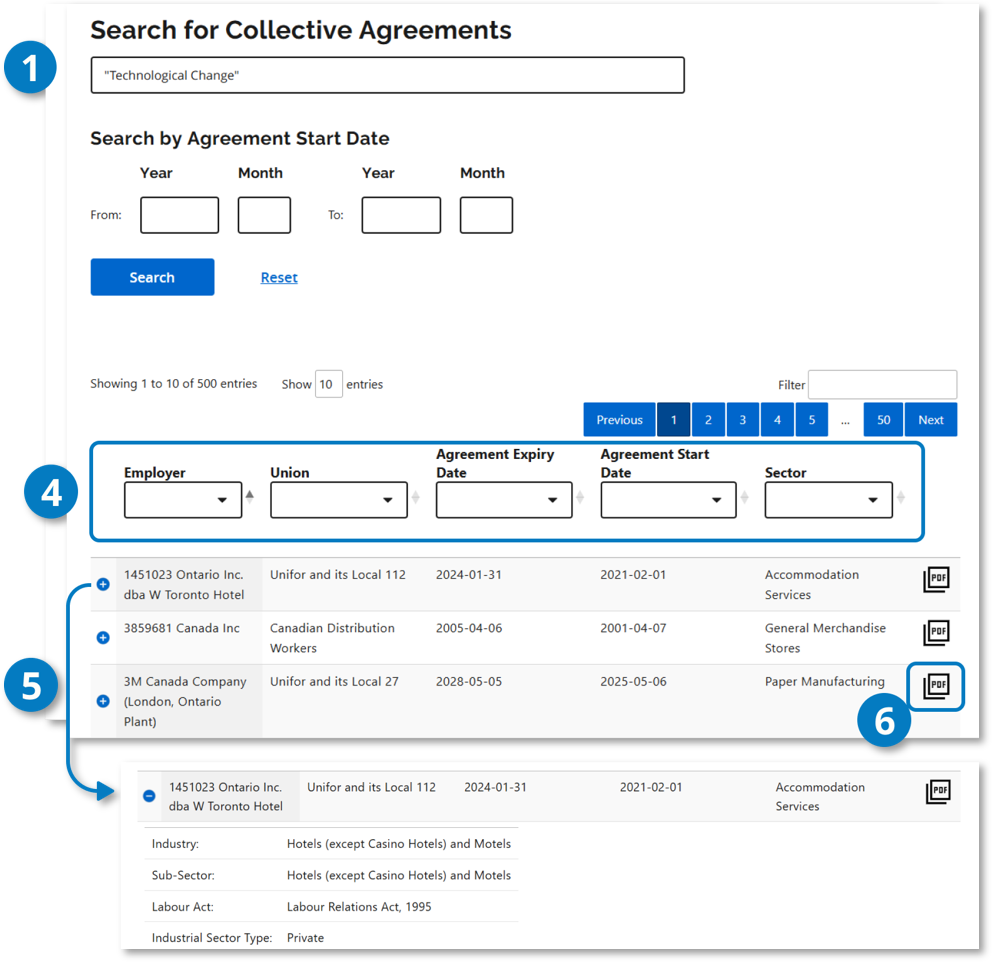
Figure 19. Controls for filtering results, viewing agreement details and opening a collective agreement. Narrow results
Refine your results using filter dropdowns to quickly find specific agreements within your search results.
View details
Select the + control to display additional details about the agreement.
View a collective agreement
Select the PDF control to open and review the full agreement.
Agreement listing spreadsheet
Use the agreement listing spreadsheet when you need to locate the exact filename of a collective agreement or interest arbitration award. The spreadsheet is available through a link at the bottom of the e-Library portal page.
Narrow search
- Use column filters, such as Employer, Union and Date, to find relevant agreements.
- Use the exact column names shown in the spreadsheet.
- In a filter dropdown, enter part of the employer or union name.
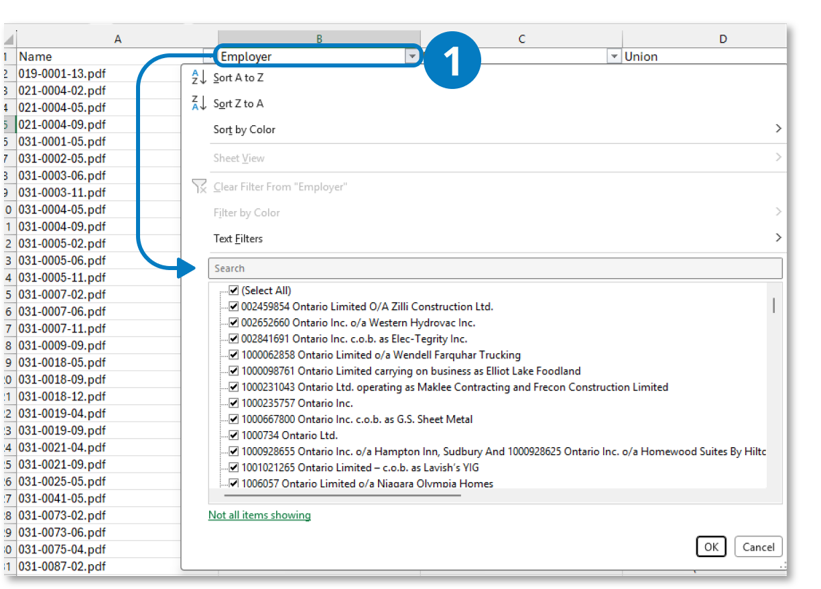
Figure 20. Employer column filter in the agreement listing spreadsheet. Find the document name
After filtering the spreadsheet, locate and copy the agreement filename in column A, for example, 019-0001-13.pdf.
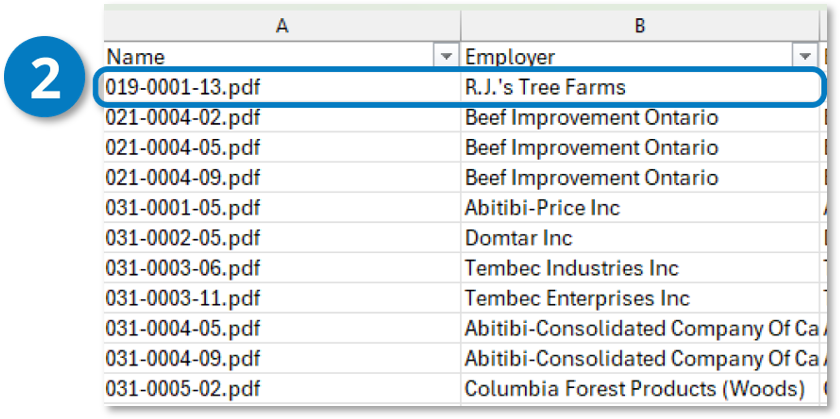
Figure 21. Agreement filename in the filtered spreadsheet. Search in the e-Library
Paste the filename into the search field in the e-Library portal, then select Search.
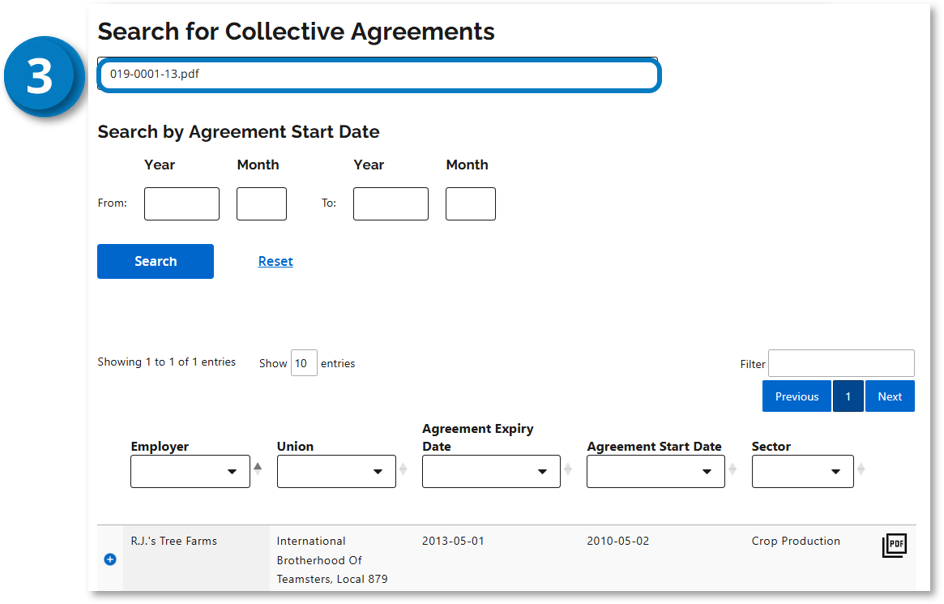
Figure 22. Agreement filename entered in the e-Library search field.
Collective agreements interactive search tool
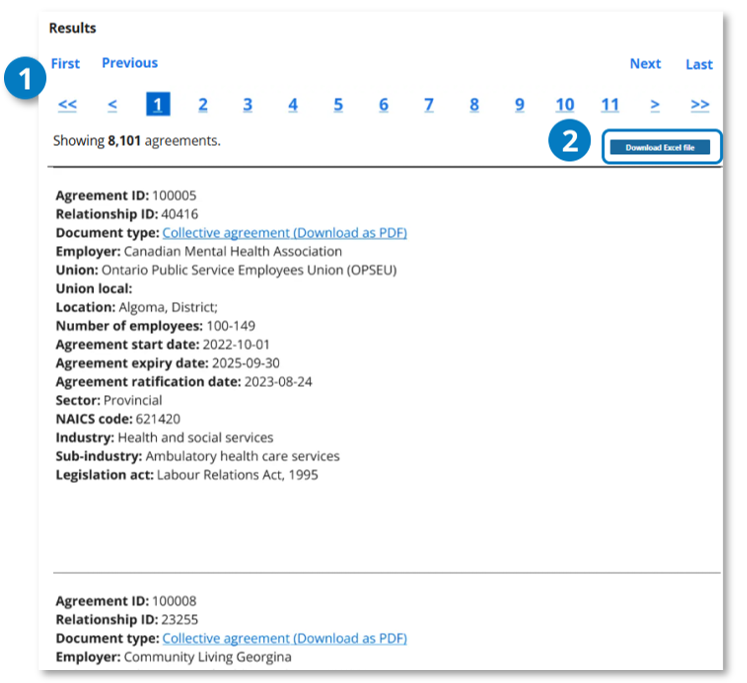
Use the collective agreements interactive search tool to find collective agreements and interest arbitration awards with an effective date of 2011 or later. Agreements are loaded by default, and filters are applied automatically.
Navigate pages
Use First, Previous, Next, Last or a page number to move through the results.
Export results
Download the full list of agreements as an Excel file, including links to agreement documents. You can review, sort and filter the exported results in Excel.
Provision library
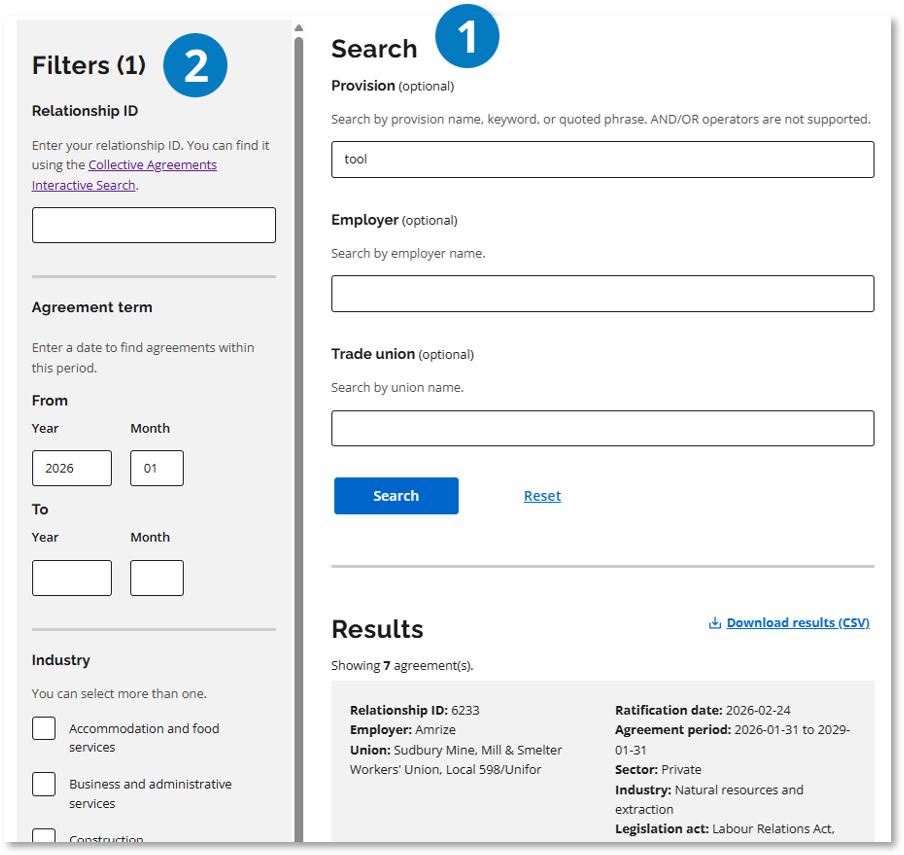
Use the provision library to search for and compare provisions from collective agreements. Results are grouped by agreement and include links to individual provisions and full collective agreements.
Start a search
Use one or more optional fields to define your search. Enter a full or partial search term. As you type, suggestions may appear. You can select a suggestion or continue typing without selecting one.
- Provision: Enter all or part of a provision name, keyword or phrase, with or without quotation marks. Boolean operators such as AND and OR are not currently supported.
- Employer: Enter all or part of an employer name.
- Trade union: Enter all or part of a trade union name.
Select Search to display the results. Select Reset to clear all search fields and return to the default search view.
Filter agreements
Use the optional filters to narrow the collective agreements included in the results. You can use filters on their own or combine them with the Provision, Employer and Trade union search fields.
The number beside Filters shows how many filters are currently applied.
- Relationship ID
Enter a relationship ID to retrieve collective agreements associated with a specific bargaining relationship and find provisions within those agreements. You can find the relationship ID using the collective agreements interactive search tool.
- Agreement term
Enter a date range to find agreements in effect during the defined range.
- Under From, enter an effective date using the year and month.
- Under To, enter an expiry date using the year and month.
- You can enter either date or both dates to define a range.
- Industry
Select one or more industries to narrow the results. Select Show more to display additional industry options.
- Sector
Select one or more sectors.
- Apply or reset filters
- Select Apply filters to update the results.
- Select Reset filters to clear all filters.
Important: If you see fewer results than expected or no results, select Reset filters to clear all filters and search again.
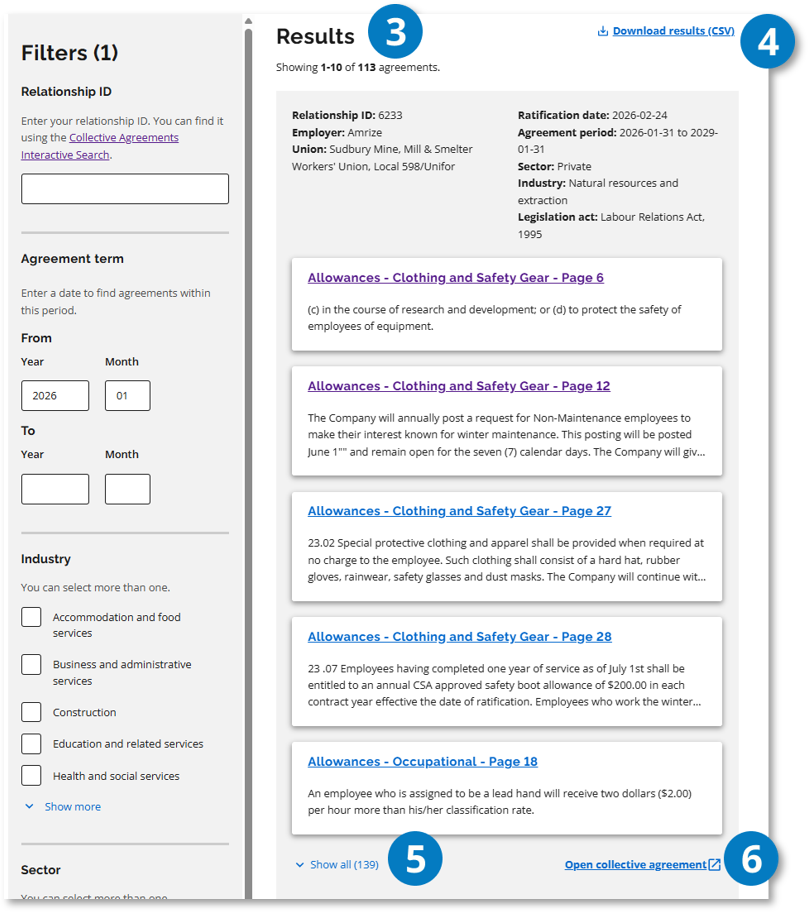
Figure 25. Provision results and agreement controls. Review search results
The results page shows the number of agreements that match your search. Results are grouped by collective agreement.
Within each agreement group, individual cards show matching provision instances. Each card includes:
- Provision name
- Page number where the provision appears
- Excerpt of the matching text
Select the provision name to open the provision in the collective agreement.
Download results
Select Download results (CSV) to export the search results. The downloaded file includes additional fields and columns that provide more context about each agreement and provision.
Display additional provision instances
Up to five matching provision instances are displayed initially. Select Show all to display the remaining matching instances for that agreement. The number in parentheses indicates how many additional instances are available. Select Show less to collapse the list.
Open the full collective agreement
Select Open collective agreement to open and review the complete agreement.
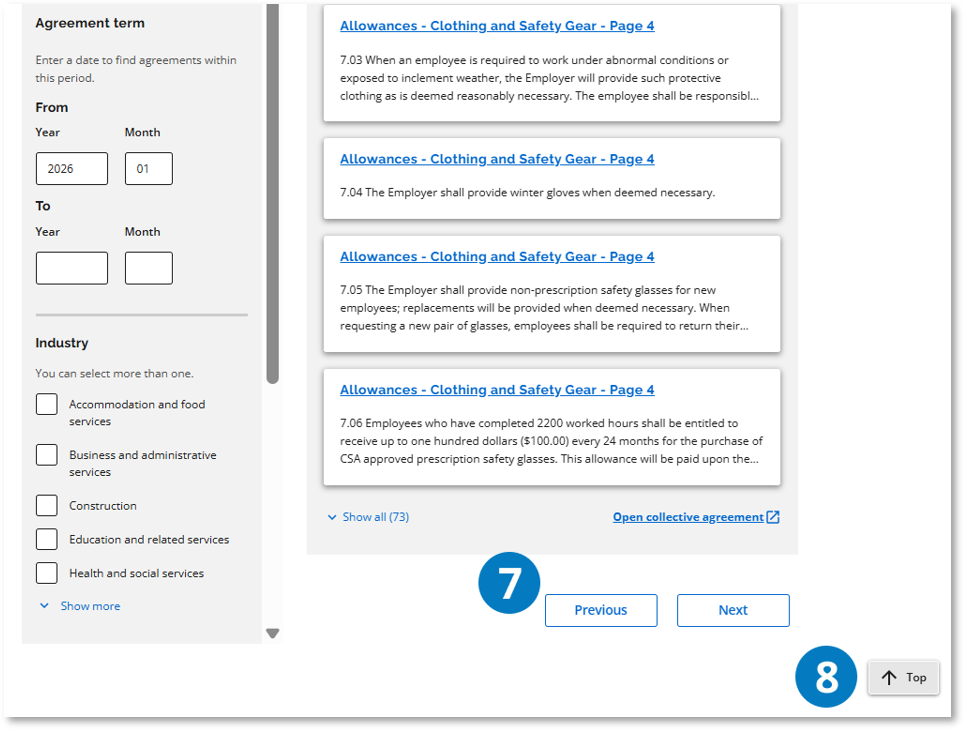
Figure 26. Controls for navigating provision results and returning to the top of the page. Navigate results
Select Previous or Next to move between groups of search results.
Return to the top of the page
Select Top to return to the beginning of the page.
Links and resources
Report links
- Collective agreements due to expire
- Wage trends
- Industry snapshot
- List of current bargaining relationships
- Work disruptions in Ontario
Search tool links
- Collective agreements interactive search
- Collective agreement e-Library portal
- Provision library search
Resources
- Industries and sub-industries are defined by the North American Industry Classification System (NAICS).
- Data dictionary and report methodology