Dairy housing - layout options
Learn about free-stall layouts for dairy barns. This technical information is for Ontario dairy farmers.
ISSN 1198-712X, Published May 2015
Introduction
The housing layout or floor plan of a dairy barn is the most important document in the design process. This is where all the free-stall barn components come together to develop a plan that is functional, flexible, expandable and cost-effective.
Component design
Decide on the individual components first, then determine how they will fit together best to form the complete plan.
- Stalls
- Free-stall widths for Holstein cows should be 122 cm (48 in.), 132 cm (52 in.) and 137 cm (54 in.) for first lactation, milking and dry cows, respectively.
- Single stall
- The platform length for a single row of free stalls in a tail-to-tail arrangement should be 3 m (10 ft) long to the outside wall to allow for lunge room but can be 2.7 m (9 ft) long on the row next to the feed alley, as they can lunge into the alley space.
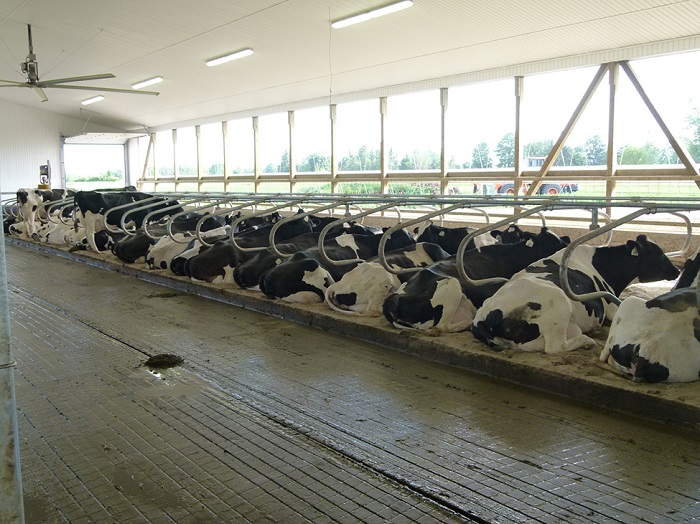
- Double stalls
- The platform length of a double row of free stalls in a head-to-head arrangement should be 5.5 m (18 ft) (Figure 1) to allow the cow to lunge forward without interfering with the cow in the stall directly across. If the platform length is less than 5.5 m (18 ft), cows may be reluctant to lay in stalls directly across from each other.
- Cow traffic alleys
- Cow traffic alleys are the cow walkways between the rows of free stalls in tail-to-tail barns, and between the outside row of stalls and the wall in head-to-head barns. The alley width will depend on the type of equipment used to clean the alleys and bed the stalls. The minimum alley width should be 2.4 m (8 ft), but if a skid steer is used to bed the stalls and has to turn 90° to the stall, then the alley width should be 3 m (10 ft).
- Cow-feed alleys
The cow-feed alley is the alley between the row of free stalls and the feed manger. In a tail-to-tail barn where the cows lunge into the feed alley, 3.6 m (12 ft) is an acceptable width. In a head-to-head arrangement, where cows must exit the free stall into the feed alley, an alley width of 3.6 m (12 ft) is acceptable, but 4.3 m (14 ft) is better to allow for the extra cow movement.
When it is not possible to provide the desirable alley widths, extra crossovers may be added to reduce the cow traffic congestion.
- Feed alley
The drive-through feed alley must be wide enough to accommodate the drive-through feed equipment. It should be at least 6 m (20 ft) wide to prevent equipment from driving on feed and should be 6.7 m (22 ft) if the TMR mixer is parked in the drive-through. Be sure to make drive-through doors at least as wide as the drive-through to avoid damage. Protect the doors on the outside with bollards (vertical pipe filled with concrete).
When belt-feeders or rail feeders are used to automatically deliver feed to the cows, the feed alley width can be reduced to 2.4-3 m (8-10 ft). Robotic feeding may become more popular in the future with the introduction of robotic automatic feed mixing and delivery systems. They too can operate in an alley width of 2.4-3 m (8-10 ft).
- Group size
- Consider the number of groups and the size of the pens when deciding on the layout. It may not be practical to divide a small herd into many groups. The group size should match multiples of the parlour size, if possible, so that the parlour is full or almost full when the last cow in the group is milked.
- Crossovers
Crossovers allow cows to travel from one alley to another. Space them so they allow cows freedom to access feed and lying areas without receiving too much interference from other cows. They must be wide enough that cows don't block the crossover, especially when there is a waterer located in the crossover.
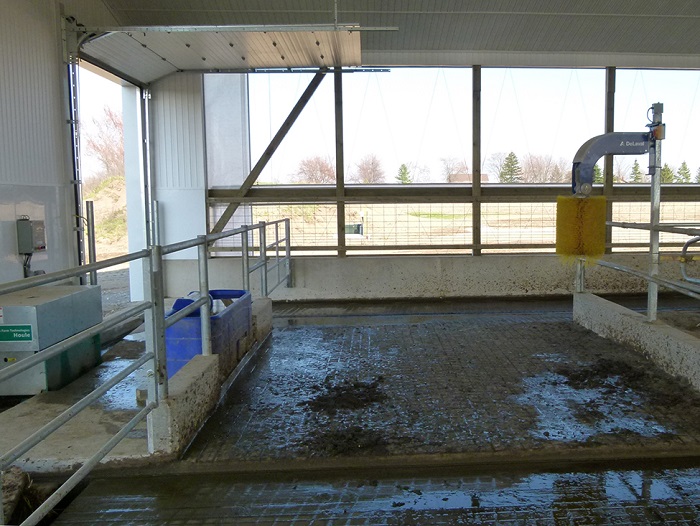
There should be at least two waterer locations (Figure 2) and two crossovers per pen. That way, a "boss" cow cannot monopolize a waterer or block a crossover. Provide additional crossovers for group sizes larger than 60-80 stalls. Locate crossovers every 30-40 stalls. Cows should not have to walk farther than 15-20 stall widths to a crossover.
If the crossover is located at the end of a pen, place the waterer on the side farthest from the stalls. Cows like to take the shortest distance around a corner, and having the waterer on the outside results in less interference with cow movement.
The crossover should be at least 3.6 m (12 ft) wide to allow one cow to drink and one to cross behind, or 4.9 m (16 ft) for one cow to drink and two-way traffic behind. If a waterer is shared between two pens, the total alley width should be 6 m (20 ft).
Layout options
Decide on the components in the layout, then assemble them to form the overall layout. Options include:
- 4-row head-to-tow
- 4-row tail-to-tail
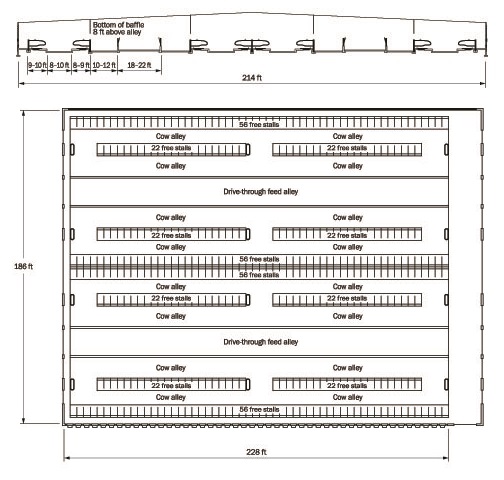
- 6-row
- 6-row with perimeter feeding
- 3-row
- wide-body head-to-head (Figure 3)
- wide-body tail-to-tail
Each component has its own set of advantages and disadvantages, as outlined in Table 1.
| Layout | Advantages | Disadvantages |
|---|---|---|
| 4- row head-to-head (Figure 4) |
|
|
| 4-row tail-to-tail (Figure 5) |
|
|
| 6-row (Figure 6) |
|
|
| 6-row with perimeter feeding (Figure 7) |
|
|
| 3-row (Figure 8) |
|
|
| Wide body, head-to-head (Figure 9) |
|
|
| Wide body, tail-to-tail (Figure 10) |
|
|
Drawings are for illustrative purposes and are not intended for use as building plans.
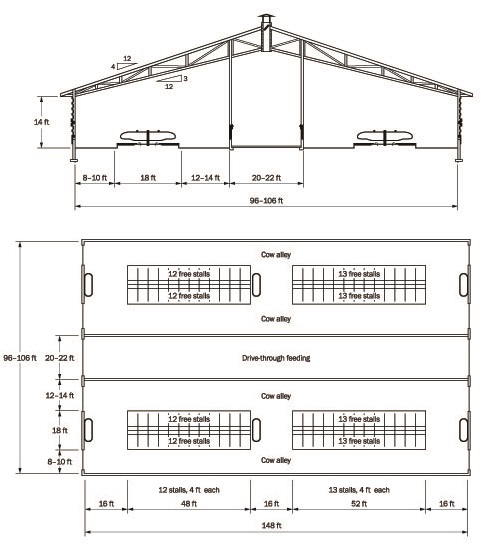
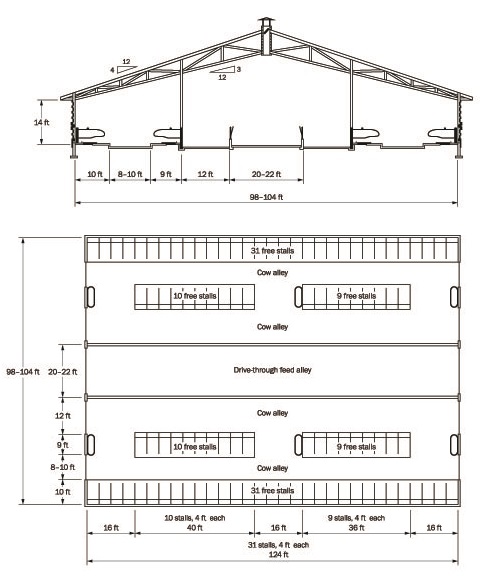
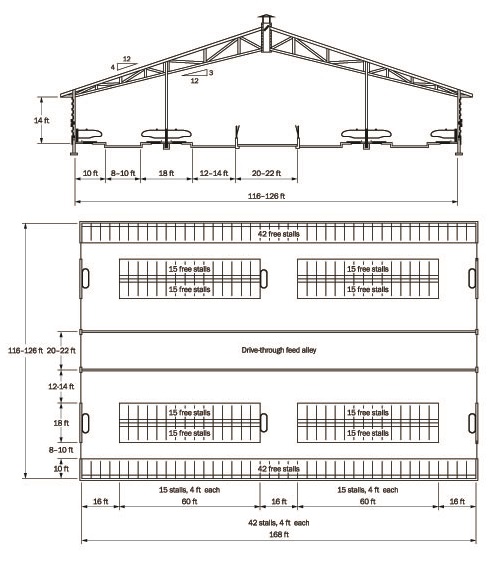
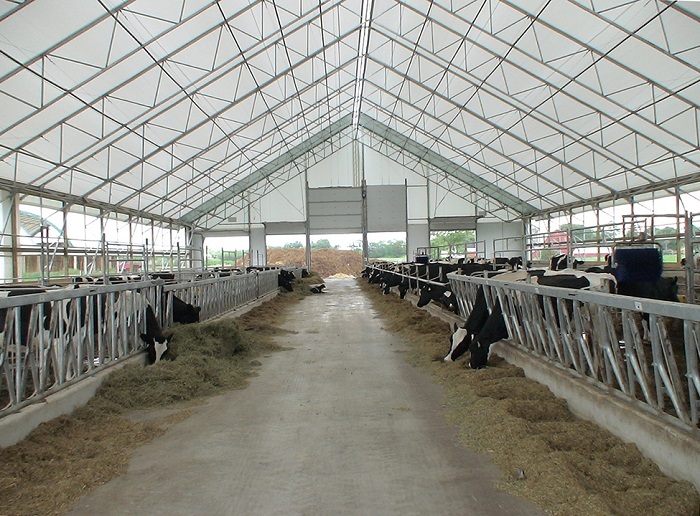
4-row head-to-head
The 4-row head-to-head arrangement consists of two rows of stalls facing each other, on either side of a drive-through feed alley.
4-row tail-to-tail
The 4-row tail-to-tail arrangement consists of a row of stalls along the outside wall with another row facing the feed manger. It is important with this layout to have a wide overhang to minimize rain and sun falling on the outside row of stalls.
6-Row
The 6-row layout combines the head-to-head and tail-to-tail layouts.
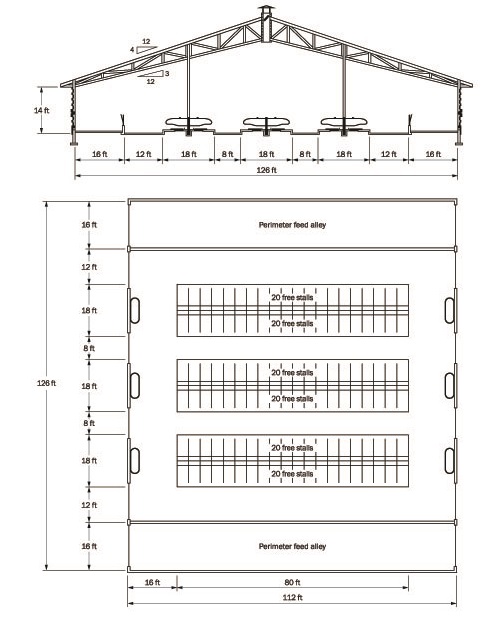
6-row with perimeter feeding
This 6-row layout has perimeter feeding, which is a common layout for robotic milking barns.
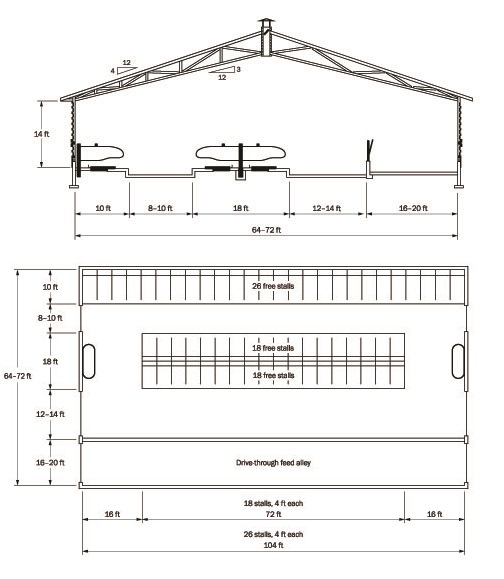
3 row
The 3-row layout is like half of a 6-row barn. It is a useful layout for a smaller herd.
Wide-body
The low-profile cross-ventilated (LPCV) or wide-body dairy barn is a new design of dairy barn that has become popular in the Midwest region of the U.S. The LPCV dairy barn is designed on the concept that an 8-row wide dairy barn takes up less space and can be better ventilated than two 4-row, naturally ventilated dairy barns located side by side.


Construction options
There are a number of construction options for dairy barns, including wood, steel or fabric. Cost or appearance may be the main reasons to choose one option over another.
- Wood frame
Wood frame buildings are by far the most popular option for dairy barn construction. Most agricultural contractors are more familiar with working with wood than other options. Designs can vary from laminated wood beams that provide a very open appearance to wood trusses that can be covered to provide an insulated attic. The roof structure can be supported by wooden post or steel post - whichever is more economical. Occasionally, stud frame wall construction is used.
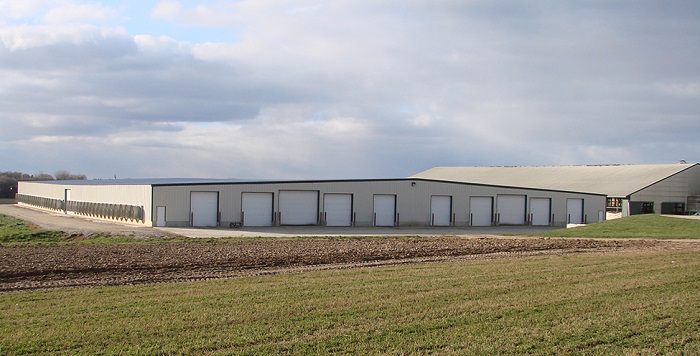
A variation on the wood frame building is a prefabricated option (Figure 11). The laminated roof beams and purlins are constructed off-site and shipped in transportable pieces to the job site. Insulated panels form the roof and wall sections. When using prefabricated pieces, some labour is saved, but the building dimensions aren't as flexible.
- Steel frame
- Steel frame buildings are the other popular option for dairy barn construction. Steel becomes more economical on wider span buildings. Steel is also more economical on low-profile roofs, so it is used almost entirely with the wide-body barns. Steel must be galvanized or coated with a high-quality paint to keep it from rusting.
- Fabric-covered
- The final option is the fabric-covered building (Figure 12). The building, often called a Cover-All building, consists of a curved truss frame covered by a heavy polyethylene tarp material. The company no longer exists, but it made the concept popular. A variation on the curved structure is a structure with a gable-shaped roof with a fabric covering. Be aware of these characteristics when considering this type of building:
- Bright - Most use a white fabric that allows for natural light.
- Well ventilated - They must be ventilated similarly to a traditional style of building.
- Less expensive - When considering a fabric-covered building, it is important to compare "apples with apples."
- Cold housing - There is no insulation on the roof or ceiling, so they are cold.
- Condensation - Because there is no insulation on the roof or ceiling, there will be condensation under certain conditions.
Summary
A number of different layout and housing options are available for dairy facilities. The size of your operation and housing preferences will determine which one is best for you.
Resources
Bickert, W.G., et al. 2000. Dairy Freestall Housing and Equipment, 7th edition. Midwest Plan Service. Iowa State University. Ames, IA.
House, H.K. 2009. Design Considerations for Low-Profile Cross-Ventilated Dairy Barns. Free Stall Housing Manual. Ontario Ministry of Agriculture, Food and Rural Affairs. Guelph, ON.
Lang, B., H.K. House, N.G. Anderson, and J. Rodenburg. 2012. Free Stall Housing Manual. Ontario Ministry of Agriculture, Food and Rural Affairs. Guelph, ON.
This factsheet was written by Harold K. House - Engineer, Dairy and Beef Housing and Equipment, OMAFRA (retired).